Contents: Removal ⇩ Installation ⇩
Removal
1. Place the car on the overpass.
2. Disconnect both cables from the battery. For more information, refer to Specification.
3. Remove the rear wheel.
4. Remove the rear bumper cover. For more information, refer to Rear Bumper Cover (76.22.74)
5. Remove the exhaust grille.
6. Right side: Remove the fuel tank. For more information, refer to Fuel Tank (19.55.01)
7. Right side: Remove the fuel tank filler neck pipe. For more information, refer to Fuel Tank Filler Neck (19.55.07)
8. Right side: Remove the fuel filler flap locking device. For more information, refer to Fuel filler neck hatch locking latch (19.55.17)
9. Remove the headliner. For more information, refer to Headliner (76.64.15)
10. Remove the rear seat. For more information, refer to Rear Seat - Vehicle Includes: 60/40 Split Seat (78.10.70/78.10.71)
11. Remove the side impact sensor from the rear pillar. For more information, refer to Pillar Side Impact Sensor (76.74.24)
12. Remove the curtain air bag module. For additional information, refer to Overhead Side Air Bag Module (76.74.40)
13. Remove the rear quarter window glass. For more information, refer to Rear quarter window glass (76.81.20)
14. Remove the threshold panel trim.
15. Remove the exhaust pipe heat shield.
16. Remove the tailgate latch. For more information, refer to Tailgate Latch (76.37.83)
17. Remove the rear door opening seal.
18. With assistance, remove the rear door.
19. Remove the luggage compartment trims.
20. Remove the luggage compartment carpet.
21. Release the wiring harness.
22.
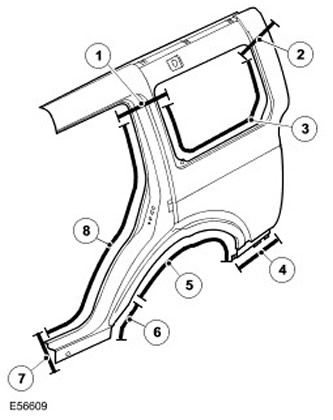
[The article was copied from a resource www.LRman.ru]
| Item name | Description |
| 1 | Butt weld. |
| 2 | Butt weld. |
| 3 | 50 spot welds. |
| 4 | 5 spot welds. |
| 5 | 40 spot welds. |
| 6 | 9 spot welds. |
| 7 | Butt weld. |
| 8 | 40 spot welds. |
23.
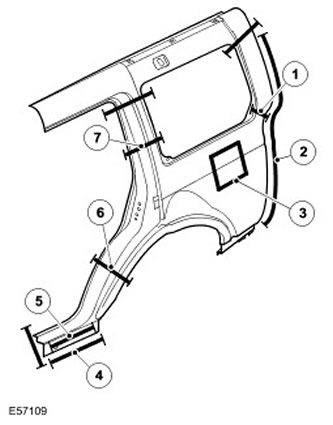
| Item name | Description |
| 1 | Soundproofing. |
| 2 | 16 plug welds. |
| 3 | Right noise insulation. |
| 4 | 7 plug welds. |
| 5 | 3 plug welds. |
| 6 | Soundproofing. |
| 7 | Soundproofing. |
24. Additional information:
- Weld. For more information, see Body Repairs.
- Anti-corrosion protection. For more information, see Anti-corrosion protection.
- Tolerances: For more information, see Body and Frame.
Installation
1. Installation should be carried out in the reverse order of dismantling.
Comments on this article