Contents: Dismantling ⇩ Assembly ⇩
Dismantling
1. Remove the automatic transmission assembly.
AUTOMATIC TRANSMISSION - GM 5L40-E, REPAIR WORK, Automatic transmission assembly with transfer case - removal and installation.
2. Remove the gearbox assembly with the transfer case and lower it onto the support.
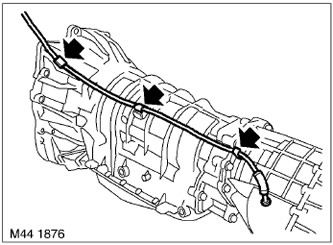
3. Release the transfer case crankcase ventilation hose from the clamps.
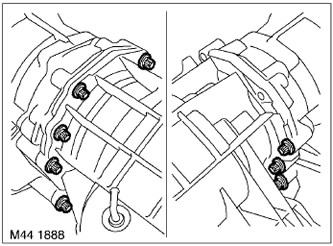
4. Remove the 9 Torx screws and remove the transfer case.
5. Remove the transfer case crankcase ventilation hose.
Assembly
1. Connect the ventilation hose to the transfer case.
2. Clean the transfer case mating surface, mounting pins and holes for them.
3. Align the transfer case with the automatic transmission, install the Torx screws and tighten them to 43 N·m.
4. Secure the transfer case crankcase ventilation hose to the clips on the automatic transmission housing.
The original article can be found here: www.lrman.ru
5. Remove the automatic transmission assembly with the transfer case from the stand and place it on a jack to raise the transmission.
6. Install the automatic transmission assembly into place.
AUTOMATIC TRANSMISSION - GM 5L40-E, REPAIR WORK, Automatic transmission assembly with transfer case - removal and installation.
Comments on this article