Contents: Dismantling ⇩ Assembly ⇩
Dismantling
1. Place the vehicle on a lift.
2. Disconnect the negative terminal from the battery.
3. Remove the viscous coupling with the fan.
COOLING SYSTEM: Td6, REPAIR WORK, Viscous fan clutch.
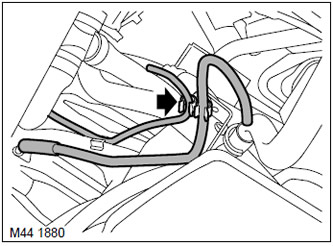
4. Disconnect the transfer case and automatic transmission ventilation hoses from the retainer on the left side of the engine.
5. Remove the starter.
ENGINE STARTING AND BATTERY CHARGING SYSTEM, REPAIR WORK, Starter - Td6 engine.
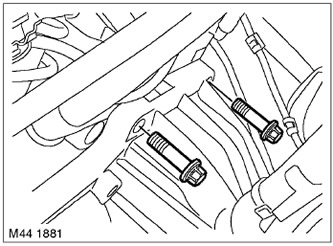
6. Remove the two upper Torx screws securing the automatic transmission housing.
7. Raise the car on a lift.
8. Remove the rear propeller shaft.
DRIVE SHAFTS, REPAIR WORK, Cardan shaft - rear.
9. Remove the front propeller shaft.
DRIVE SHAFTS, REPAIR WORK, Cardan shaft - front.
10. Drain the working fluid from the automatic transmission housing.
AUTOMATIC TRANSMISSION - GM 5L40-E, ADJUSTMENTS, Automatic transmission fluid - draining and filling.
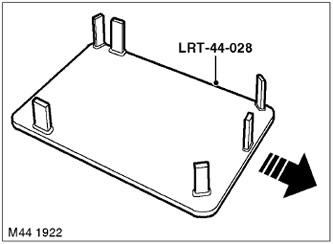
11. Using the LRT-44-028 tool, support the automatic transmission on a jack.
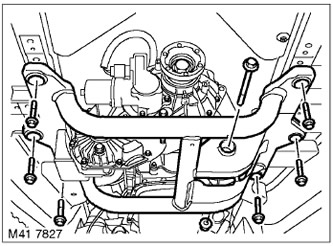
12. Remove the bolt and nut connecting the transmission support assembly to the cross frame.
13. Remove the 6 cross frame mounting screws and remove the cross frame.
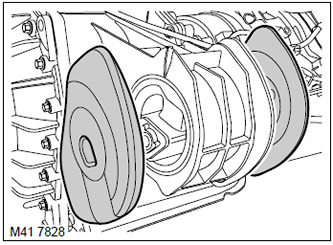
14. Remove the silent blocks from the support.
15. Lower the gearbox using a jack.
CAUTION: Do not allow the transmission to hang by the gear selector cable.
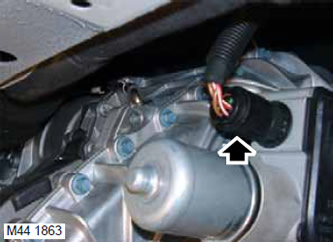
16. Remove the connector from the transfer case gear shift drive unit connector.
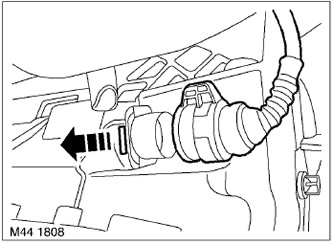
17. Disconnect the connector from the automatic transmission connector.
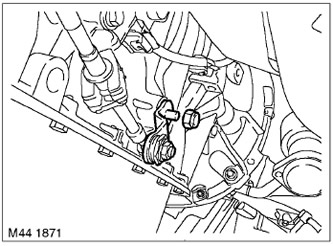
18. Loosen the nut securing the selector lever to the gearbox selector shaft and remove the selector lever.
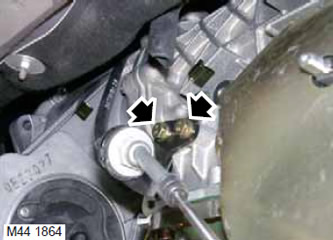
19. Remove the two screws from the selector cable mounting bracket to the gearbox and secure the cable to the side.
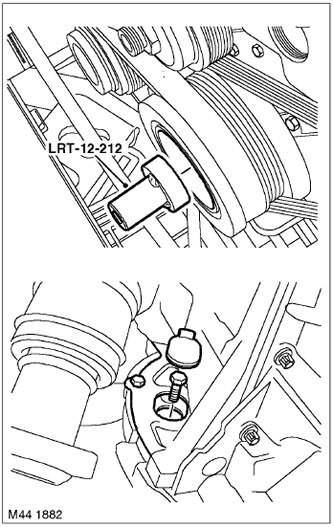
20. Remove the plug from the torque converter housing to gain access to the torque converter mounting screws.
21. Use the LRT-12-212 crankshaft turning tool and remove the three screws securing the torque converter to the crankshaft drive flange.
22. Remove the screw securing the intermediate plate to the automatic transmission housing.
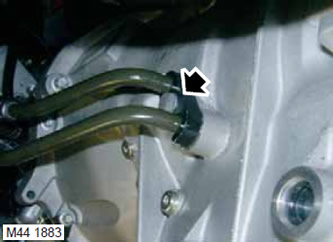
23. Loosen the screw and remove the automatic transmission fluid cooler line clamp.
24. Remove both coolant lines, remove and discard the O-rings and set the lines aside.
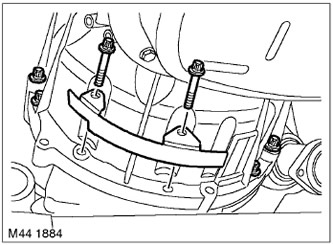
25. Remove the 2 Torx screws securing the plate to the automatic transmission housing and remove the plate.
26. Remove the four Torx screws securing the torque converter housing.
27. With the help of an assistant, carefully remove the automatic transmission assembly from the engine. The torque converter should remain with the automatic transmission.
28. Install the torque converter retaining plate and secure it with screws.
Assembly
1. Clean all surfaces to be joined.
2. Remove the torque converter retaining plate.
3. With the help of an assistant, carefully install the automatic transmission assembly onto the engine. Ensure that the centering parts of the torque converter and the automatic transmission housing are aligned.
4. Install and tighten the 4 Torx type automatic transmission mounting screws.
to the engine. Tighten the M12 screws to a torque of 72 N·m and the M8 screws to a torque of 25 N·m.
5. Install the plate onto the gearbox housing and tighten the Torx screws to 25 Nm.
6. Wipe the coolant pipe seal wheel installation locations and the mating surface of the crankcase.
7. Install new O-rings on the cooler lines and lubricate them with automatic transmission fluid.
8. Install the cooler pipes to the gearbox housing, install the clamp and tighten the screw to 25 N·m.
9. Tighten the intermediate plate mounting screw to the gearbox housing and tighten it to a torque of 10 N·.
10. Tighten the torque converter mounting screws to the drive flange to a torque of 45 Nm.
11. Install the plug on the torque converter housing.
12. Install the selector cable mounting plate on the gearbox housing, tighten the screws and tighten them to a torque of 10 Nm.
13. Install the selector lever onto the selector shaft, tighten the nut and tighten it to a torque of 10 Nm.
14. Connect the connector to the automatic transmission connector.
15. Connect the connector to the transfer case gear shift drive unit connector.
16. Raise the gearbox with a jack.
17. Install the silent blocks on the support.
18. Connect the cross frame to the support, install the bolt and nut, but do not tighten them completely.
19. Install the cross frame, tighten the mounting screws and tighten them to a torque of 68 N·m.
20. Remove the jack from under the gearbox.
21. Tighten the nut and bolt securing the support to the cross frame to a torque of 100 Nm.
22. Install the rear propeller shaft.
DRIVE SHAFTS, REPAIR WORK, Cardan shaft - rear.
23. Install the front propeller shaft.
DRIVE SHAFTS, REPAIR WORK, Cardan shaft - front.
24. Lower the vehicle.
25. Install the two upper automatic transmission case Torx screws and tighten them to 72 N·m (55 lb ft).
26. Reinstall the starter.
ENGINE STARTING AND BATTERY CHARGING SYSTEM, REPAIR WORK, Starter - Td6 engine.
27. Secure the automatic transmission and transfer case crankcase ventilation hoses in the clamps.
28. Install the fan viscous coupling.
COOLING SYSTEM: Td6, REPAIR WORK, Viscous fan clutch.
29. Connect the negative terminal to the battery.
30. Fill the automatic transmission with working fluid.
AUTOMATIC TRANSMISSION - GM 5L40-E, ADJUSTMENTS, Automatic transmission fluid - draining and filling.
Comments on this article