Table of signs of malfunction
Incorrect power steering pressure
CAUTION: Do not hold the steering wheel at the lock position for more than 30 seconds within a minute to avoid overheating the working fluid and damaging the seals.
Increased pressure in the system is almost always caused by a faulty safety valve in the PAS pump.
Insufficient system pressure is usually caused by low fluid level or slipping PAS pump drive belt or one of the following: leaks in the PAS system, faulty PAS pump relief valve, faulty steering gear worm gear valve assembly, leaking steering gear piston, worn PAS pump components or crankcase.
State |
Possible reasons |
Action |
Insufficient gain |
* Leaks of working fluid |
* Check for leaks, add fluid to the reservoir. |
* Incorrect pressure in the system |
* Perform a pressure check. |
|
* Power steering pump drive belt |
* Check for contamination and/or adjust tension. |
Steering gear failure
State |
Possible reasons |
Action |
Increased "feedback" through the steering wheel |
* Steering shock absorber malfunction |
* Replace the steering shock absorber |
* Looseness or play in the steering gear |
* Check the steering gear and replace worn or faulty components. |
|
* Loose or worn bushings in the front suspension |
* Check the suspension and replace worn or faulty components. - When replacing suspension bushings, you should replace ALL bushings and fastening elements. |
|
* Incorrect hub resistance |
* Check the kingpin bearing preload. |
Leaks of working fluid
CAUTION: Do not hold the steering wheel at the lock position for more than 30 seconds within a minute, as this may cause the hydraulic fluid to overheat and damage the seals.
State |
Possible reasons |
Action |
Leaks of working fluid from the steering gear housing |
* Increased pressure in the system |
* Replace the power steering pump. If the problem persists, repair the steering gear. |
Power steering fluid leaks |
* Incorrect working fluid level. |
* Top up or drain excess working fluid to bring the level to normal. |
* Leaks from hoses and/or connections. |
* Loosen and tighten connections. Replace faulty pipes or hoses. |
|
* Leakage of working fluid through the filler cap. |
* Bleed the power steering system. |
|
* Worn or damaged steering system element seal. |
* Replace faulty seal(s). |
Insufficient gain - normal return action of longitudinal tilt of the steering axes
State |
Possible reasons |
Action |
Insufficient gain |
* Incorrect tire pressure or incorrect tire type |
* Adjust tire pressure and/or replace tires. |
* Low fluid level or air locks in the system |
* Bring the working fluid level up to normal, remove air from the system. |
|
* Incorrect pressure in the system. |
* Check the system pressure and bleed the air from the system. If the problem persists, replace the power steering pump and/or repair the steering gear. |
Heavy / hard steering operation - poor return effect of the longitudinal tilt angle of the wheel axes
State |
Possible reasons |
Action |
Steering is hard or heavy |
* Incorrect tire type or incorrect tire pressure. |
* Install the correct tires or adjust tire pressure to the correct level. |
* Incorrect alignment or binding of the universal joint. |
* Loosen or replace the universal joint, adjust it correctly. |
|
* Incorrect steering adjustment. |
* Adjust the steering gear. For more information, see: Steering Gear Adjustment (211-00 Steering System - General Information, General Procedures). |
|
* Seizure of steering ball joints. |
* Replace seizing elements. |
|
* Kingpins require lubrication or bearing preload adjustment. |
* Lubricate kingpins or adjust bearing preload. |
|
* Worn or sticking steering gear. |
* Repair the steering gear. |
Increased steering sensitivity. Increased play in the steering wheel
WARNING: Steering adjustments are not required during the warranty period. If the housing is covered by the warranty, it should be returned to the manufacturer. Do not attempt to introduce side clearance.
State |
Possible reasons |
Action |
Light steering action/increased play |
* Incorrect steering adjustment |
* Adjust the steering gear. For more information, see: Steering Gear Adjustment (211-00 Steering System - General Information, General Procedures). |
* Worn Panhard rod bushings or trailing arms. Check the ball joints and lower steering column universal joint for wear. |
* Replace worn/damaged parts. |
Steering vibration, angular oscillation of the steering wheels
NOTE: The vibration transmitted through the steering linkage is severe enough to cause high frequency oscillations in the steering wheel. Typically caused by wheel imbalance. However, there are a number of other possible causes for this symptom, which in severe cases may be described as shimmying of the steering wheels. Regardless of the terminology used by the owner/driver to describe the symptom, the following diagnostic tests should be performed in the sequence presented.
State |
Possible reasons |
Action |
Steering vibration |
* Wheel balancing, condition/brand of tires. |
* Balance wheels, replace faulty or incorrect brand tires. |
* Steering shock absorber malfunction. |
* Replace the steering shock absorber. |
|
* Wear/alignment universal joints. |
* Replace worn parts, adjust hinges correctly. |
|
* Wear of the ball joints of the steering drive, including the steering gear and steering rod. |
* Replace worn or damaged parts. |
|
* Worn suspension bushings. Incorrectly tightened fasteners. |
* Replace worn or damaged components. Tighten all fasteners to the specified torque with the vehicle resting on its own wheels. * If the problem persists, install the following steering damper kits: - Models 90 - STC288 (front) and STC 289 (rear) - Models 110/130 - STC290 (front) - Models 110 (with alignment) - STC291 (rear) - Models 110 (without alignment) - STC291 (rear) - Models 130 - STC293 (rear) |
|
* Incorrect adjustment of the power steering gear. |
* Adjust the steering gear. For more information, refer to: Adjusting the steering gear (211-00 Steering System - General Information, General Procedures). |
|
* Increased axial clearance of the hub bearing. |
* Check the condition of the hub bearings and adjust the axial clearance if necessary. |
|
* Incorrect adjustment of the steering knuckle joints. |
* Adjust the kingpin bearing preload. |
|
* Steering geometry is not within specification. |
* Perform a complete steering geometry check. |
Steering pull
State |
Possible reasons |
Action |
Steering pull - not under braking |
* Unevenly worn or defective front tires. |
* Inspect the tires. Swap them (from left to right) front tires. If the car pulls in the opposite direction, replace the tires. If the problem persists, leave the tires in their new locations. |
* Steering gear not centered. |
* Center the steering gear. For more information, see: Steering Gear Centering (211-00 Steering System - General Information, General Procedures). |
|
Steering pull - when braking |
* Presence of air in the brake system |
* Perform air removal procedure. For more information, see: Bleeding the Brake System (206-00 Brake System - General Information, General Procedures). |
* Greasing of brake pads |
* Remove any clogging or replace the brake pads. |
|
* Incorrect adjustment of the kingpin bearing preload |
* Adjust the kingpin bearing preload. |
Stability on course
State |
Possible reasons |
Action |
Sustainability |
* Overloading the vehicle or improper load distribution. |
* Check the vehicle loading parameters in the owner's manual. |
*Worn rear trailing arms/chassis bushings. |
* Replace worn parts. |
|
* Wear of front and rear shock absorbers. |
* Replace worn parts. |
|
* Steering shock absorber malfunction. |
* Replace the steering shock absorber. |
|
* Wheels are not balanced. |
* Balance the wheels. |
Power steering system - increased noise
State |
Possible reasons |
Action |
Increased noise |
* Incorrect working fluid level. |
* Top up or drain excess working fluid to bring the level to normal. |
* Contact of hoses with the vehicle body. |
* Route hoses away from the vehicle body. |
|
* PAS drive belt tension |
*Tighten the drive belt correctly. |
|
* Air in the power steering system. |
* Bleed the power steering system. |
|
* Steering gear and/or pump faulty. |
* Replace faulty elements. |
Checking the power steering system
NOTE: When the power steering loses its effectiveness, check the hydraulic pump pressure before installing new components. Use the troubleshooting chart to help you find the problem.
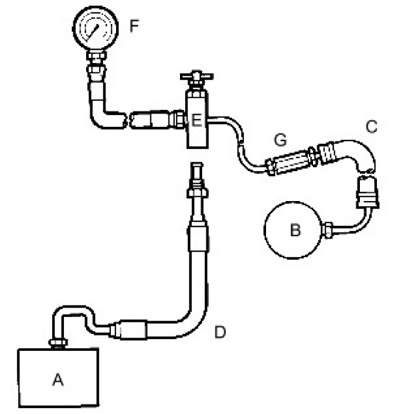
| Pos. | Spare part number | Name |
| A. | - | Steering gear |
| B. | - | Power steering pump |
| C. | - | Hose from steering gear to pump |
| D. | - | Hose LRT-57-030 |
| E. | - | Test adapter LRT-57-001 |
| F. | - | Pressure gauge LRT-57-005 |
| G. | - | Threaded adapter LRT-57-004 |
| H. | - | Threaded adapter LRT-57-022 |
1. A pressure gauge and test adapter are used to check the power steering system. This pressure gauge is capable of measuring pressure of 140 kgf/cm². The maximum pressure in the power steering system is 77 kgf/cm².
2. In case of certain hydraulic pump malfunctions, pressure up to 105 kgf/cm² may be reached. It is important to understand that the pressure on the pressure gauge is the same pressure that is applied to the steering wheel. When checking, gradually rotate the steering wheel, reading the pressure gauge.
3. Monitor and maintain the maximum fluid level in the tank.
4. Inspect the power steering components and connections for leaks. All leaks should be repaired before attempting to test the system.
5. Check the tension of the power steering pump drive belt and replace the belt if necessary.
6. Assemble the test equipment and install it on the vehicle as shown in RR3959M.
7. Open the adapter tap.
8. Bleed the system, being careful not to overload the gauge.
9. In normal system conditions the pressure should be equal to:
- 1. (A) Steering wheel held at the limit position with the engine running at 1,000 rpm, 70 - 77 kgf/cm².
- 2. (B) Steering wheel held at the limit position with the engine idling, 28 kgf/cm².
- 3. Checks should be performed with the steering wheel in both limit/positions.
CAUTION: Do not maintain this pressure for more than 30 seconds within a minute to avoid overheating the hydraulic fluid and damaging the seals.
10. Release the steering wheel and let the engine idle. The pressure reading should be below 7 kgf/cm².
11. If the pressure values differ from the prescribed ones, there is a malfunction.
12. To determine whether the fault is in the steering gear or pump, close the tap on the adapter for a maximum of five seconds.
13. If the pressure gauge does not show the prescribed pressure, the pump is faulty.
14. Install a new pump, bleed the system and retest. If there is low pressure or significant imbalance, the fault is in the steering worm gear valve assembly.
Steering shock absorber
NOTE: The power steering system, in addition to reducing the effort required to maneuver the vehicle when parking, also helps to dampen any wheel vibrations transmitted back to the steering wheel. When driving off-road, potholes and bumps often impact the wheels, causing the steering wheel to turn left and right. This phenomenon is called "steering kickback." To eliminate steering kickback, a hydraulic shock absorber is installed in the steering linkage between the tie rod and the differential housing. The shock absorber, which provides equal resistance in extension and compression, is sealed for life.
1. Inspect the shock absorber for damage to the housing or leaks.
2. Clamp one end of the shock absorber horizontally in a vice with soft jaws. Compress and stretch the shock absorber by hand. The resistance should be the same in both directions.
3. If you feel that the shock absorber performance is not up to standard, install a new steering shock absorber.
Visual and control checks
WARNING: Before driving your vehicle on a public road to perform a road test, be sure to carry out the following basic visual checks to ensure that the vehicle is in the correct technical condition for legal requirements.
1.
NOTE: This information applies to standard tires fitted as original equipment.
Check and adjust tire pressure.
2. Check the condition of the tires. Inspect the tires for signs of uneven wear, damage, and abrasion.
3. Check the tread depth. Make sure the brand, type and general condition of the tires are the same for each axle.
4. Check the wheel rims for signs of damage and increased runout.
Road test procedure
General steering/handling problems can usually be categorized into one of the following categories. THEY ARE MAINLY RELATED TO THE AGE, CONDITION, AND USE OF THE VEHICLE.
WARNING: All road tests must be carried out by qualified drivers on roads where traffic conditions allow the tests to be carried out without violating traffic regulations.
1. Perform visual and control checks.
2. Confirm the general nature of the complaint by talking to the customer, simulating the problem conditions where possible. Perform the following road test procedure to establish the problem.
3. Steering load assessment - driving at 16 km/h. Turn the steering wheel 90°, check the self-centering. Self-centering should be the same at each limit position, but the steering wheel should not necessarily return exactly to the "straight ahead" position without driver assistance.
4. Evaluation of the steering performance - driving at a speed of 64 km/h on a straight and level road (without convex profile) road, check for steering pull. The vehicle should follow a straight line path WITHOUT a tendency to curve. If the vehicle experiences pull towards the curb, the vehicle may have "camber sensitivity". A small pull in the direction of the camber is considered acceptable.
5. Course Stability Assessment - Drive at 70 mph (112 km/h) or the maximum legal speed on a straight, level road. Perform a normal lane change. The vehicle should quickly right itself on the new straight path.
6. Braking assessment (with medium effort) - drive at 96 km/h on a straight, level road. Apply a steady, moderate braking force, noting any tendency to drift. Perform the braking test three times. If drift is consistently noted, perform a brake efficiency test on a roller stand.
7. Braking assessment (with full effort) - Drive at 96 km/h on a straight, level road. Apply full braking force, noting any tendency to drift. Perform the braking test three times. If drift is consistently noted, perform a brake efficiency test on a roller stand.
8. If the symptom described by the customer is hard steering or steering problems, perform the procedure for hard steering. If not, proceed to the basic checks and adjustments.
Comments on this article