Removing
For all vehicles
1.
WARNING: Do not work on or under a vehicle supported only by a jack. Always support the vehicle with jack stands.
Raise and support the vehicle.
2. Disconnect the wire "masses" from the battery. For more information refer to Specification.
3. WARNING: Do not remove the coolant expansion tank cap when the system is hot, as steam or coolant escaping from the cap could cause serious injury such as burns.
Drain the coolant from the cooling system. For more information, refer to Draining/Filling Coolant and Bleeding the Cooling System (26.10.01)
4. Remove the bottom cooling fan shroud. For more information refer to Cooling Fan Shroud (26.25.11)
5. Remove the grille. For more information refer to Radiator Grille (76.55.03)
6. Remove the left headlight assembly. For more information refer to headlight assembly (86.40.49)
7. Remove a broad tank of a cooling liquid. Turn out 2 bolts.
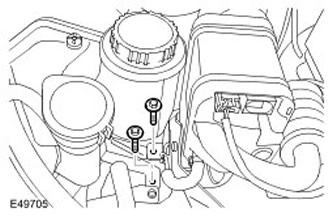
8. Disconnect a hose for removal of air from a radiator. Release the clamp.
9. Remove the mudguard of the right front fender. Remove 4 clips.
10.
CAUTION: Be sure to plug all open connections to avoid contamination of the system.
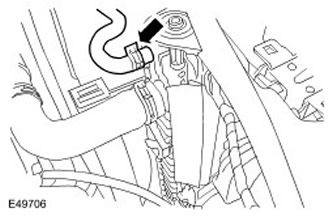
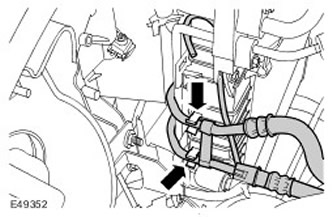
Disconnect the charge air cooler inlet hose.
- Release the clamp.
- Take aside and tie.
11.
CAUTION: Be sure to plug all open connections to avoid contamination of the system.
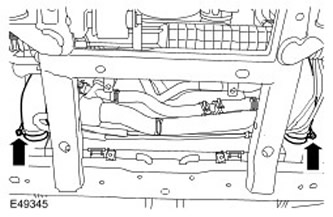
Disconnect the charge air cooler outlet hose.
- Release the clamp.
- Take aside and tie.
- Release the clamp.
- Take aside and tie.
- Release the clamp.
- Take aside and tie.
Vehicles with automatic transmission
15.
CAUTION: Be sure to plug all open connections to avoid contamination of the system.
Disconnect the 2 transmission fluid cooler pipes.
- Release the clamps.
- Install a container to catch spilled liquid.
- Take aside and tie.
16. Disconnect the fuel cooler line. Release the clamp.
17. Remove the radiator mounting pins. Release the clamps.
18. Remove the upper radiator deflector. Release 2 clips.
19. Remove the power steering fluid cooler.
- Release 2 clips.
- Take the hose aside and tie.
21. Remove the clamp securing the power steering fluid cooler tube.
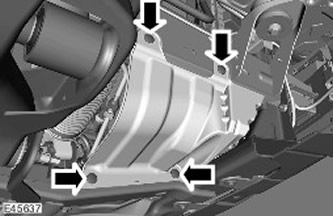
22. Remove the conditioner condenser.
- Turn out 3 bolts.
- Release 2 clips.
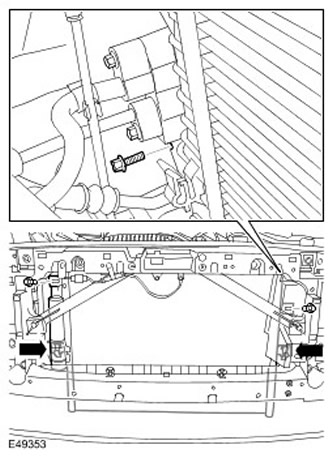
23. Release the radiator.
- Turn out 2 bolts.
- Lift the heatsink to remove it from its mountings.
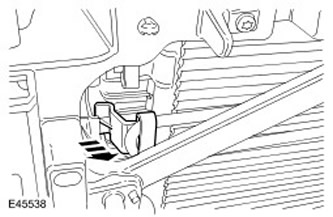
25.
NOTE: Left side shown, right side similar.
Remove the 2 clips that secure the radiator to the aftercooler.
26.
WARNING: During this operation, the radiator must be protected.
NOTE: Do not proceed with further disassembly if the part is being removed only for access.
Carefully remove the radiator.
27.
NOTE: Mark the installation position.
Remove the fuel cooler hose. Release the clamp.
28. Remove the lower radiator deflector.
29. Remove the rubber radiator mounts.
Installation
For all vehicles
1. Install the rubber radiator mounts.
2. Install the lower radiator deflector.
3. Put on the fuel cooler hose. Tighten the clamp.
4.
WARNING: During this operation, the radiator must be protected.
Install the heatsink carefully.
5. Install the 2 clamps that secure the radiator to the charge air cooler.
6. Align the heatsink.
- Lift the radiator onto its mountings.
- Tighten the bolts (tightening torque 25 Nm).
- Remove and discard 2 wire ties.
- Lift the knot into the clamps.
- tighten bolt (tightening torque 6 Nm).
9. Install the power steering fluid cooler. Secure with 3 clips.
10. Install the upper radiator deflector.
11. Establish pins of fastening of a radiator.
12. Connect the fuel cooler line. Fasten with a clip.
Vehicles with automatic transmission
13. Attach the transmission fluid cooler hoses. Install clamps.
For all vehicles
14. Install the lower radiator hose. Fasten with a clip.
15. Release the air intake. Remove and discard wire tie.
16. Attach the upper radiator hose.
- Remove and discard wire tie.
- Fasten with a clip.
- Remove and discard wire tie.
- Fasten with a clip.
19. Connect the charge air inlet hose. Tighten clamp (tightening torque 10 Nm).
20. Establish a mudguard of the right forward wing. Install 4 clips.
21. Fix a broad tank of a cooling liquid. Tighten the two mounting bolts (tightening torque 10 Nm).
22. Attach a hose for removal of air from a radiator. Fasten with a clip.
23. Install the left headlight assembly. For more information refer to headlight assembly (86.40.49)
24. Install the grille. For more information refer to Radiator Grille (76.55.03)
25. Install the lower cooling fan shroud. For more information refer to Cooling Fan Shroud (26.25.11)
26. Connect the wire "masses" battery. For more information refer to Specification.
27. Fill the cooling system with coolant. For more information, refer to Draining/Filling Coolant and Bleeding the Cooling System (26.10.01)
Vehicles with automatic transmission
28. Check the transmission fluid level in the automatic transmission.
Comments on this article