Contents: Dismantling ⇩ Assembly ⇩
Before disconnecting the battery, make sure that all requirements and conditions contained in the section on disconnecting the battery are met.
GENERAL INFORMATION, Precautions when working with electrical equipment.
Dismantling
1. Disconnect the negative battery terminal.
WARNING: Fuel vapors are highly flammable and toxic and explosive in confined spaces. Always have a foam, carbon dioxide (CO), gas or powder fire extinguisher on hand when working with fuel.
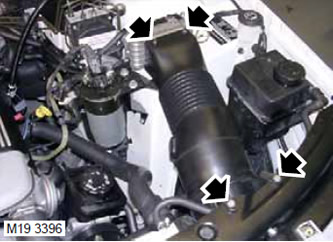
2. Unscrew the 2 bolts securing the air pipe to the fuel cooling heat exchanger.
3. Unscrew the 2 bolts securing the air pipe of the fuel cooling heat exchanger to the upper cross member of the radiator frame.
4. Remove the fuel cooler heat exchanger air duct to provide further access.
5. Remove the intake manifold.
EXHAUST MANIFOLD AND EXHAUST SYSTEM: Td6 engine, REPAIR WORK, Intake manifold gaskets.
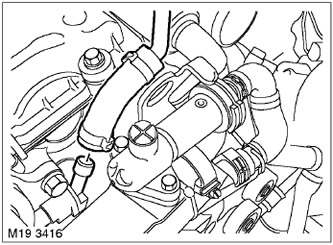
6. Loosen the clamp and disconnect the vacuum hose from the vacuum pump, discard the clamp.
7. Move the vacuum tube to the side for easier access.
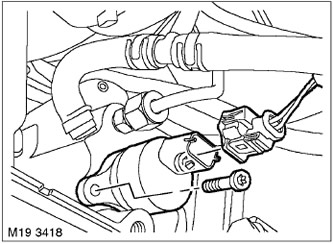
8. Disconnect the connector from the fuel pressure regulator.
9. Lay out a rag to collect any leaking fuel.
CAUTION: Before disconnecting or removing system components, make sure that the adjacent surfaces of the joints are free of dirt. Install plugs in the openings of the fittings and pipes to prevent dirt from entering the system.
10. Remove the 2 T30 head bolts and move the harness aside for further access. Carefully remove the fuel pressure regulator. Discard the 2 gaskets.
Assembly
1. Wipe the pressure regulator and mating surfaces.
2. Install new gaskets on the fuel pressure regulator.
3. Install the pressure regulator and tighten the bolts to 10 Nm.
(The original article is located on LRman.ru)
4. Connect the hose to the vacuum pump and secure it with a new clamp.
5. Connect the connector to the fuel pump.
6. Install the intake manifold gaskets.
EXHAUST MANIFOLD AND EXHAUST SYSTEM: Td6 engine, REPAIR WORK, Intake manifold gaskets.
7. Install the air duct assembly and secure the heat exchanger.
8. Secure the heat exchanger air pipe to the upper cross member of the radiator frame and tighten the bolts. Tightening torque 3 N·m.
9. Connect the negative battery terminal.
Comments on this article