Contents: Removal ⇩ Installation ⇩
Removal
1. Close the door window glass completely.
2. Disconnect the battery.
3. Remove the door closing handle, trim panel and plastic insulation.
4. Remove the two lower screws securing the drive board to the inner door panel.
Note: The two top drive board mounting screws also secure the door handle bracket and nut retainer to the inside door panel.
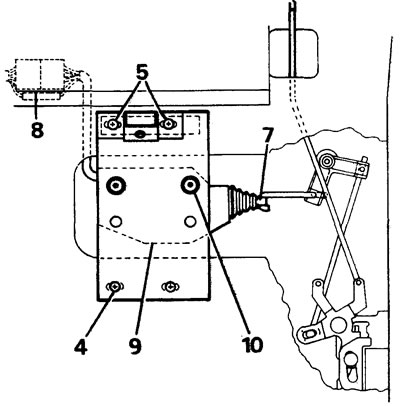
5. Remove the two upper screws securing the drive board, remove the door handle bracket and the nut holder on the inner door panel.
6. Disconnect the clips securing the window motor wires to the door panel to remove slack from the wires.
7. Disconnect the door lock rod from the drive.
8. Remove the drive from the door, pulling the wires until the connector is released.
9. Disconnect the lock drive connector
10. Unscrew the two screws securing the rubber supports of the drive to the board and remove the drive (if necessary).
Installation
11. Connect the drive connector to the vehicle wiring.
12. Secure the door lock rod to the drive.
13. Push the wires into the door and secure the bundle with three clips.
14. Install the drive onto the door and hand tighten the two lower drive board mounting screws.
15. Insert the nut holder and the door handle mounting bracket into the door panel, hand tighten the two upper drive board mounting screws.
16. Position the board so that the mounting screws are in the center of the oval slots.
17. Check the operation of the manual door lock from the button: if the drive and manual lock rods have contact, move the drive to the desired position.
18. Connect the battery.
19. Check the operation of the door lock drive, adjust the position of the drive if necessary. Tighten the drive board mounting screws.
20. Reinstall the removed parts.
Comments on this article