Contents: Removal ⇩ Installation ⇩
Removal
NOTE: This procedure replaces the fender skirt panel reinforcement along with the fender skirt trim panel.
1. Disconnect both cables from the battery. For more information, refer to Specification.
2. Remove the front fender. For more information, refer to Fender (76.10.24)
3. Remove the hood latch panel. For more information, refer to Hood Latch Panel (76.16.22)
4. Left side: Remove the battery junction block. For more information, refer to Battery Junction Box (BJB) -2.7L Diesel (86.70.55)
5. Left side: Remove the power steering fluid reservoir. For more information, refer to Power Steering Fluid Reservoir -2.7L Diesel (57.15.08)
6. Left side: Remove the battery.
7. Left Side: Remove the fuel coolant heater module. For more information, refer to Auxiliary Heater (universal action), fuel-fired (80.40.01)
8. Left side: Remove the fuel coolant heater pipes.
9. Right side: Remove the air filter. For more information, refer to Air Filter (19.10.01)
10. Right side: Release the ABS modulator.
11. Disconnect the wiring harness.
12. Remove the mixing chamber panel. For more information, refer to Accumulating Chamber (80.15.62)
13. Remove the hood.
14. Remove both hood pillars.
15. Remove the hood wiring harness.
16.
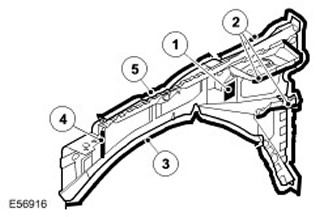
| Item name | Description |
| 1 | Soundproofing. |
| 2 | 34 plug welds. |
| 3 | 13 spot welds. |
| 4 | 3 spot welds. |
| 5 | 14 spot welds. |
17. Additional information:
- Weld. For more information, see Body Repairs.
- Anti-corrosion protection. For more information, see Anti-corrosion protection.
- Tolerances: For more information, see Body and Frame.
Installation
1. Installation is carried out in the reverse order to dismantling.
Comments on this article