


Contents: Dismantling ⇩ Installation ⇩
CAUTION: If there is a lot of fuel in the tank, pump it out through the filler neck, using a special device, to a level below the fuel intake.
Dismantling
1. Place the car on a lift.
2. Disconnect the negative battery terminal.
3. Remove the fuel pump.
DIESEL ENGINE FUEL SUPPLY SYSTEM, REPAIR WORK, Submersible fuel pump module: up to May 2003.
CAUTION: Fuel leakage is inevitable during this operation. Take safety measures to prevent fire or explosion.
4. Using the device, pump the fuel from the fuel tank into a hermetically sealed container. For detailed instructions on using the device, read the operating instructions for the device.
CAUTION: Drain the fuel tank before removing it from the vehicle.
5. Remove the intermediate section of the exhaust system.
COLLECTORS AND EXHAUST SYSTEM - Td4, REPAIR WORK, Middle section of the exhaust system.
6. Remove the driveshaft.
DRIVE SHAFTS, REPAIR WORK, Cardan shaft assembly.
7. Remove the plastic mudguard of the right rear wheel.
EXTERIOR PARTS, REPAIR WORK, Rear mudguard.
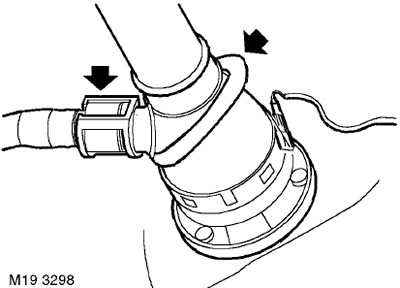
8. Loosen the ventilation hose clamp and disconnect the ventilation hose from the filler pipe.
The original article can be found here [LRMAN.RU]
9. Loosen the clamp and disconnect the atmospheric hose on the fuel vapor separator.
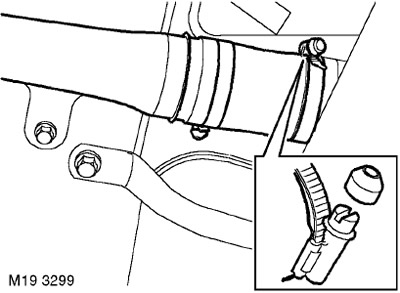
10. Remove the protective cover of the filler pipe clamp and loosen the clamp.
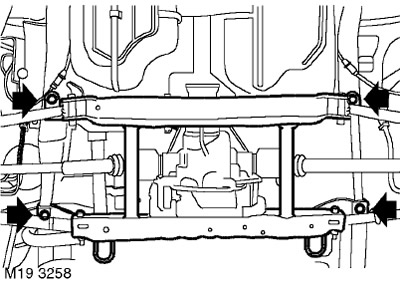
11. Raise the rear subframe and unscrew the 4 bolts securing the rear subframe to the body.
12. Lower the subframe.
CAUTION: Do not allow the rear subframe to hang on the brake hoses.
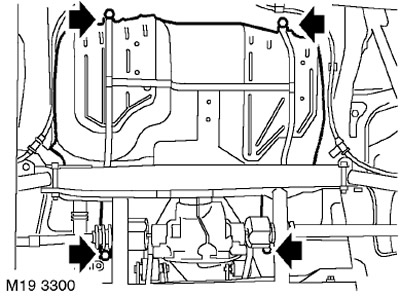
13. Together with an assistant, unscrew the 4 bolts securing the fuel tank to the body, lower it and remove it from the car.
NOTE: When lowering the fuel tank, the filler pipe and fuel vapor canister hoses must be pulled out through the body opening.
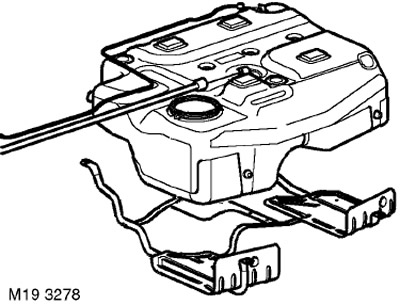
14. Remove the fuel tank from its outboard mount. Remove the heat shields and fire shields.
15. Remove the fastening clamps from the ventilation hose and from the atmospheric hose.
16. Disconnect the ventilation hose and the atmospheric hose from the fuel tank.
Installation
1. Place the ventilation hose and the atmospheric hose on the fuel tank and secure them with clamps.
2. Install heat and fire shields. Install a hanger on the fuel tank.
3. With the help of a partner, screw in the bolts securing the fuel tank to the body and tighten them to a torque of 45 Nm.
NOTE: When installing the fuel tank, it is necessary to route the filler pipe and fuel vapor canister hoses through the body opening.
4. Raise the subframe, screw in the bolts and tighten them to 190 Nm.
5. Attach the ventilation hose to the filler neck and secure with a clamp.
6. Connect the atmospheric hose to the fuel vapor trap, put on and tighten the clamp.
7. Install the plastic mudguard of the right rear wheel.
EXTERIOR PARTS, REPAIR WORK, Rear mudguard.
8. Install the driveshaft.
DRIVE SHAFTS, REPAIR WORK, Cardan shaft assembly.
9. Install the middle section of the exhaust system.
COLLECTORS AND EXHAUST SYSTEM - Td4, REPAIR WORK, Middle section of the exhaust system.
10. Install the electric fuel pump module.
DIESEL ENGINE FUEL SUPPLY SYSTEM, REPAIR WORK, Submersible fuel pump module: up to May 2003.
11. Connect the negative battery terminal.
Comments on this article