NOTE: The spare wheel well is serviced as a separate welded panel and includes the spare wheel mounting bracket but not the cross member.
NOTE: The panel is serviced without its mounting studs.
Removing
1. In combination with the spare wheel well, replaces:
- rear bumper cover
- rear bumper
- Back panel
- Rear panel assembly
- Fuel tank
- Rear subframe and suspension assembly
2. For more information regarding this repair procedure, see: For more information, refer to the chapter: Body and frame (501-26 Body Repairs - Vehicle Special Information and Approval Checks, Description and Operation) / Standard techniques used at the service station (100-00 General information, Description and principle of operation).
3. Remove the rear panel assembly. For more information, please refer to the chapter: Rear Panel (501-30 Repairs of sheet metal elements of the back, Removal and installation).
4. Remove the rear subframe and suspension assembly.
5. Remove the fuel tank. For more information, see chapter: Fuel tank (310-01A Fuel tank and fuel lines - 3.2L NA - I6, Removal and installation) / Fuel tank (310-01B Fuel tank and fuel lines - 2.2L Duratorq - Td4, Removal - Refitting).
6. Remove the rear seat.
7. Remove the interior trim of the right and left bottom trim panels.
8. Remove moldings of the right and left panels of a back lateral part of a body. For more information, please refer to the chapter: Rear Side Panel Molding (501-08 Exterior finish, Removal and installation).
9. Loosen and set aside the carpet.
10. Remove the left and right pipelines of brake system.
11. Loosen and lay aside the floor panel and rear side panel wiring harnesses.
12. Mill out the weld points.
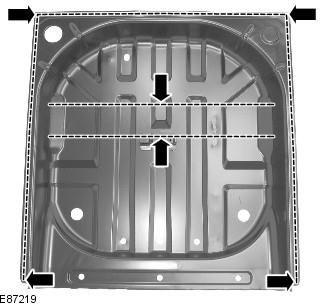
13. Separate the connections and remove the old panel.
Installation
1. Prepare the connecting surfaces of the old and new panels.
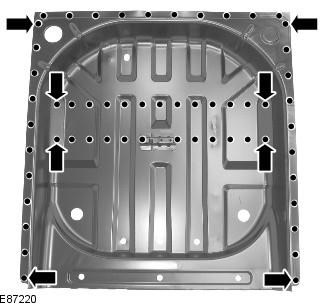
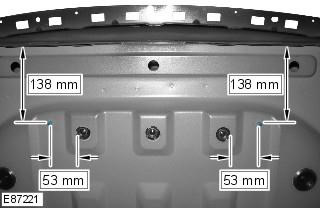
2. Drill holes in the new panel for MIG welding.

3. Attach the new panel and lock it in place. Check the reconciliation, if correct, go to the next step, if not, correct and check again before proceeding to the next step.
4. Welding with electric MIG rivets.
5. Install the mounting studs.
6. Clean all welds.
7. Reverse the removal procedure to install the appropriate panels and mechanicals.
Comments on this article