Contents: Sealing materials for the underbody ⇩ Mastics for the underbody ⇩ Protective compounds for the engine…⇩ What to pay attention to during…⇩ Anti-corrosion treatment carried out…⇩ Installation of approved equipment ⇩ Cleaning the bottom with steam ⇩ Inspection during maintenance ⇩ Repair of protective coating of the…⇩
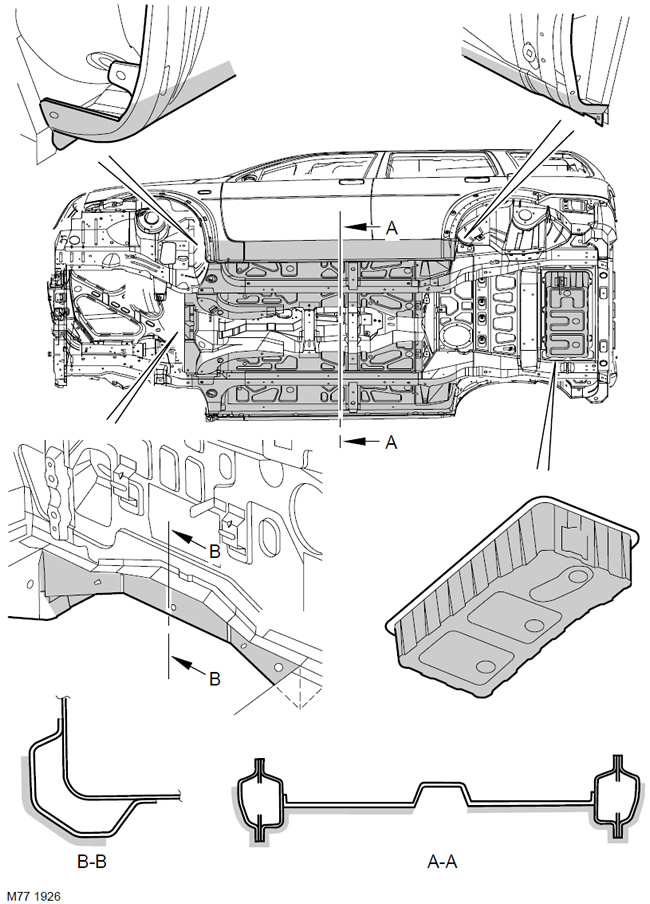
Sealing materials for the underbody
The underbody surface and the outer surfaces of the sills are treated with Plastisol PVC underbody sealant. This material is not suitable for re-application. During repair operations, remove the factory underbody coating in the damaged area down to bare metal. Make sure that the treated area is cleaned to a metallic shine and that the edges of the existing sealant coating are securely bonded to the panel.
Apply new sealer to the primed surface before painting. Apply weld sealer before applying underbody sealer. Ensure that all floor panel plugs and rubber stoppers (except plugs covering the sealant holes) are in place before applying sealer. Replace any plugs that have been damaged by heat during repairs or install rubber stoppers in their place.
Caution: Cover all suspension components, wheels, tires, powertrain, drive shafts, propeller shafts, exhaust system and brake assemblies (including all mounting points) before applying new underbody sealant.
Mastics for the underbody
After any repair of the bottom panels, the protective coating should be restored. The protective coating is applied to the surfaces after painting and applying the sealing mastic.
Caution: Completely remove the old underbody coating from the surface extending at least 200 mm beyond the area to be coated with the new protective coating.
Protective compounds for the engine compartment
Restore all protective coating of the engine compartment damaged during repair work using recommended materials.
If the engine compartment panels were replaced during the repair, treat the entire surface of the engine compartment, including all components, fasteners and other fastening elements with the recommended varnishes and compounds.
What to pay attention to during repair work
Be careful when carrying out repair work in the workshop. The underbody sealant, seam seals, and body parts may be damaged if the car is carelessly lifted on a lift.
Anti-corrosion treatment carried out by the owner
Owner-applied rustproofing in addition to factory treatment is not recommended as it will void the vehicle's rustproofing warranty. This does not apply to approved rustproofing waxes that are compatible with and can be applied over the existing coating.
Installation of approved equipment
When installing additional equipment, make sure that the protective anti-corrosion layer has not been damaged in the form of cracks or moisture access to body parts.
Do not screw self-tapping screws directly into body panels. Use suitable plastic inserts for this purpose. When drilling holes in body parts, always treat the edges of the holes with a suitable zinc or phosphoric acid primer and then apply a protective compound around the hole with a brush.
Do not install equipment with a painted metal surface directly on a body panel without prior protective treatment. When connecting metal surfaces to each other with bolts, always treat the joint surfaces with zinc primer, place zinc tape between the surfaces or apply a layer of inert material.
Cleaning the bottom with steam
When cleaning with steam, there is a risk of damage or softening of anti-corrosion protection materials due to the high temperature.
Adjust the steam cleaning equipment so that the temperature at the nozzle outlet does not exceed 90°C. Do not direct the steam jet at one place for a long time and place the equipment nozzle no closer than 300 mm from the body surface.
DO NOT remove any protective coating or paint from the underbody or engine bay during repair work. If steam cleaning is necessary, apply a new protective coating as soon as possible.
Inspection during maintenance
A requirement of the factory body corrosion warranty is that the condition of the factory protective coating is checked by an authorized Land Rover dealer at least once a year.
The list of maintenance works includes the following operations for checking the anti-corrosion protection of the body:
- Raise the vehicle on a lift and perform a visual inspection of the anti-corrosion coating on the underbody.
- Lower the vehicle and inspect the outside for any damage to the paintwork or signs of rust.
The vehicle must be washed and free of stickers before the inspection. The vehicle owner must promptly remove dirt accumulations that contribute to the development of corrosion. If the owner presents a dirty vehicle for maintenance, the car must be washed at a dealer station before the body condition is checked. Hard-to-reach areas must be inspected especially carefully.
The above checks are visual only. When checking the condition of the body, do not remove decorative panels, rubber moldings or separate sound-absorbing materials.
With the vehicle raised on the lift, use a flashlight to visually inspect the following:
- Are there any signs of corrosion or damage to the coating, what is the condition of the sealing coating on the lower panels of the front and rear body parts, sills and wheel arches?.
- Damage to the protective layer of the body. Corrosion in areas adjacent to suspension mountings and fuel tank mounts.
Minor swellings in the underbody coating are acceptable provided that no metal sections are visible in them.
Pay particular attention to the absence of signs of damage to body panels and protective coating caused by improper installation of the vehicle on the lift.
Attention: It is very important to follow the rules for installing and lifting the car on a lift and jack.
With the vehicle lowered, inspect all visible areas of the body for damage to panels or signs of corrosion, paying attention to the following areas:
- Front edge of the hood.
- Visible flanges in the engine compartment.
- Lower body and door panels.
Repair body damage and panel corrosion detected during inspection as soon as possible to reduce the damage area and ensure the effectiveness of the factory protective coating. The cost of the work to eliminate the traces and causes of corrosion is paid by the owner, but the dealer should advise the owner and issue the relevant documents.
If traces of corrosion are obvious and are located near a removable body part (molding, glass, seat, etc.), remove this part to effectively remove the corrosion.
Repair of protective coating of the underbody
Each time body repair is carried out, make sure that the sealant and anti-corrosion coating is completely restored. This applies to both damaged areas of the body and to places where the protective coating was affected as a result of an impact or during repair operations.
Before repairing a warped panel, remove the anti-corrosion mastic from the damaged area. This applies especially to panels coated with protective wax, PVC-based sealant, sound-absorbing fillers, etc.
Caution: DO NOT use an oxy-acetylene torch to remove the anti-corrosion coating. This will heat up the coating materials and produce large amounts of gases and smoke.
Equipment for removing tough anti-corrosion coatings varies in efficiency and speed. A compressed air scraper (NOT an air chisel) provides a relatively quiet method of mechanically removing sealant due to the very fast reciprocating movements of the working element. Move the tool along the panel being repaired to remove material.
The most common method for removing sealant is to use a warm air supply integrated with a scraper.
The high temperatures generated by this equipment may cause smoke, so caution should be exercised.
Another tool, one of the most effective, is the fast-acting "hot knife". This fast and versatile tool has a wide blade and can be successfully used in hard-to-reach places on profiled surfaces.
When restoring the underbody finish, use the following procedure.
- 1. Remove the existing underbody covering.
- 2. After the repair is completed, wipe the repair area with a cloth soaked in solvent and treat the surface with a phosphoric acid-based material.
- 3. Apply primer to the area to be treated.
Caution: NEVER apply sealant directly to the cleaned metal surface.
- Replace any inserts that have been damaged by heat. If new inserts are not available, use rubber plugs of the correct size, making sure they are recessed into the sealant coating.
- Cover all mounting areas where pipes, hoses and other mechanical components have been removed before applying the mastic. The underbody coating should be applied before these components are installed.
- Apply protective coating with a brush to all exposed welds.
- Apply the recommended underbody protection compound to the surface to be treated using a pneumatic gun.
- Remove the screens that covered the mounting areas and add protective compound where necessary. Allow the coating to dry before applying a coat of protective wax to the underbody.
The original was published on the portal (lrman.ru)
After installing all mechanical components, including lines and hoses, cover the brakes and apply the recommended underbody wax.
NOTE: If the repair work involves touching up paint in areas to be treated with protective wax, the touching up should be done before applying the protective wax.
Comments on this article