Contents: Dismantling ⇩ Installation ⇩
Dismantling
1. Disconnect the negative battery terminal.
2. Raise the rear of the vehicle.
CAUTION: Do not work under a vehicle supported only by a jack. Always support the vehicle with safety stands.
3. Remove the front wheel.
4. Remove the drive shaft.
DRIVE SHAFTS, REPAIR WORK, Rear shaft with outer and inner joints.
5. Place the drive shaft in a vice.
6. Remove both protective cover clamps and dispose of the clamps.
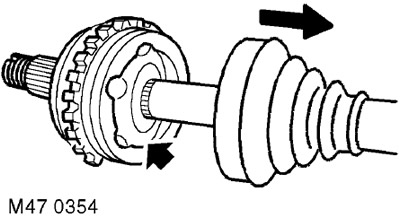
7. Slide the protective cover along the shaft to gain access to the joint.
8. Using a mandrel, strike the inside of the joint to remove the joint from the shaft.
9. Check the cover for damage and replace if necessary.
10. Remove and discard the drive shaft retaining ring.
Installation
1. Wipe the drive shaft and protective boot.
2. Install a new snap ring onto the end of the drive shaft.
(The full version is available on the website: «LRMAN.RU»)
3. Install the outer constant velocity joint onto the shaft, use a screwdriver to insert the retaining ring into the groove of the joint and slide the joint completely onto the shaft.
4. Lubricate the joint with grease from the tube.
5. Install the cover on the hinge and use the LRT-99-019 tool to install two new clamps.
6. Install the drive shaft in place.
DRIVE SHAFTS, REPAIR WORK, Rear shaft with outer and inner joints.
7. Reinstall the wheel(s) and tighten the nuts to 115 Nm.
8. Remove the supports and lower the vehicle.
9. Connect the negative battery terminal.
Comments on this article