Dismantling
1. Raise the front of the car.
WARNING: Do not work under a vehicle that is only supported by a jack. Always install safety props.
2. Remove the lower engine protection.
EXTERIOR PARTS, REPAIR WORKS, Engine lower shield.
3. Drain the oil from the transfer case.
TRANSFER BOX, ADJUSTMENTS, Changing the transmission oil in the transfer case: except for the North American market.
4. Raise one rear wheel so that the driveshaft can be rotated to access the bolts.
5. For ease of reassembly, mark the position on the front propeller shaft.
6. Turn away 6 nuts and remove bolts of fastening of a cardan shaft to a leading flange of a distributing box.
7. Remove the propeller shaft from the transfer box drive flange and tie it aside.
CAUTION: Care must be taken when removing the three-roller joint from the transfer case. In order not to damage the cover, it must not be fully stretched, the hinge body must be protected from shock.
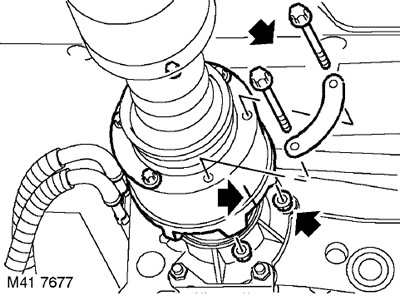
8. Turn away a nut of fastening of a heat-shielding screen to an arm.
9. Turn away 2 nuts of fastening of a heat-shielding screen to a case of a distributing box.
10. Remove the heat shield.

11. Turn away a nut of fastening of a heat-shielding screen to a distributing box.
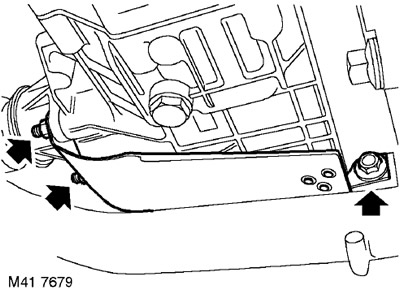
12. Turn away a nut of fastening of a heat-shielding screen to a case of a shaft of a drive of the back bridge.
13. Turn away 2 bolts of fastening of the heat-shielding screen and remove the screen.
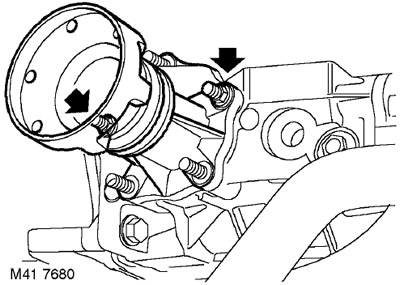
14. Turn away 2 remained nuts of fastening of a case of a shaft of a drive of the back bridge.
15. Remove the rear axle drive shaft housing.
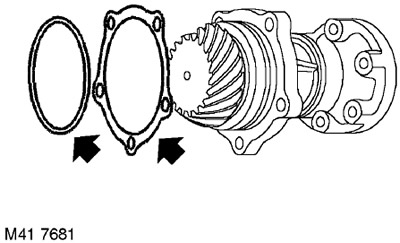
16. Remove and discard O-ring.
17. Remove and save spacer.
Installation
1. Clean the rear axle drive shaft housing and mating surface on the transfer case.
2. Wash off the spacer.
3. Install the spacer on the transfer case.
4. Lubricate a new O-ring with transfer case gear oil and install the seal in the shaft housing.
5. Install the rear axle drive shaft housing.
6. Install the heat shield and tighten the nuts by hand tightening.
7. Install the heat shield of the collector and use your finger to tighten the nut that secures the rear axle drive shaft to the crankcase.
8. Fit the nut securing the heat shield to the transfer case and tighten it to 45 Nm.
9. Screw in the bolts securing the heat shield to the transfer case bracket and tighten them to 9 Nm.
10. Install remaining crankcase nuts and tighten all nuts. Tightening torque 25 Nm.
11. Tighten the nut securing the screen to the exhaust system bracket to 45 Nm.
12. Check that the mating surfaces of the propeller shaft flange and rear axle drive shaft flange are clean.
13. Install the cardan shaft on the drive flange of the transfer case so that the previously applied marks are aligned. Tighten nuts and bolts to 40 Nm.
14. Fill oil into the transfer case housing to the required level.
TRANSFER BOX, ADJUSTMENTS, Changing the transmission oil in the transfer case: except for the North American market.
15. Lower the rear wheel and remove the jack.
16. Reinstall the lower engine guard.
EXTERIOR PARTS, REPAIR WORKS, Engine lower shield.
17. Remove props and lower the car.
Comments on this article