Dismantling
1. Remove the automatic transmission assembly.
AUTOMATIC TRANSMISSION - ZF 5HP24, REPAIR WORKS, Automatic transmission complete with transfer case - removal and installation.
2. Remove the gearbox assembly with the transfer case and lower it onto the stand.
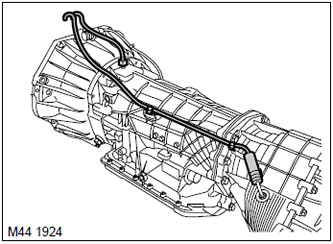
3. Release the transfer case crankcase ventilation hose from the clamps.
4. Disconnect the ventilation hose from the gearbox.

5. Turn out 9 screws like Torx and remove a distributing box.
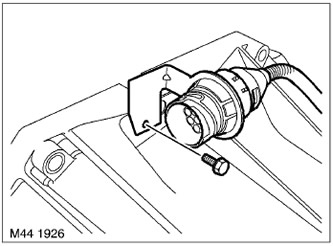
6. Turn out the screw fixing an arm of a socket of the switch of blocking and release wires from a transmission.
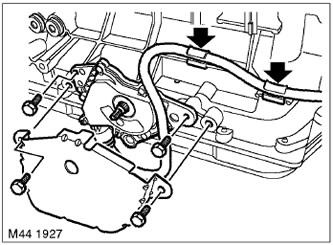
7. Turn out two screws of fastening of a guard of the switch of blocking and remove a guard.
8. Turn out two screws of fastening of the switch of blocking to a transmission and remove the switch.
Assembly
1. Clean the lockout switch and transmission mating surface.
2. Install the interlock switch, tighten the fastening screws and tighten them with a torque of 10 Nm.
3. Install the blocking switch shield, tighten the fastening screws and tighten them with a torque of 10 Nm.
4. Install the interlock switch wires, tighten the connector clamping screw and tighten it with a torque of 10 Nm.
5. Clean the transfer case mating surface, dowel pins and pin holes.
6. Align the transfer case with the automatic transmission, tighten the Torx screws and tighten them to 43 Nm.
7. Attach a ventilating hose to a transmission.
8. Attach the transfer case crankcase ventilation hose to the retainers on the automatic transmission crankcase.
9. Remove the automatic transmission assembly with transfer case from the stand and place on a jack to raise the transmission.
10. Reinstall the automatic transmission assembly.
AUTOMATIC TRANSMISSION - ZF 5HP24, REPAIR WORKS, Automatic transmission complete with transfer case - removal and installation.
Comments on this article