Removing
NOTE: This procedure requires the body to be removed from the body frame.
NOTE: This procedure replaces the front side member section along with the hood latch panel, front wheel arch and front cross member.
1. Put the car on a flyover.
2. Disconnect both wires from the battery. For more information refer to Specification.
3. Left side: Remove the battery.
4. Remove the front fender. For more information refer to Wing (76.10.24)
5. Remove the hood latch panel. For more information refer to Hood Latch Panel (76.16.22)
6. Remove the front wheel arch. For more information, refer to Front wheel arch.
7. Remove the front cross member. For more information refer to Front cross member (77.20.25)
8. Remove the hood.
9. Remove both hood pillars.
10. Remove the hood wiring harness.
11. Remove the mixing chamber panel. For more information, refer to Storage Chamber (80.15.62)
12. Left side: Remove the power steering fluid reservoir. For more information refer to Power Steering Fluid Cooler - 2.7L Diesel (57.15.11)
13. Remove the instrument panel. For more information refer to Dashboard - 2.7L Diesel (76.46.23/99)
14. Remove the insulation from the inner and outer bulkhead.
15. Right side: Release the ABS modulator.
16. Right side: Remove the accelerator pedal. For more information refer to Accelerator Pedal (19.20.01)
17. Left side: Remove the battery junction block. For more information refer to Battery Connection Box (BJB) -2.7L Diesel (86.70.55)
18. Release the wiring harness from the bulkhead.
19. Release the wiring harness from the wing apron reinforcement.
20. Release the wiring harness from the side member.
21. Left side: Remove the fuel coolant heater module. For more information, refer to Additional heater (universal action), fuel powered (80.40.01)
22. Remove panels of finishing of a threshold. For more information refer to Door Sill Trim Panel (76.49.54)
23. Remove the footrest.
24. Remove the front door opening trim panel. For more information refer to Front Doorway Trim Panel (76.13.27)
25. Remove the front carpet.
26.
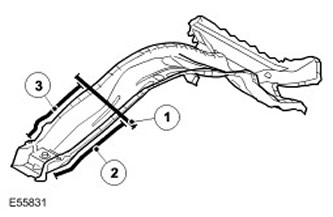
| Item name | Description |
| 1 | Butt weld. |
| 2 | 7 spot welds. |
| 3 | 8 spot welds. |
27. Additional information:
- Weld seam. For more information, refer to Body Repairs.
- Anti-corrosion protection. For more information, refer to Corrosion Protection.
- Tolerances. For more information, refer to Body and frame.
Installation
1. Installation is carried out in the reverse order to dismantling.
Comments on this article