Special tool
 Special tool for EVAP system 310-142 Special tool for EVAP system 310-142 |
NOTE: The following procedure will pinpoint the location of a fuel leak that is indicated by a lit malfunction indicator light (MIL). This check should be performed only after it is found that the fuel system components do not have obvious malfunctions.
1.
WARNING: It is forbidden to carry out work on a vehicle standing on only one jack. Always support the vehicle with jack stands.
Place the car on a lift.
2. Check fuel system parts and evaporative emission systems for obvious faults. Make sure all connections are tight.
3. Connect to the car T4.
- Perform a DMTL check.
- Follow the instructions on the screen and complete the DMTL procedure.
WARNING: Do not smoke or walk with a lit cigarette or open flame of any type while working on or near fuel related items. There is a danger of ignition of flammable vapours. Failure to follow these instructions may result in personal injury.
WARNING: The vehicle must be kept in an enclosed area with good ventilation. Signs must be posted around the vehicle "No smoking! vapors of gasoline!"
CAUTION: Before disconnecting or dismantling parts, make sure that the area around the contact surfaces and connections is clean. Plug all open connections to avoid contamination of the system.
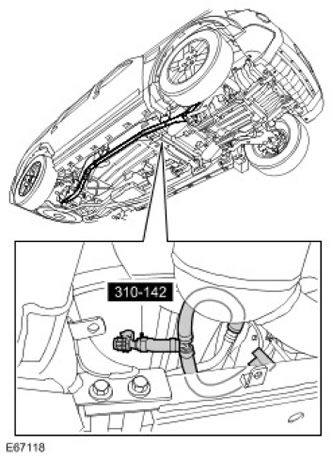
Install the special tool on the purge line.
- Release the clamp and disconnect the purge line.
- Clean the contact surfaces of the parts.
- Attach special tool.
5.
CAUTION: Before disconnecting or dismantling parts, make sure that the area around the contact surfaces and connections is clean. Plug all open connections to avoid contamination of the system.
Disconnect the purge line from the fuel vapor canister line. Release the clamp.
6. Follow the procedures described in the EVAPS 310-115 Diagnostic Test Station manual in the given order (LRA-19-004) or (LRA-19-005A).
7. After detecting a leak, replace the part if necessary and recheck to make sure the leak has been completely repaired.
8. Connect the purge line to the fuel vapor canister line.
- Clean the contact surfaces of the parts.
- Fasten with a clip.
- Clean the contact surfaces of the parts.
- Connect the purge line.
Comments on this article