Contents: Dismantling ⇩ Installation ⇩
Dismantling
1. Disconnect the negative battery terminal.
2. Remove the lower engine guard.
EXTERIOR PARTS, REPAIR WORK, Lower engine protection shield.
3. Remove the left rear timing belt cover.
ENGINE KV6 - MODIFICATION K, Camshafts of the left cylinder head, Cover of the left rear timing belt.
4. Remove the right front wheel.
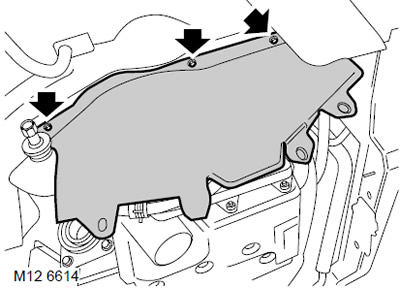
5. Unscrew the 3 bolts securing the right mudguard panel and remove the panel.
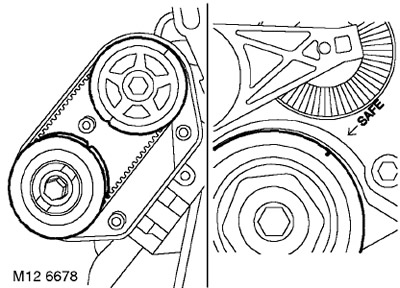
6. Using a socket head, turn the crankshaft clockwise using the pulley mounting bolt. Align the "SAFE" mark on the crankshaft pulley with the "ARROW" mark on the front engine plate, while the marks on the rear camshaft gears should align as shown.
CAUTION: Do not turn the engine by the camshaft gear mounting bolts or the timing belt. Do not use the arrow on the oil pump housing as an alignment mark.
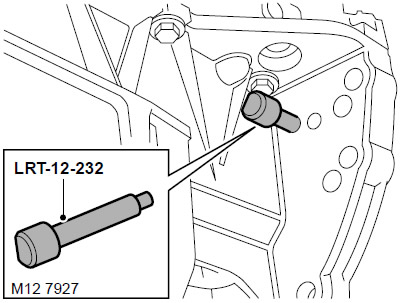
7. Insert the LRT-12-232 pin through the hole in the bottom tray so that the pin enters the hole in the drive disc.
CAUTION: The pin is inserted through the hole in the bottom tray closest to the edge of the tray, as shown in the figure.
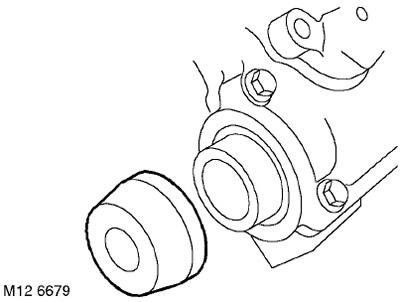
8. Remove and discard the exhaust camshaft cap seal from the cylinder head.
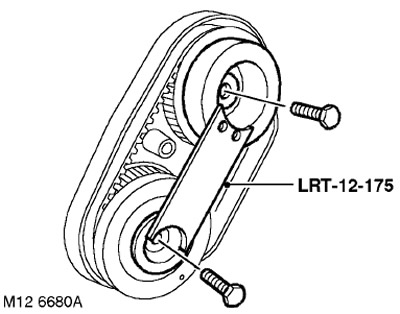
9. Install the LRT-12-175 tool on the rear gears, unscrew and dispose of the bolts securing the gears to the camshafts.
10. Remove the gears, timing belt and fixture as an assembly.
CAUTION: Do not rotate the crankshaft or camshafts with the timing belt removed.
11. If you intend to continue using the timing belt, mark the direction of its movement.
12. Remove the LRT-12-175 tool from the gear wheels and remove the timing belt from the wheels.
CAUTION: Do not rotate the crankshaft with the timing belt removed and the cylinder heads installed.
CAUTION: Timing belts require careful handling and storage. Timing belts should be stored on their edge and with a bending radius of no less than 50 mm. Do not use a timing belt that has been twisted or folded in half, as the cord threads may be damaged. Do not use the timing belt if any wear particles other than dust (crumbs, threads) are found on the belt cover. Do not use the timing belt if the engine has partially seized. Belts that have covered 72,000 km must be replaced. Do not use timing belts whose surface is contaminated with oil or coolant. The cause of the contamination must be eliminated.
Installation
NOTE: There is a possibility that after replacing the front or rear timing belt and setting the crankshaft pulley to the 'SAFE' position, the position marks on the rear timing gears may no longer align. This misalignment is acceptable provided the belt replacement procedure was carried out correctly.
1. Clean the camshaft gears and their seats on the camshafts.
ATTENTION: If the gears manufactured by sintering (powder metallurgy technology) have been in contact with oil for a long time, they must be soaked in a solvent and then washed in a clean solvent before installation. The porous structure of the sintered material absorbs oil, which, when released, will contaminate the timing belt.
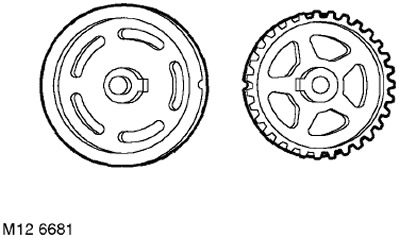
2. Place the inverted gears on a flat surface with the marks facing as shown in the figure.
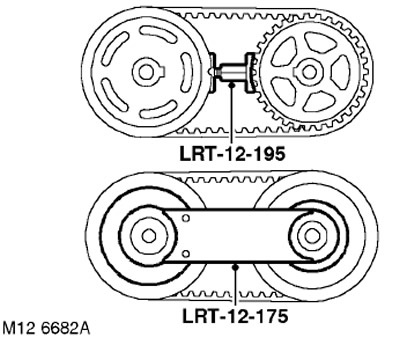
3. Place the timing belt on the gears, keeping the timing marks aligned.
4. Install the LRT-12-195 tool between the gears, rotate the tool nut until the belt is sufficiently tensioned.
5. Turn the gears with the belt over and install the LRT-12-175 device on the gears.
6. After checking the alignment of the installation marks, remove the LRT-12-195 device that was located between the wheels.
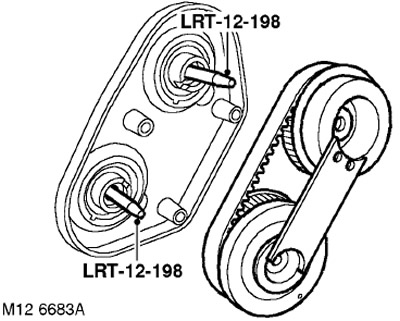
7. Install the LRT-12-198 guide pins into the end of each camshaft.
8. Using guide pins LRT-12-198, place the timing gears on the camshafts.
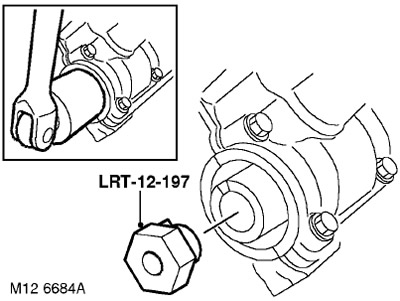
9. Screw the special bolt LRT-12-197 into the front end of the left exhaust shaft.
10. With the help of a partner, install a 30 mm socket head on the special bolt LRT-12-197 and rotate the left camshaft until the protrusions on the gears align with the grooves of each of the camshafts.
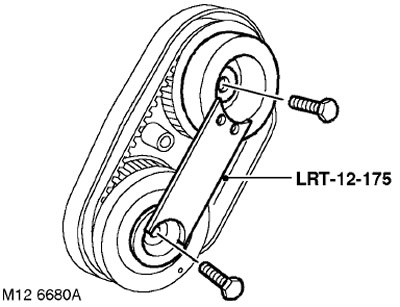
11. Remove the guide pins LRT-12-198 and screw in new gear mounting bolts.
12. Tighten the gear mounting bolts:
- Stage 1: 27 Nm
- Step 2: 90° turn
13. Remove the LRT-12-175 tool from the gears.
14. Remove special bolt LRT-12-197 from the front of the exhaust camshaft.
15. Wipe the left exhaust camshaft cap seal seat and install a new seal.
16. Remove the LRT-12-232 pin from the bottom tray.
17. Install the mudguard panel and secure it with bolts.
(The original article is located on: www.LRman.ru)
18. Reinstall the right wheel and tighten the nuts to a torque of 115 Nm.
19. Install the left rear timing belt cover.
ENGINE KV6 - MODIFICATION K, Camshafts of the left cylinder head, Cover of the left rear timing belt.
20. Reinstall the lower engine guard.
EXTERIOR PARTS, REPAIR WORK, Lower engine protection shield.
21. Connect the negative battery terminal.
Comments on this article