Contents: Dismantling ⇩ Installation ⇩
Dismantling
1. Disconnect the negative battery terminal.
2. Remove the timing belt.
ENGINE KV6 - MODIFICATION K, Camshafts of the left cylinder head, Timing belt.
3. Remove the rear timing belt of the right cylinder head.
ENGINE KV6 - MODIFICATION K, Left cylinder head camshafts, Right rear timing belt.
4. Remove the right cylinder head valve cover gasket.
ENGINE KV6 - MODIFICATION K, Camshafts of the left cylinder head, Valve cover gasket of the right cylinder head.
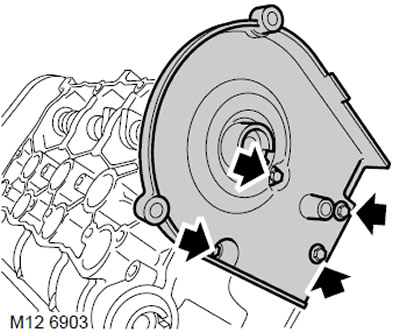
5. Unscrew the 4 bolts securing the rear cover of the front timing belt to the right cylinder head and remove the cover.
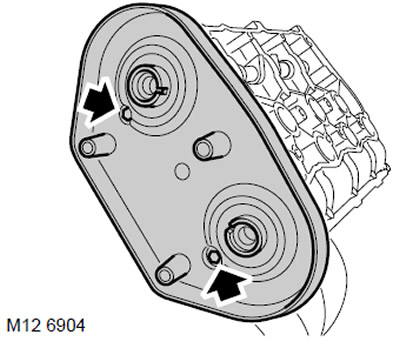
6. Unscrew the 2 bolts securing the rear timing belt rear cover to the right cylinder head and remove the cover.
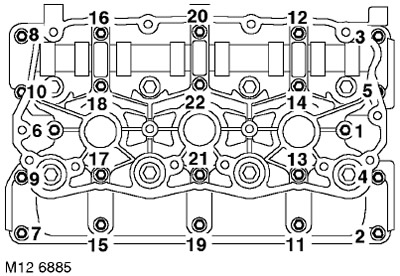
7. Gradually, in the sequence shown in the figure, loosen the 22 camshaft cover mounting bolts until the valve springs are completely unloaded.
8. Release the camshaft cover from the guide pins and remove it from the cylinder head.
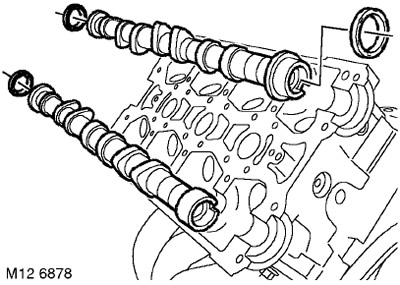
9. Remove the camshafts and discard the camshaft seals.
10. Use a magnet to remove
12 hydraulic compensators from the cylinder head.
CAUTION: The hydraulic lifters must be laid out in the order in which they were installed on the cylinder head. When working with hydraulic lifters, the maximum possible cleanliness must be maintained. Failure to comply with these requirements may result in engine failure.
11. Wipe the camshafts and their seats in the cover and in the cylinder head.
12. Check the condition of the camshafts. If they are scratched, dented or excessively worn, replace the camshafts.
NOTE: Camshafts are color coded: ORANGE - Intake Camshaft, BLUE - Exhaust Camshaft
Installation
1. Carefully wipe the hydraulic compensators and lubricate them with clean engine oil. Install the hydraulic compensators in the cylinder head, in their original places.
2. Check that the mating surfaces of the cylinder head and camshaft cover are clean and dry.
3. Lubricate the camshafts with clean engine oil.
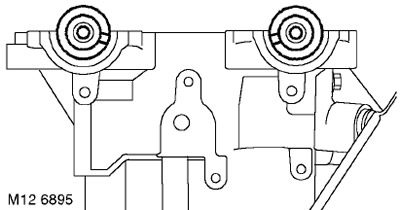
4. Place the camshafts in the cylinder head so that the gear grooves are directed towards the middle of the engine, as shown in the figure.
CAUTION: Check that the shafts are placed in their places: ORANGE - intake, BLUE - exhaust.
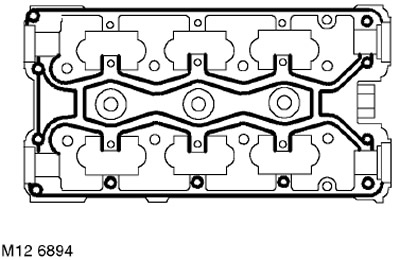
5. Apply continuous thin beads of STC 4600 Sealant in the areas shown in the figure. Use a roller trowel to spread the sealant in a thin layer over the surface.
Do not allow the sealant to enter the oil channels and grooves; perform assembly no later than 20 minutes after applying the sealant.
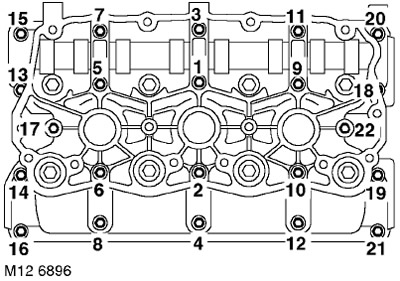
6. Install the camshaft cover, screw in and gradually tighten the bolts to a torque of 10 N·m in the sequence shown in the figure.
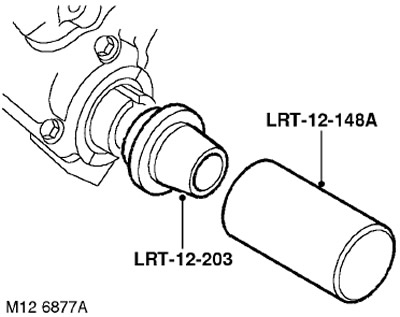
7. Remembering that the front seals are black and the rear seals are red, install new seals using the LRT-12-203 and LRT-12-148A drifts.
CAUTION: Seals must be installed dry. Do not use the LRT-12-148 driver to install seals.
8. Clean the rear timing belt cover mounting bolts and apply STC 50552 sealant to the first three threads.
9. Install the rear belt covers, screw in the bolts and tighten them to 9 Nm.
10. Install the right cylinder head valve cover gasket.
ENGINE KV6 - MODIFICATION K, Camshafts of the left cylinder head, Valve cover gasket of the right cylinder head.
11. Install the timing belt.
ENGINE KV6 - MODIFICATION K, Camshafts of the left cylinder head, Timing belt.
12. Install the rear timing belt of the right cylinder head.
ENGINE KV6 - MODIFICATION K, Left cylinder head camshafts, Right rear timing belt.
13. Add oil to the engine.
MAINTENANCE, Engine Oil and Oil Filter - KV6.
14. Connect the negative battery terminal.
Comments on this article