Dismantling
1. Disconnect "negative" battery terminal.
2. Empty the air conditioning system and collect the refrigerant.
AIR CONDITIONING SYSTEM, AIR CONDITIONER DRAINAGE, REFRIGERANT RECOVERY AND CHARGING, Air Conditioner Emptying - Refrigerant Recovery and Charging.
3. Remove the bottom motor shield.
EXTERIOR PARTS, REPAIR WORKS, Engine lower shield.
4. Remove the right forward wheel.
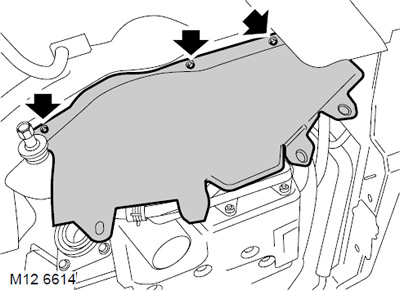
5. Turn away 3 bolts of fastening of the right protective screen to a body and remove the screen.
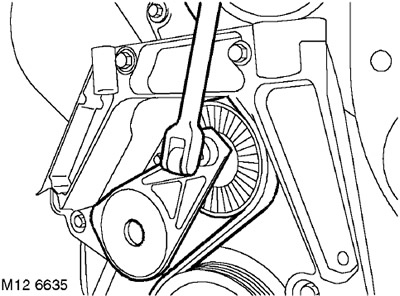
6. Using a 3/8" socket, raise the implement drive belt tensioner and remove the drive belt from the A/C compressor pulley.
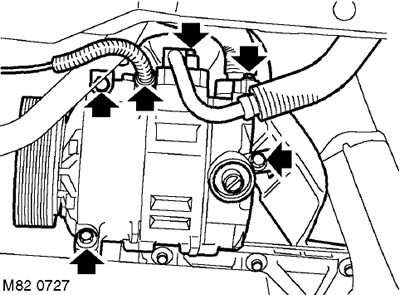
7. Turn away 2 bolts of fastening to the compressor of pipelines of high and low pressure. Disconnect lines from compressor, remove and discard o-rings.
CAUTION: Before disconnecting or removing system components, make sure that the surfaces adjacent to the connection points are free of dirt. Install plugs in fittings and piping to keep dirt out of the system.
8. Disconnect the connector block from the compressor.
9. Note the position of the heat shield on the compressor and remove the 3 bolts securing the compressor to the front mounting plate and cylinder block. Remove the compressor and protective screen.
Installation
1. If a new compressor is installed, the specified amount of refrigerant must be drained from it.
GENERAL INFORMATION, Air conditioning compressor replacement.
2. The new compressor is hermetically sealed. It contains nitrogen under pressure. Remove the cover slowly. As soon as the tightness is broken, you will hear the characteristic noise of gas escaping under pressure.
3. Clean the compressor and mating surfaces of the front mounting plate and cylinder block.
4. Install the compressor, screw on the lower bolt of its fastening, but do not completely tighten it yet.
5. Install the heat shield and tighten the top mounting bolts. Tighten the lower and upper compressor mounting bolts to 25 Nm.
6. Remove the cover from the high pressure pipe and the cover from the connection of the pipeline to the compressor.
7. Wipe down the high pressure pipe and its connection to the compressor.
8. Lubricate the new O-ring with clean refrigerant and install it on the high pressure line.
9. Connect the high pressure pipe to the compressor, screw in the bolt and tighten it to 25 Nm.
10. Connect the block to the compressor connector.
11. Remove the cover from the low pressure pipe and the cover from the connection of the pipeline to the compressor.
12. Wipe down the low pressure pipe and its connection to the compressor.
13. Lubricate the new O-ring with clean refrigerant and install it on the low pressure pipe.
14. Connect the low pressure pipeline to the compressor, wrap the bolt and tighten it with a torque of 25 Nm.
15. Clean the pulley groove and idler roller tread from dirt.
16. Using a 3/8" socket, raise the idler and slide the drive belt over the pulleys.
17. Establish a back board and tighten bolts of its fastening.
18. Reinstall the right wheel and tighten the nuts to 115 Nm.
19. Replace receiver water separator.
AIR CONDITIONING SYSTEM, A/C compressor drive belt - for models with Td4 engine, Receiver water separator.
20. Prime the A/C system.
AIR CONDITIONING SYSTEM, AIR CONDITIONER DRAINAGE, REFRIGERANT RECOVERY AND CHARGING, Air Conditioner Emptying - Refrigerant Recovery and Charging.
21. Attach "negative" battery terminal.
22. Replace the lower engine shield.
EXTERIOR PARTS, REPAIR WORKS, Engine lower shield.
Comments on this article