Contents: Pinpoint Test A: Sunroof Opening…⇩ Pinpoint Test B: Sunroof Opening…⇩ Pinpoint Test D: Sunroof Opening…⇩ Pinpoint Test E: Sunroof Opening…⇩ Pinpoint test F: water ingress ⇩ Pinpoint Test G: Opening Sunroof…⇩ Pinpoint test H: Seals are loose or…⇩
Pinpoint Test A: Sunroof Opening Panel - Noise During Operation
A1: Electric motor - noise during operation
NOTE: These tests are performed to determine the cause of noise during operation of the sunroof opening panel
Use the overhead switch to move the sunroof opening panel to all possible positions (horizontal open/horizontal close/tilt/lower).
Is the noise level of the sunroof motor different from another vehicle?
Да - GO to A2.
No - GO to A4.
A2: Electric motor repair - fastening reliability, location and tightening torque
- Provide access to the sunroof opening panel motor.
- Check the correct position and secure fastening of the sunroof opening panel electric motor.
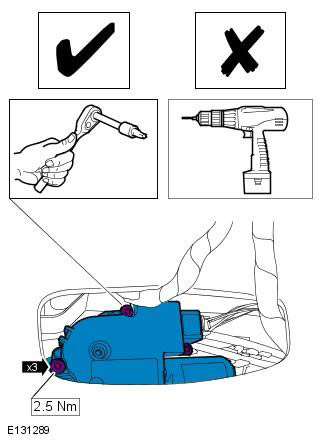
Is the sunroof opening panel motor positioned correctly and securely fastened?
Да - GO to A3.
No - Correctly position and secure the sunroof opening panel motor. Check that the sunroof opening panel operates correctly. If the problem persists, GO to A1.
A3: Electric Motor Mount - Electric Motor Mount Hex Inserts
Remove the sunroof motor from the sunroof opening panel and ensure the 3 copper hexagonal inserts that secure the motor to the panel are properly positioned and engaged. For additional information, refer to: Sunroof Motor (501-17 Sunroof, Removal and Installation).
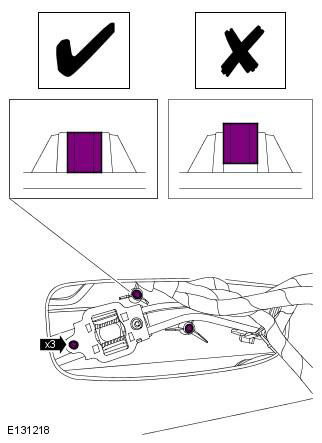
Are the 3 copper hexagonal inserts for the electric motor mounts on the panel correctly positioned and secured?
Да - Install a new sunroof motor. For additional information, refer to: Sunroof Motor (501-17 Sunroof, Removal and Installation).
No - Replace the sunroof opening panel. For additional information, refer to: Sunroof (501-17 Sunroof, Removal and Installation).
A4: Air deflector - noise
Using the overhead switch, move the sunroof opening panel to determine the cause of the noise during operation of the sunroof opening panel.
Is the air deflector making noise when you move the sunroof opening panel?
Да - GO to A5.
No - GO to A6.
A5: Air deflector - adjustment
Check the air deflector spring adjustment.
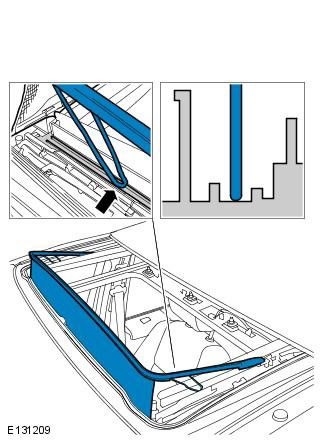
Is the air deflector spring adjusted correctly?
Да - Install a new air deflector For additional information, refer to: Air Deflector (501-17 Sunroof, Removal and Installation). Check the sunroof opening panel for proper operation.
No - Adjust the air deflector spring. Perform the manual initialization procedure for the sunroof opening panel. For additional information, refer to: Programming the Motor (501-17 Sunroof, General Procedures). Check the correct operation of the sunroof opening panel.
A6: Lower side cover - noise
Using the overhead switch, move the sunroof opening panel to determine the cause of the noise during operation of the sunroof opening panel.
Are the lower side covers making noise when moving the sunroof opening panel?
Да - GO to A7.
No - GO to A8.
A7: Lower side cover - adjustment
Check the adjustment of the lower side cover.
Are the lower side covers adjusted correctly?
Да - Install new lower side covers. Check the sunroof opening panel for proper operation.
No - Adjust the lower side covers. Perform the manual initialization procedure for the sunroof opening panel. For additional information, refer to: Programming the Motor (501-17 Sunroof, General Procedures). Check the correct operation of the sunroof opening panel.
A8: Upper side cover - noise
Using the overhead switch, move the sunroof opening panel to determine the cause of the noise during operation of the sunroof opening panel.
Are the upper side covers causing noise when moving the sunroof opening panel?
Да - GO to A9.
No - GO to A13.
A9: Upper side cover - adjustment
Check the adjustment of the upper side cover.
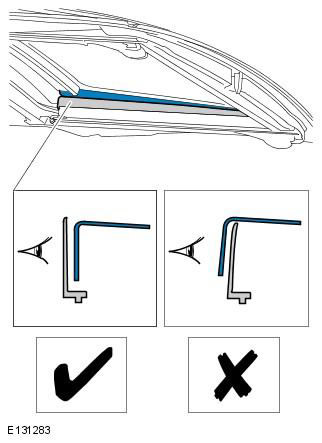
Are the top side covers adjusted correctly?
Да - GO to A10.
No - Adjust the upper side covers correctly. Perform the manual initialization procedure for the sunroof opening panel. For additional information, refer to: Programming the Motor (501-17 Sunroof, General Procedures). Check the correct operation of the sunroof opening panel.
A10: Upper Side Cover - Fastening
Check that the rear parts of the upper side covers are securely fastened.
Are the backs of the upper side covers securely fastened?
Да - GO to A11.
No - Install a new sunroof opening panel glass (upper side covers are not serviceable). For additional information, refer to: Sunroof Glass (501-17 Sunroof, Removal and Installation).
A11: Rail mounted - guide brackets
- Remove the sunroof glass panel. For additional information, refer to: Sunroof Glass (501-17 Sunroof, Removal and Installation).
- Inspect the guide brackets on the roof rails for damage and proper installation.
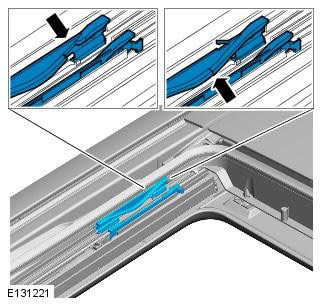
Are the guide brackets on the roof rails damaged or incorrectly installed?
Да - Replace the guide brackets on the roof rails if necessary.
No - GO to A12.
A12: rear - runners
Perform a visual and manual inspection of the rear runners and connecting beam for damage (broken parts) and correct positioning.
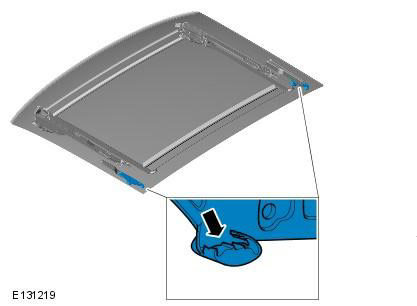
Are the rear runners or connecting rail damaged/seized?
Да - Replace damaged rear runners or connecting beam if necessary.
No - GO to A13.
A13: Glass mounted - guide brackets
Inspect the guide brackets installed on the glass for damage.
Are the brackets installed on the glass damaged?
Да - Install a new opening panel glass (the guide brackets installed on the glass are not serviceable). For additional information, refer to: Sunroof Glass (501-17 Sunroof, Removal and Installation).
No - Install the original glass panel to the sunroof opening panel. Perform the manual initialization procedure for the sunroof opening panel. For additional information, refer to: Motor Programming (501-17 Sunroof, General Procedures). Check the sunroof opening panel for proper operation. If the problem persists, contact your dealer for technical support.
Pinpoint Test B: Sunroof Opening Panel - One-Touch Control Function Does Not Work
B1: Sunroof opening panel - action
NOTE: These tests are performed to determine the reason why the One Touch Control feature has stopped working.
Operate the sunroof opening panel to all possible positions (horizontal open/horizontal close/tilt/down) without using the one-touch control function.
Does the sunroof opening panel fit correctly in all possible positions?
Да - Perform the manual initialization procedure for the sunroof opening panel. For additional information, refer to: Motor Programming (501-17 Sunroof, General Procedures). Check for proper operation of the sunroof opening panel. If the problem persists, use the manufacturer's recommended diagnostic system to perform the "Sunroof Initialization Procedure" including the "Vehicle Hard Reset Procedure (if necessary)". Check for proper operation of the sunroof opening panel. GO to B2.
No - Proceed to PINPOINT TEST C.
B2: One-touch control switch - action
Use the ceiling switch to activate the one-touch opening panel control function.
Is the one-touch opening panel control function working properly?
Да - No additional actions are required.
No - Install a new sunroof motor. For additional information, refer to: Sunroof Motor (501-17 Sunroof, Removal and Installation).
C1: Sunroof opening panel - fuse
NOTE: These tests are performed to determine the cause of the one-touch sunroof control feature being disabled.
Refer to the electrical diagrams to check the sunroof opening panel motor fuse link.
Is the sunroof opening panel motor fuse link (VBATT) intact?
Да - GO to C2.
No - The sunroof opening panel motor fusible link has failed. Refer to the electrical schematics to check the circuit (VBATT) between the fusible link and the sunroof opening panel motor for a short to ground. Replace the fusible link or repair the circuit as necessary. Check the sunroof opening panel for proper operation.
C2: car - authorization
NOTE: When the ignition is turned to the ON position, authorization signal voltage is supplied to the sunroof opening panel motor (ACC) circuit. The voltage should be greater than 7 volts when the sunroof authorization signal is active and less than 1 volt when the sunroof authorization signal is roofs are not active.
- Provide access to the sunroof opening panel switch. For additional information, refer to: Overhead Console (501-12 Instrument Panel and Console, Removal and Installation).
- Refer to the electrical diagrams to verify proper operation of the sunroof opening panel motor (ACC) circuit (see note above).
Is the sunroof opening panel motor circuit (ACC) voltage as expected?
Да - GO to C3.
No * Verify that DTC B10F2-14 (Sunroof Control - Short to Ground or Open Circuit) is set; refer to the electrical diagrams to check the (ACC) circuit between the central junction box and the sunroof opening panel motor for proper operation. Repair as necessary. If DTC is not set, check the operation of the central junction box (ACC) circuit.
C3: Sunroof Opening Panel - Switch Connector
C4: Sunroof opening panel - Electric motor connector
Provide access to the sunroof opening panel motor. For additional information, refer to: Sunroof Motor (501-17 Sunroof, Removal and Installation). Refer to the electrical diagrams to check the position and condition of the terminals and the sunroof opening panel motor housing. Are the sunroof opening panel motor connector terminals and housing correctly positioned and in good condition?
Да- GO to C5.
No - Correctly position or replace the sunroof opening panel motor connector terminals. Check that the sunroof opening panel operates correctly.
C5: Switch - Circuit Check 1
NOTE: The sunroof opening panel motor supplies voltage to the open and close circuits, which are grounded when the switch is moved; this voltage when the ignition is on should be greater than 7 volts (switch open) and less than 1 volt (switch closed).
Refer to the electrical schematics to locate the open and close circuits between the sunroof opening panel motor and the panel switch, and monitor the voltage in each circuit as the switch is moved.
Does the voltage in both the open and close switch circuits change from greater than 7 volts to less than 1 volt when the sunroof open or close switches are moved?
Да - GO to C8.
No - GO to C6.
C6: Switch - Circuit Test 2
NOTE: If the voltage remained high (over 7 volts) during the previous test, refer to the electrical diagrams to check for a faulty switch circuit.
NOTE: If the voltage remained low (less than 1 volt) during the previous test, refer to the electrical diagrams to check the switch circuit for faults.
See notes above.
Was the voltage still low (less than 1 volt)?
Да - GO to C7.
No - Voltage remained high (over 7 volts) refer to electrical diagrams to check for faulty sunroof opening panel switch circuit.
C7: Electric motor power supply - voltage
Refer to the electrical diagrams to check for battery voltage between the power (VBATT) and ground (GND) circuits of the sunroof opening panel motor (approximately 12 volts).
Is there battery voltage at the sunroof opening panel motor (VBATT) and (GND) circuits?
Да - GO to C8. No - Check the (VBATT) and (GND) circuits of the sunroof opening panel motor. Repair if necessary. Check the correct operation of the sunroof opening panel.
C8: Electric motor - malfunction
Using the overhead switch, move the sunroof opening panel.
When you move the sunroof opening panel using the overhead switch, does the motor click?
Да - GO to C9.
No - Replace the sunroof opening panel motor. For additional information, refer to: Sunroof Motor (501-17 Sunroof, Removal and Installation). Perform the manual initialization procedure for the sunroof opening panel. For additional information, refer to: Motor Programming (501-17 Sunroof, General Procedures). Check the correct operation of the sunroof opening panel
C9: Testing the Electric Motor - Removed
NOTE: Place a support under the sunroof opening panel motor to avoid damaging it when connecting the electrical connectors.
Remove the 3 sunroof motor fasteners, carefully lower the motor from the sunroof opening panel. For additional information, refer to: Sunroof Motor (501-17 Sunroof, Removal and Installation).
Operate the sunroof opening panel switch. Does the sunroof opening panel motor work?
Да - GO to C11.
No - GO to C10.
C10: Car - Hard Reset
Install the electric motor to the frame of the sunroof opening panel
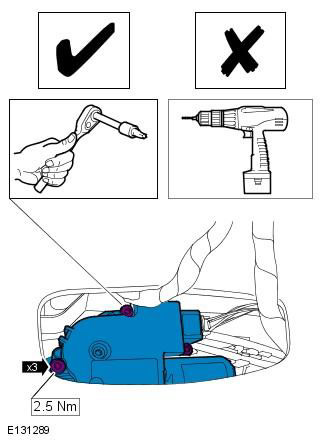
Using a manufacturer approved diagnostic system, perform a hard reset of the vehicle. Using the manufacturer approved diagnostic system, perform the sunroof opening panel initialization procedure. Use the ceiling switch to activate the one-touch opening panel control function.
Is the one-touch opening panel control function working properly?
Да - No additional actions are required.
No - Replace the sunroof opening panel motor. Using the manufacturer-approved diagnostic system, perform the sunroof opening panel initialization procedure. Check the sunroof opening panel for proper operation.
C11: Manual mode - sunroof operation
- Install the electric motor to the sunroof opening panel frame.
- Manually move the sunroof opening panel to all possible positions (horizontal open/horizontal close/tilt/lower).
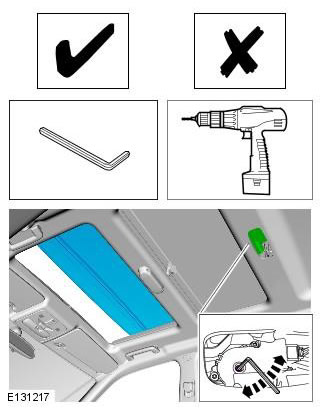
Is it possible to manually move the sunroof opening panel to all possible positions?
Да - Contact your dealer's technical support service.
No - GO to C12.
C12: Glass panel - removal
Remove the glass panel from the sunroof opening panel. For additional information, refer to: Sunroof Glass (501-17 Sunroof, Removal and Installation).
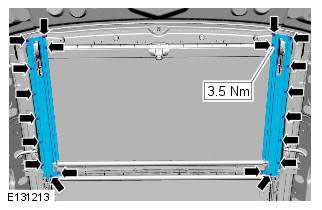
Is it possible to remove the glass panel?
Да - GO to C13.
No - If the glass panel cannot be removed using the standard R procedure&I, remove the 20 mounting screws that secure the glass panel guides, then push the glass outward, manually move the sunroof opening panel to the glass position (open horizontally), and remove the front glass installation guides. Manually move the sunroof opening panel to the closed position and remove it. If the panel cannot be removed, contact your dealer for technical support. GO to C13.
C13: Glass panel removed
Inspect and feel the roof rails for debris accumulation.
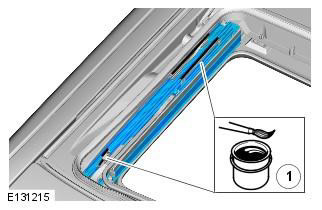
Are your roof rails clogged?
Да - Clean the roof rails. Refer to drawing E131215, apply grease (KP 1N-30 or ISO-LX-CDBE1) to the areas marked in black before assembly. GO to C14.
No - GO to C14.
C14: Rail mounted guide brackets - condition
Inspect and feel the guide brackets installed on the roof rails for cracks and damage (broken parts).
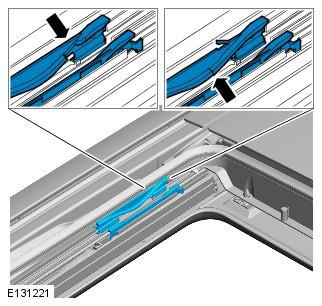
Are the guide brackets on the roof rails cracked or damaged?
Да - Replace the guide brackets on the roof rails if necessary. GO to C15.
No - Assemble the guide brackets correctly on the roof rails. GO to C15.
C15: Rail mounted guide brackets - position
- Inspect and feel the guide brackets mounted on the roof rails.
- Make sure the guide brackets on the roof rails are positioned correctly and do not move in any direction.
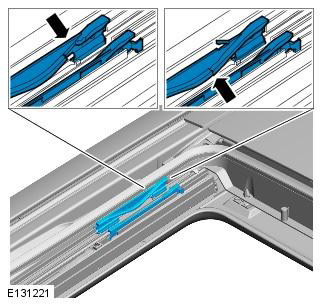
Are the guide brackets on the roof rails positioned correctly and not moving in any direction?
Да - GO to C16.
No - Correctly assemble or replace (if necessary) the guide brackets on the roof rails. GO to C16.
C16: Rear runners - condition and position
Perform a visual and manual inspection of the rear runners and connecting beam for damage (broken parts) and correct positioning.
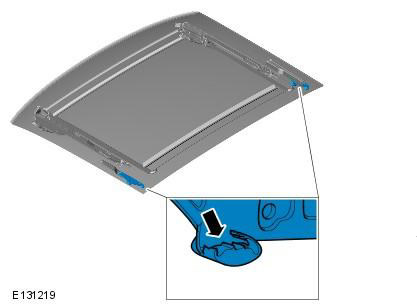
Are the rear runners or connecting rail damaged/seized?
Да - Replace damaged rear runners or connecting beam if necessary.
No - GO to C17.
C17: Guide brackets installed on glass
Inspect the guide brackets installed on the glass for damage.
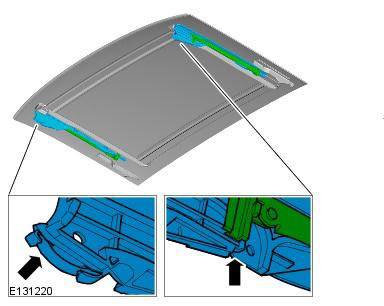
Are the brackets installed on the glass damaged?
Да - Install a new sunroof glass. For additional information, refer to: Sunroof Glass (501-17 Sunroof, Removal and Installation).
No - GO to C18.
C18: Glass panel - assembly
- Install the rails using the 20 screws securing the glass panel guides (if removed).
- Install the glass panel to the sunroof opening panel. For additional information, refer to: Sunroof Glass (501-17 Sunroof, Removal and Installation).
- Perform the manual initialization procedure for the sunroof opening panel. For additional information, refer to: Motor Programming (501-17 Sunroof, General Procedures).
- Check that the sunroof opening panel operates correctly.
Does the sunroof opening panel operate properly?
Да - No additional actions are required.
No - Contact your dealer's technical support service.
Pinpoint Test D: Sunroof Opening Panel - Rollback
D1: initialization
NOTE: These tests are performed to determine the cause of the sunroof opening panel rolling back on its own.
- Perform the manual initialization procedure for the sunroof opening panel. For additional information, refer to: Programming the Motor (501-17 Sunroof, General Procedures).
- Use the overhead switch to move the sunroof opening panel to all possible positions (horizontal open/horizontal close/tilt/lower).
- Use the ceiling switch to activate the one-touch opening panel control function five times in a row.
Has the sunroof opening panel operated correctly five times in a row?
Да - No additional actions are required.
No - GO to D2.
D2: Incorrect position of the seal causes spontaneous rollback
1. Inspect the position of the sunroof opening panel seals.
2. Gutter
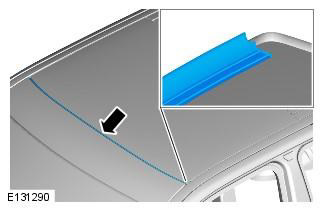
3. Front acoustic seal. Vehicles up to VIN 154971. Vehicles starting with VIN154972.
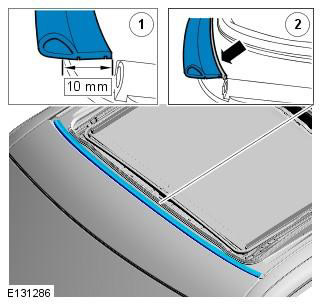
4. Lateral acoustic seal
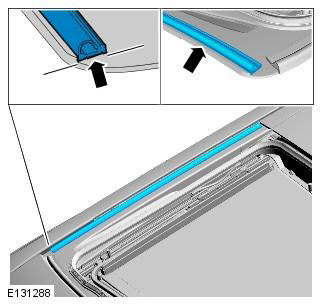
5. Opening seal
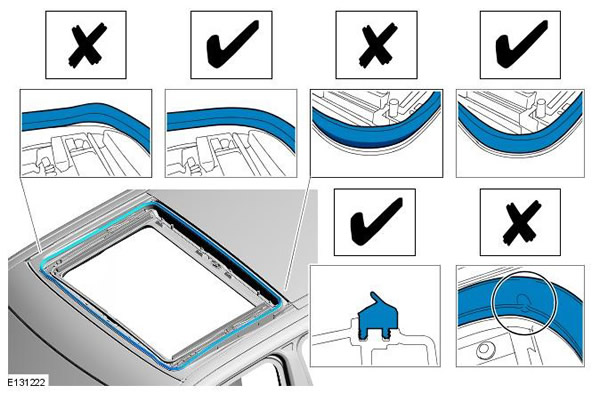
Do any of the seals cause rollback?
Да - GO to D3.
No - GO to D8.
D3: Lateral acoustic seal - position
Inspect the side acoustic seals of the sunroof opening panel.
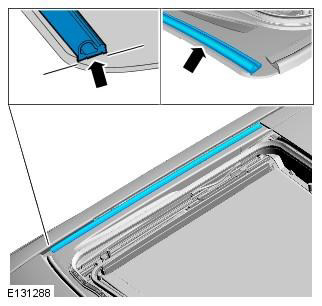
Is the rollback caused by any of the side acoustic seals of the sunroof opening panel?
Да - Replace the side acoustic seals. Clean all relevant surfaces, then correctly position and adhere the new acoustic seals to the sunroof opening panel. GO to D4.
No - GO to D4.
D4: Front Acoustic Seal - Position
Inspect the front acoustic seal of the sunroof opening panel. Vehicles up to VIN 154971. Vehicles starting with VIN154972.
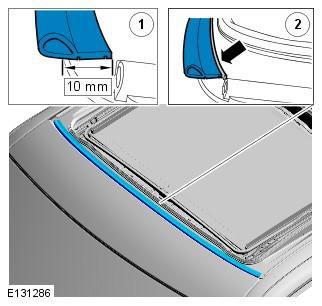
Is the rollback caused by the front acoustic seal of the sunroof opening panel?
Да - Replace the front acoustic seal. Clean all relevant surfaces, then correctly position and adhere the front acoustic seal to the sunroof opening panel. GO to D5.
No - GO to D5.
D5: Glass seal - position
Inspect the sunroof opening panel glass seal.
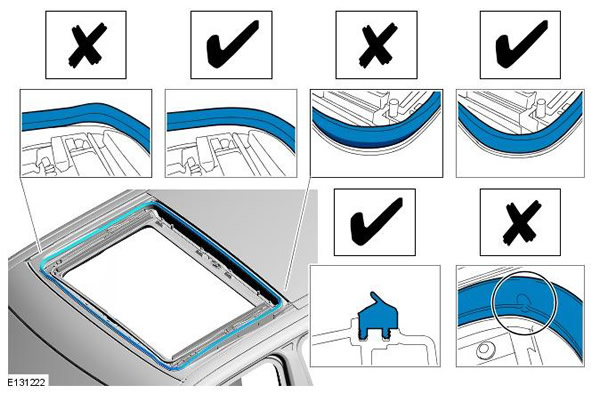
Is the rollback caused by the seal on the sunroof opening panel glass?
Да - Install a new sunroof opening panel glass seal. For additional information, refer to: Sunroof Seal (501-17 Sunroof, Removal and Installation). GO to D6.
No - GO to D6.
D6: Glass panel groove - position
Inspect the sunroof opening panel glass groove.
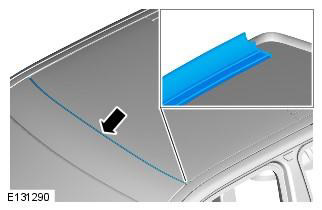
Is the rollback caused by the glass channel of the opening panel of the sunroof?
Да - Replace the glass panel (the gutter is not serviceable). For additional information, refer to: Sunroof Glass (501-17 Sunroof, Removal and Installation). GO to D7.
No * GO TO D7.
D7: correct work
- Perform the manual initialization procedure for the sunroof opening panel. For additional information, refer to: Programming the Motor (501-17 Sunroof, General Procedures).
- Use the overhead switch to move the sunroof opening panel to all possible positions (horizontal open/horizontal close/tilt/lower).
- Use the ceiling switch to activate the one-touch opening panel control function five times in a row.
Да - No additional actions are required.
No - GO to D8.
D8: Air deflector - location
Inspect the sunroof opening panel air deflector.
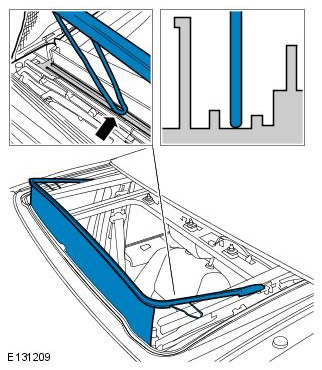
Is the rollback caused by the sunroof opening panel air deflector?
Да - Correctly position and secure (replace if necessary) the sunroof opening panel air deflector. For additional information, refer to: Air Deflector (501-17 Sunroof, Removal and Installation). GO to D7.
No - GO to D9.
D9: glass panel - removed
Inspect and feel the glass panel tracks for debris buildup.
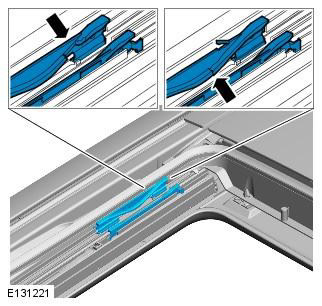
Are the guides clogged?
Да - Clean the glass panel guides. GO to D10.
No - GO to D10.
D10: Guide brackets installed on glass - condition
Inspect and feel the guide brackets installed on the glass for cracks and damage.
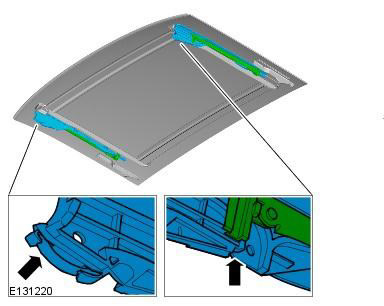
Are the guide brackets on the glass cracked or damaged?
Да - Replace glass panel (guide brackets are not serviceable). GO to D11.
No - GO to D11.
D11: rear runners - condition
Perform a visual and manual inspection of the rear runners and connecting beam for damage (broken parts) and correct positioning.
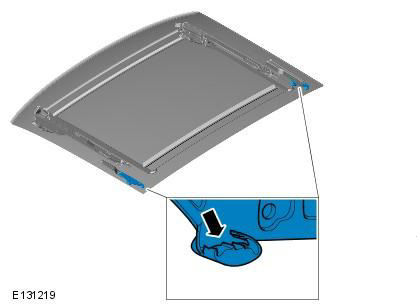
Are the rear runners or connecting rail damaged/seized?
Да - Replace damaged rear runners or link rail if necessary. GO to D12.
No - GO to D12.
D12: Guide brackets mounted on roof rails - condition
Inspect and feel the guide brackets installed on the roof rails for cracks and damage (broken parts).
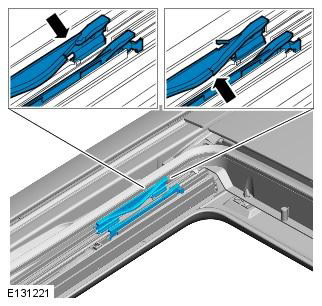
Are the guide brackets on the roof rails cracked or damaged?
Да - Replace the guide brackets on the roof rails if necessary. GO to D13.
No - GO to D13.
D13: Guide brackets mounted on roof rails - position
- Inspect and feel the guide brackets mounted on the roof rails.
- Make sure the guide brackets on the roof rails are positioned correctly and do not move in any direction.
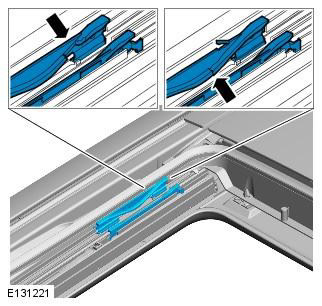
Are the guide brackets on the roof rails positioned correctly and not moving in any direction?
Да - GO to D14.
No - Correctly assemble or replace the guide brackets on the roof rails. GO to D14.
D14: Glass panel - assembly
- Install the glass panel onto the sunroof opening panel.
- Perform the manual initialization procedure for the sunroof opening panel. For additional information, refer to: Programming the Motor (501-17 Sunroof, General Procedures).
- Check that the sunroof opening panel operates correctly.
Да - No additional actions are required.
No - Contact your dealer's technical support service.
Pinpoint Test E: Sunroof Opening Panel Curtain
E1: Sunroof opening panel curtain - action
NOTE: These tests are performed to determine the cause of operating noise, failure to latch, or retraction of the sunroof opening panel shade.
Move the sunroof opening panel curtain in all directions and fix it to the frame.
Does the sunroof opening panel curtain move correctly in all directions and lock into place on the frame?
Да - GO to E2.
No - GO to E8.
E2: Sunroof opening panel curtain - noise during operation
Move the sunroof opening panel curtain in all directions and fix it to the frame.
Is the noise level of the sunroof panel curtain different from another vehicle?
Да - GO to E3.
No - GO to E8.
E3: Sunroof Opening Panel Curtain - Assembly
- Inspect the sunroof opening panel curtain assembly.
- Check that the mounting pins and sliding shoes are positioned correctly.
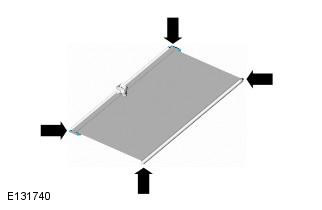
Are the mounting pins and sliding shoes positioned correctly?
Да - GO to E4.
No - Properly assemble the mounting studs or sliding shoes. GO to E2.
E4: Sunroof opening panel curtain - sliding shoes
- Move the sunroof opening panel curtain in all directions and fix it to the frame.
- Inspect, feel and listen for the sunroof opening panel curtain while working.
Да - GO to E5.
No - GO to E7.
E5: Sliding shoe - contamination
- Remove the front edge of the sunroof opening panel curtain, disconnect the sliding shoes from the guides.
- Inspect the guides for clogging.
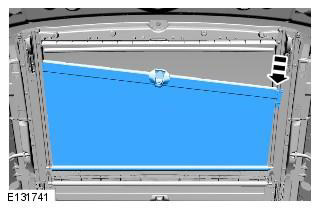
Are the guides clogged?
Да - Clean the guides. Install the sliding shoes in the guides and reinstall the curtain. GO to E1.
No - GO to E6.
E6: Sliding guides / rubber cushions / springs - assembly
Make sure the rubber pads and sliding shoe springs are properly assembled.
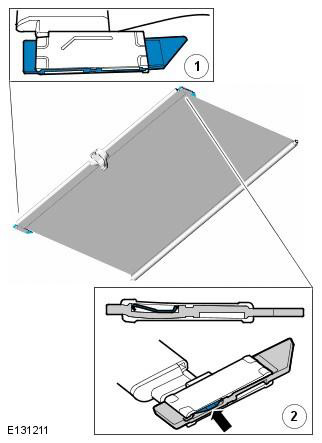
Are the rubber pads and sliding shoe springs assembled correctly?
Да - Replace the sunroof opening panel blind. GO to E7.
No - Correctly install the rubber cushions and springs into the sliding shoes, install the sliding shoes into the guides. GO to E1.
E7: Sunroof opening panel curtain - noise in mechanism
Move the sunroof opening panel curtain in all directions and fix it to the frame.
Is the noise caused by the sunroof opening panel shutter mechanism?
Да - Replace the sunroof opening panel blind. GO to E1.
No - GO to E1.
E8: Sunroof opening panel curtain - lock action
Move the sunroof opening panel curtain in all directions and fix it correctly on the frame.
Is the sunroof opening panel blind latched correctly?
Да - GO to E9.
No - GO to E12.
E9: Sunroof opening panel blind - retract
Move the sunroof opening panel curtain in all directions and then retract it.
Does the sunroof opening panel curtain retract correctly?
Да - GO to E1.
No - GO to E10.
E10: Sunroof Opening Panel Curtain - Winding Procedure
- Remove the sunroof opening panel cover from the sunroof opening panel.
- Perform the procedure for winding the sunroof opening panel curtain onto the retractor mechanism.
- Assemble the sunroof opening panel curtain and install it in place.
Да - GO to E11.
No - Replace the sunroof opening panel blind. GO to E1.
E11: Sunroof opening panel blind - refitting
- Install the sunroof opening panel shade onto the sunroof opening panel. For additional information, refer to: Sunroof Cover Sunshade (501-17 Sunroof, Removal and Installation).
- Move the sunroof opening panel curtain in all directions and then retract it.
Да - No additional actions are required.
No - Replace the sunroof opening panel curtain.
E12: visual inspection
Inspect the sunroof opening panel curtain.
Is the sunroof opening panel curtain handle installed?
Да - GO to E13.
No - Install the sunroof opening panel curtain handle. Check operation.
E13: Replacing the handle
1. Curtain (check)
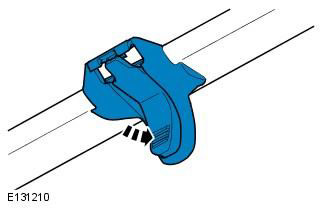
2. Inspect the sunroof opening panel curtain.
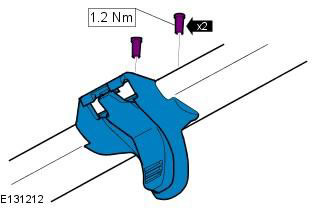
Is the sunroof opening panel curtain handle damaged?
Да - Replace the damaged sunroof opening panel curtain handle. GO to E15.
No - GO to E14.
E14: Curtain - Mounting Pins / Sliding Shoes - Position
Inspect and feel the sunroof opening panel curtain mounting studs and sliding shoes.
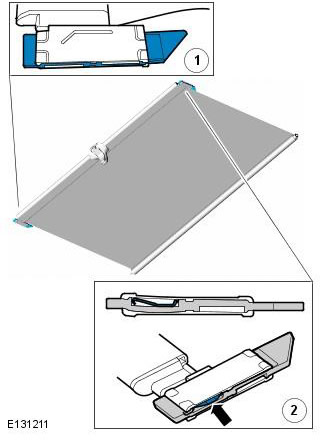
Are the mounting studs and sliding shoes intact and positioned correctly?
Да - GO to E15.
No - Correctly assemble the mounting pins and sliding shoes, install the sunroof opening panel curtain in place. Check the operation.
E15: Sunroof opening panel curtain - damaged
Inspect the sunroof opening panel curtain.
Is the sunroof opening panel curtain beam deformed such that the handle lock has moved away from the frame lock?
Да - Replace the sunroof opening panel curtain.
No - Contact your dealer's technical support service.
Pinpoint test F: water ingress
F1: Drain pipe - inspection
NOTE: These tests are performed to determine the cause of water seepage around the perimeter of the sunroof opening panel.
NOTE: Using the manufacturer's recommended procedure, perform a leak test to locate the water leak; often the best way to do this is to visually inspect the suspected area and examine the water marks.
- Pull the sunroof opening panel back completely.
- Inspect the sunroof opening panel drain tube holes to ensure they are not clogged.
Да - Clean the tubes.
No - GO to F2.
F2: drain pipe - position
1. Provide access to the drain tubes at the sunroof opening panel outlet. For additional information, refer to: Upper Trim - Vehicles Included: Sunroof with Tilt Lid (501-05 Interior Trim, Removal and Installation).
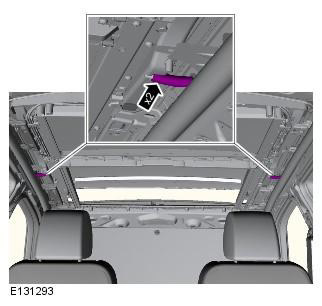
2. Make sure the drain pipes are not bent or twisted.
3. Make sure the drain pipes are connected correctly.
Are the drain tubes properly connected to the sunroof opening panel?
Да - GO to F3.
No - Reinstall the drain pipes correctly, making sure they are not bent or twisted.
F3: Air deflector - folded position
Using the overhead switch, move the sunroof opening panel.
When closing the sunroof glass, does the air deflector fold forward and become pinched between the glass panel and the glass seal?
Да - Install a new air deflector. For more information, refer to: Air Deflector (501-17 Sunroof, Removal and Installation).
No - GO to F4.
F4: Glass panel seal - position
Make sure the sunroof opening panel glass seal is positioned correctly, securely fastened and not twisted.
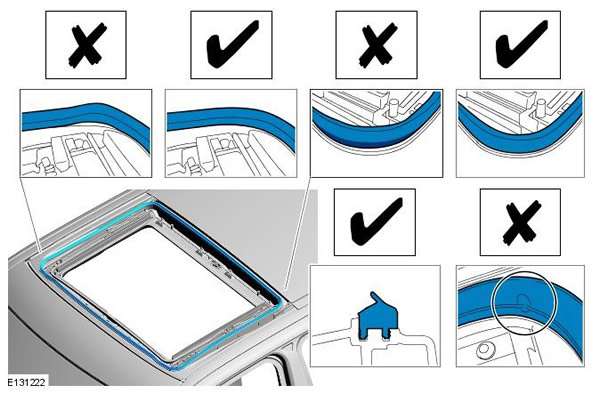
Is the sunroof opening panel glass seal positioned correctly, securely fastened and not twisted? For additional information, refer to: Sunroof Seal (501-17 Sunroof, Removal and Installation).
Да - GO TO F5.
No - Install a new glass panel seal. For additional information, refer to: Sunroof Seal (501-17 Sunroof, Removal and Installation).
F5: Roof hatch - opening
NOTE: In the previous steps it was determined that the water was not leaking through the sunroof opening panel, but through the seal between the vehicle body and the sunroof opening panel frame.
Check the tightness of the seal between the vehicle body and the sunroof opening panel frame to identify where water is leaking.
Is it possible to detect water penetration on the seal between the car body and the sunroof opening panel frame?
Да - Using the manufacturer's recommended process, apply sealant to the water penetration area.
No - No water intrusion found or sunroof opening panel frame must be removed to install weatherstripping. Contact dealer technical support
Pinpoint Test G: Opening Sunroof Panel - Aerodynamic Noise
G1: Opening roof hatch panel - action
NOTE: These tests are performed to determine the cause of aerodynamic noise around the perimeter of the sunroof opening panel.
Use the overhead switch to move the sunroof opening panel to all possible positions (horizontal open/horizontal close/tilt/lower).
Does the sunroof opening panel operate properly?
Да - GO to G2.
No - Proceed to PINPOINT TEST C.
G2: Lateral acoustic seal - position
Inspect the location and secure attachment of the side acoustic seals.
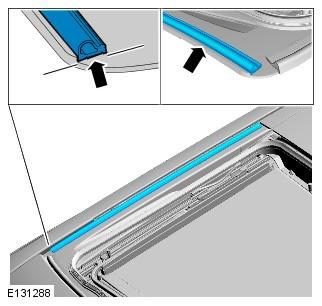
Are the side acoustic seals positioned correctly and bonded to the sunroof opening panel frame?
Да - GO to G3.
No - Properly position and adhere the side acoustic seals to the sunroof opening panel frame. GO to G3.
G3: Front Acoustic Seal - Position
Inspect the location and secure mounting of the front acoustic seals. Vehicles up to VIN 154971. Vehicles starting with VIN154972.
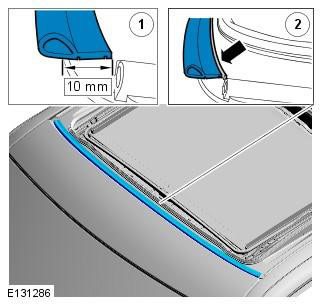
Is the front acoustic seal positioned correctly and bonded to the sunroof opening panel frame?
Да - GO to G4.
No - Replace the front acoustic seal. Clean all relevant surfaces, then correctly position and adhere the front acoustic seal to the sunroof opening panel. GO to G4.
G4: Glass seal - position
Inspect the location and reliability of the glass seal.
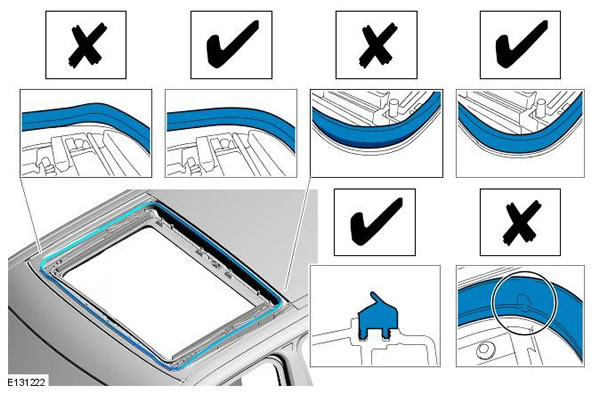
Is the glass seal positioned correctly and bonded to the sunroof opening panel frame?
Да - GO to G5.
No - Replace the glass seal. Clean all relevant surfaces, then properly position and adhere the glass seal to the sunroof opening panel. GO to G5.
G5: Gutter - Position
Inspect the location and reliability of the gutter attachment to the glass panel.
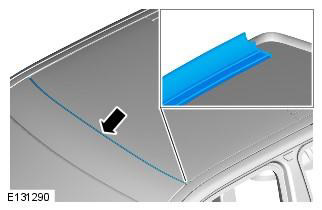
Is the gutter positioned correctly on the glass panel?
Да - GO to G7.
No - Replace glass panel (gutter not serviceable). GO to G6.
G6: initialization
- Perform the manual initialization procedure for the sunroof opening panel. For additional information, refer to: Programming the Motor (501-17 Sunroof, General Procedures).
- Use the overhead switch to move the sunroof opening panel to all possible positions (horizontal open/horizontal close/tilt/lower).
- Check for aerodynamic noise from the opening sunroof panel.
Да - Contact your dealer's technical support service.
No - No additional actions are required.
G7: initialization
- Perform the manual initialization procedure for the sunroof opening panel. For additional information, refer to: Programming the Motor (501-17 Sunroof, General Procedures).
- Check for aerodynamic noise from the opening sunroof panel.
Да - Contact your dealer's technical support service.
No - No additional actions are required.
Pinpoint test H: Seals are loose or displaced
H1: Lateral acoustic seal - position
Inspect the location and secure attachment of the side acoustic seals.
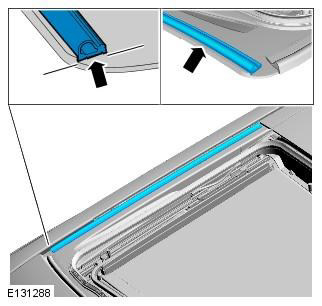
Are the side acoustic seals positioned correctly and bonded to the sunroof opening panel frame?
Да - GO to H2.
No - Properly position and adhere the side acoustic seals to the sunroof opening panel frame. GO to H2.
H2: Front Acoustic Seal - Position
Inspect the location and secure mounting of the front acoustic seals. Vehicles up to VIN 154971. Vehicles starting with VIN154972.
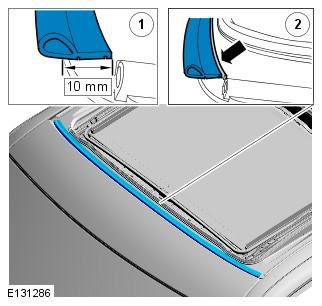
Is the front acoustic seal positioned correctly and bonded to the sunroof opening panel frame?
Да - GO to H3.
No - Properly position and adhere the front acoustic seal to the sunroof opening panel frame. GO to H3.
H3: Glass seal - position
Inspect the location and reliability of the glass seal.
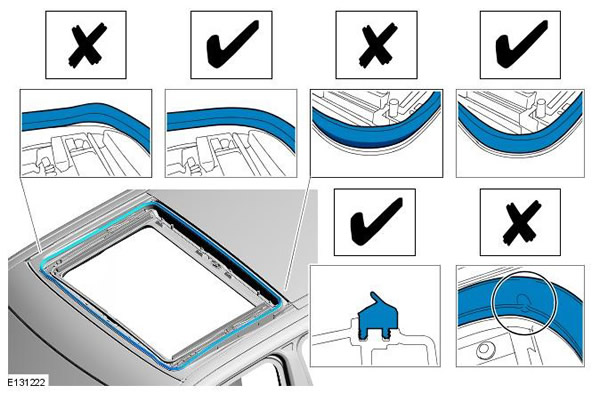
Is the glass seal positioned correctly and bonded to the sunroof opening panel frame?
Да - GO to H4.
No - Replace the glass seal and glue the four corners of the glass seal to the sunroof opening panel frame. GO to H4.
H4: Gutter - Position
Inspect the location, condition and reliability of the gutter attachment to the glass panel.
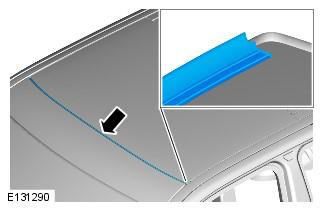
Is the gutter properly positioned on the glass panel and in good condition?
Да - The gutter is correctly positioned on the glass panel. No further action is required.
No - Replace the glass panel (the gutter is not serviceable).
Comments on this article