car logo Ford
car logo Volkswagen
car logo BMW
car logo Opel
car logo Audi
car logo Toyota
car logo Peugeot
English Русский
Български
Беларускі
Український
Српски
Hrvatski
Română
Polski
Slovenský
Magyar


Main
Freelander
Discovery
Range Rover
Defender
Contacts
Articles

Position of mirrors when reversing (Discovery 3)

 
  • Main
  • Discovery
  • Discovery 3
  • Body and coating
  • Seats
  • Position of mirrors when reversing
 
        1  
To give the driver a better view of the curb when reversing, the outside rearview mirrors can tilt downwards. The factory setting is a certain angle, but the owner can change it.

To memorize the rearview mirror settings, follow these steps.
  • Make sure the ignition switch is in position I or II.
  • Perform the memory recall procedure
  • Make sure that the reverse gear is engaged.
  • Manually set the rear view mirrors to the desired position.
  • Press and release the 'memory store' button (preservation)
  • Press and release the button with the desired memory address number
  • The new positions of the rear view mirrors when reversing will be saved in the memory cell corresponding to the number of the pressed key.
Successful completion of the memory write operation is confirmed by a single gong signal on the instrument panel.

Once this procedure is completed, the mirrors will return to the stored position each time the reverse gear is engaged.

Saving the mirror position when reverse gear is engaged affects only one memory address, the contents of the other memory addresses remain unchanged.

To protect against accidental adjustment, the mirror position can only be saved when the mirror position is changed with the reverse gear engaged. If the user does not set the mirror positions when reversing, the mirrors will be set by default to the position stored in the memory controller.

Three personal memory settings can be set for each key. Each memory setting can set three mirror positions when reversing. This corresponds to nine possible rearview mirror positions when reversing. The personal memory settings apply to the last three registered keys.
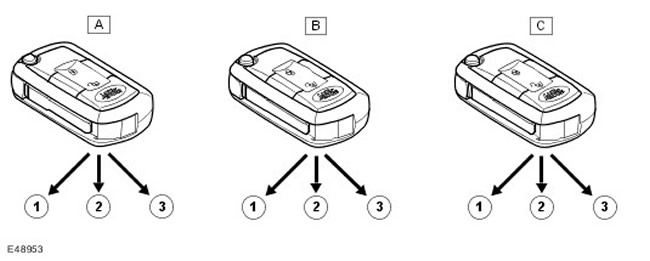


Three personal memory settings can be set for each key. Each memory setting can set three mirror…


Item nameSpare part catalog numberDescription
A-Key registered last
B-The key registered last but one
C-Key registered before the penultimate one
1-Maintaining the first position of the mirror for reversing
2-Saving the second position of the mirror for reversing
3-Maintaining the third position of the mirror for reversing

On vehicles with advanced equipment, the function of memory of the mirror positions when reversing can be activated or cancelled by the driver using the user settings menu in the instrument cluster. The driver can therefore decide whether to use this function or not. For more information, refer to the Information and Message Center (413-08 Information and Message Center)

Information regarding the status of the mirrors when reversing is transmitted via the local area network (LIN) bus on both manual and automatic transmission vehicles.

If the reverse mirror position memory function is set to OFF, all three settings associated with these personal settings stored in memory will be replaced by the standard reverse mirror positions.

NOTE: The mirror can only be adjusted to the reverse position when the ignition switch is in position II.


When the lever is moved from the reverse position to another position, the mirrors immediately return to their original position. (in which they were before the reverse gear was engaged). However, if a request is made to restore the settings stored in memory while reverse gear is engaged, when the lever is moved from the reverse position to another position, the mirrors will return to the position recalled from memory.

On vehicles equipped with a ZF automatic transmission, there is a half-second delay after the reverse gear is engaged and before the mirror starts to move. This is necessary to prevent the mirrors from moving when the gear selector is switched from the reverse position to the parking position.


This article is available at russian, bulgarian, belarusian, ukrainian, serbian, croatian, romanian, polish, slovak, hungarian
Article review: Saveliy Ushakov


Previous articles
Specification
The structure and technical description of the seats
Manual adjustment of front seats
Front seats with electrical adjustment
Driver's seat with memory adjustments

Current article
Position of mirrors when reversing

Next articles
Steering column adjustment
Seat Memory Controller
Heated seats
Seat control system diagram
Diagnostics and testing of seats
Index of DTC codes
40/20/40 split rear seat
60/40 split rear seat


Similar articles from Land Rover repair manuals:
• Crankshaft position sensor Freelander 2 (2006-2014)
• Throttle Position Sensor: After May 2003 Freelander 1 (1997-2006)
• Left camshaft position control valve (VCC) Range Rover 3 (2001-2012)
• Crankshaft Position Sensor (CKP) — Removal and Installation Defender 2007+ (2007-2016)

Comments on this article

Юрий
28.07.2020
22:43
Добрый вечер! Нужна помощь! Перестало опускаться правое зеркало при включении заднего хода на Рендж Ровер 2007 года. Куда-то нажал, но не знаю куда) Пробывал программировать не получается 1- включил зажигание 2-перевёл режим ручки в R. 3- опустил правое зеркало в низ. 4- нажал кнопку М с боку сидения. 5- перевёл в режим D и ничего не поменялось! Подскажите пожалуйста! Может я что-то не так делаю!
answer quote


How much will 14 + 17 =


Discovery 3 
  • General information
  • Using the manual
  • Precautionary measures
  • Service Information
  • Technique
  • Health protection
  • Road test
  • Identification codes
  • Jacking and lifting
  • Maintenance - diesel
  • Maintenance - petrol
  • Chassis
  • Suspension
  • Front suspension
  • Rear suspension
  • Wheels and tires
  • Dynamic suspension
  • Cardan shaft
  • Rear drive axle
  • Front drive axle
  • Front axle axles
  • Rear axle axles
  • Brake system
  • Parking brake
  • Hydraulic brake
  • Vacuum brake booster
  • Anti-lock braking system
  • Steering
  • Steering column
  • Power unit
  • Petrol engine 4.0L
  • Petrol engine 4.4L
  • Diesel engine 2.7L
  • Engine cooling
  • Fuel supply
  • Drive units
  • Launch system
  • Ignition system
  • Emission reduction
  • Air filtration
  • Fuel vapor control
  • Electronic control part
  • Car gearbox
  • Clutch
  • All-wheel drive systems
  • Transfer case
  • Exhaust system
  • Fuel tank and lines
  • Acceleration control
  • Electrical equipment
  • Climate control
  • Instruments and control lamps
  • Battery and charging system
  • Information system
  • Lighting and headlights
  • Power distribution
  • Electronic Function Group
  • Body and coating
  • Body elements
  • Interior and body trim
  • Mirrors and glasses
  • Seats
  • Instrument panel and console
  • Handles and locks
  • Windshield wipers and washers
  • Sunroof and bumpers
  • Safety system
  • Body repairs
  • Repair of front end elements
  • Repair of back elements
  • Side panel repair
  • Frame and body mount

Discovery 1 
  • General information
  • Technical specifications
  • Introduction to manual
  • Troubleshooting
  • Power unit
  • Diesel engine Tdi
  • Petrol engine V8i (3.9 l)
  • Petrol engine V8i (4.0 l)
  • Petrol engine Mpi
  • Reducing harmful emissions
  • Fuel system Tdi
  • Fuel system MFi
  • Fuel system SFi
  • Fuel system MPi (MEMS)
  • Cruise control
  • Cooling system (Tdi)
  • Cooling system (V8i)
  • Cooling system (MPi)
  • Exhaust system
  • Transmission
  • Clutch
  • Manual gearbox R380
  • Manual gearbox LT 77
  • Transfer case LT230T
  • Automatic gearbox
  • Cardan shaft
  • Rear axle
  • Front axle
  • Chassis
  • Steering system
  • Front suspension
  • Rear suspension
  • Brake system
  • Wheels and tires
  • Body and interior
  • Passive safety
  • Doors, locks and windows
  • Exterior body parts
  • Interior trim details
  • Seats
  • Electrical equipment
  • Heating and ventilation
  • Air conditioning
  • Windscreen wipers
  • Starting and charging system
  • Equipment and devices
  • Lighting and headlights


LRman.ru © 2013-2026 | Mobile version | Free Lander | Discovery | Range Rover | Defender | Contacts | | Sitemap |
Car repair and service instructions Land Rover: Freelander, Discovery, Range Rover, Defender
We use cookies to make pages load faster and provide a more user-friendly experience 🍪