Contents: Removal ⇩ Installation ⇩
Removal
1. Remove the headliner. For more information, refer to Headliner (76.64.15)
2. Disconnect the 4 drain hoses from the sunroof panel.
3. Disconnect the sunroof motor electrical connector.
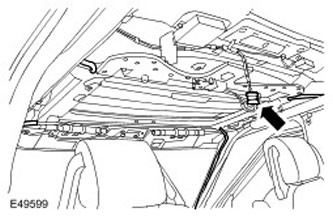
4. Using assistance, remove the hatch panel assembly. Remove the 11 bolts.
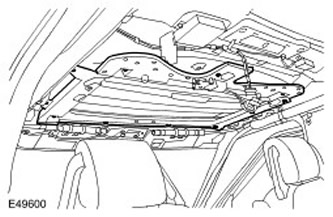
5.
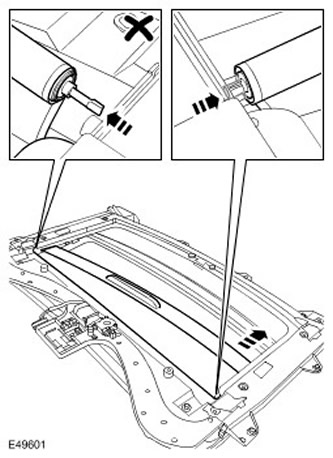
CAUTION: Do not press the right plunger to remove the curtain.
NOTE: Do not perform further disassembly if the part is removed only for access.
NOTE: Remember the position in which the part is installed.
Remove the sunroof curtain.
- Turn the handle to remove it.
- Press the left plunger.
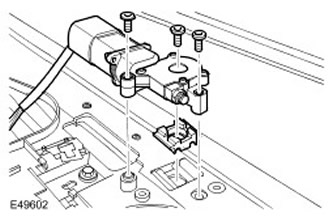
6. Remove the sunroof motor.
- Remove 3 Torx head screws.
- Remove the spacer sleeve.
Installation
1. Install the sunroof motor.
- Install the spacer sleeve.
- Tighten the Torx head screws (tightening torque 4 Nm).
NOTE: Align the parts back to their original positions.
Install the sunroof curtain.
- Insert the curtain into the guides.
- Align the tensioner pin.
- Press the left plunger.
- Clean the contact surfaces of the parts.
- Tighten the bolts (tightening torque 10 Nm).
5. Attach the drain hoses. Make sure the drain hoses are clean before installing them.
6. Install the headliner. For more information, refer to Headliner (76.64.15)
7. Using the T4 device, select the settings for the new sunroof motor.
8. If the battery is disconnected, the one-touch and trauma safety functions will be unavailable. Close the sunroof panel and keep the switch pressed for another 20 seconds until the sunroof completes a full cycle. This will complete the sunroof calibration procedure and reset these functions.
Comments on this article