Contents: Hydraulic control unit ⇩ HCU diagram ⇩
The ABS module controls the brake functions by acting on the HCU to modulate the hydraulic pressure supplied to the brakes of individual wheels.
The ABS module is attached to the HCU and forms a single unit with it. A 47-pin electrical connector provides electrical communication between the ABS module and the vehicle's electrical system. Information from the ABS module can be read using Land Rover approved diagnostic equipment.
Hydraulic control unit
The HCU is a 4-channel unit that modulates the hydraulic pressure supply to the brakes under the control of the ABS module.
The outputs of the primary and secondary circuits of the master cylinder are connected to the primary and secondary circuits of the HCU. For more information, refer to the chapter: Hydraulic Brake System (206-06 Hydraulic Brake System, Description and Operation). Each of the HCU circuits contains the following elements that control the supply of hydraulic pressure to the brakes:
- Normally open control valve with electromagnetic control to provide active braking.
- Normally closed solenoid operated filling valve to connect the brake fluid reservoir to the dual circuit hydraulic pump during active braking.
- Hydraulic pump to generate hydraulic pressure for active braking and return brake fluid to the reservoir.
- Normally open solenoid-controlled inlet valves and normally closed solenoid-controlled outlet valves to modulate the hydraulic pressure to the individual brakes.
- Accumulator and relief valve to allow rapid release of pressure from the brakes.
- Filters to protect internal elements from contamination.
The primary circuit also includes a pressure sensor that provides the ABS module with a hydraulic pressure signal.
The contact pins on the HCU mate with the contacts on the ABS module to provide electrical connections between the ABS module and the dual circuit hydraulic pump motor and pressure sensor. The solenoids that operate the valves are mounted in the ABS module.
HCU diagram
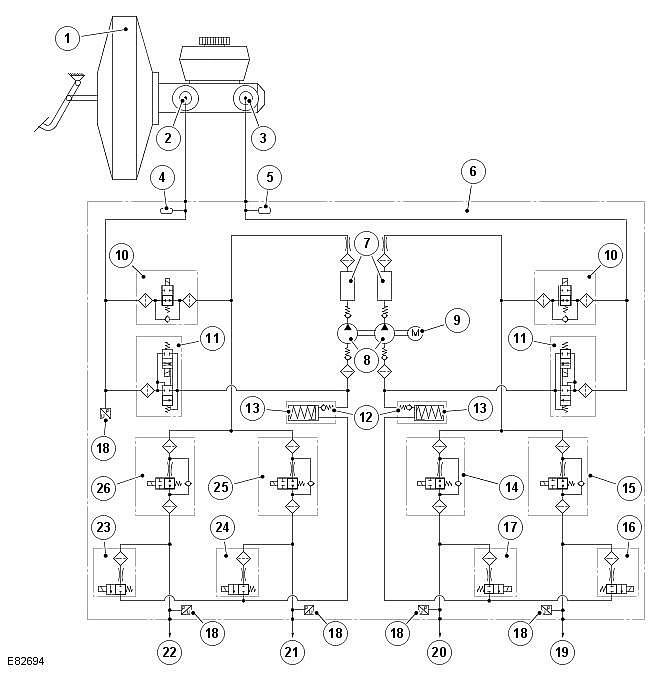
| Pos. | Spare part number | Name |
| 1 | - | Vacuum brake booster |
| 2 | - | Primary hydraulic circuit |
| 3 | - | Secondary hydraulic circuit |
| 4 | - | Pulsation dampener |
| 5 | - | Pulsation dampener |
| 6 | - | HCU |
| 7 | - | Damping chamber |
| 8 | - | Dual circuit hydraulic pump |
| 9 | - | DC electric motor |
| 10 | - | Solenoid control valve (2 pcs.) |
| 11 | - | Electromagnetic filling valve (2 pcs.) |
| 12 | - | Check valve |
| 13 | - | Low pressure accumulator (2 pcs.) |
| 14 | - | Solenoid Inlet Valve (Right Rear Brake) |
| 15 | - | Solenoid Inlet Valve (Left Front Brake) |
| 16 | - | Solenoid release valve (left front brake) |
| 17 | - | Solenoid release valve (right rear brake) |
| 18 | - | Pressure sensor (5 pcs.) |
| 19 | - | Left front brake (secondary circuit) |
| 20 | - | Right rear brake (secondary circuit) |
| 21 | - | Left rear brake (primary circuit) |
| 22 | - | Right front brake (primary circuit) |
| 23 | - | Solenoid release valve (right front brake) |
| 24 | - | Solenoid release valve (left rear brake) |
| 25 | - | Solenoid Inlet Valve (Left Rear Brake) |
| 26 | - | Solenoid Inlet Valve (Right Front Brake) |
HCU has three operating modes:
- Normal Braking/EBD
- Braking with ABS
- Active braking
Normal Braking/EBD Mode
Initially, all solenoids are deactivated. Operation of the brake pedal causes a corresponding increase or decrease in brake pressure, via the open control valves and inlet valves. If the ABS module determines that EBD operation is necessary, it activates the inlet valves for both rear brakes to prevent any further increase in brake hydraulic pressure.
NOTE: The EBD function controls the rear brakes only.
(The article is based on data from the website: www.lrman.ru)
Braking mode with ABS
If the ABS module determines that ABS braking is necessary, it activates the inlet and outlet valves of the appropriate brake and turns on the return hydraulic pump. The inlet valve closes to isolate the brake from the pressurized fluid; the exhaust valve opens to release pressure from the brake into the accumulator and return pump circuit. The reduced hydraulic pressure allows the wheel to accelerate. The ABS module then activates the inlet and outlet valves to modulate the brake pressure to apply maximum braking force without locking the wheel. The valves are controlled individually for each wheel.
Active braking mode
Active Brake Mode is used to generate and control hydraulic pressure supplied to the brakes for functions other than normal braking and ABS braking, such as RSC, DSC, EBA, ETC, HDC.
During active braking, the ABS module activates the control valves and filler valves, starts the return pump and activates all inlet valves. The brake fluid, which is drawn from the reservoir through the master cylinder and filler valve, is pumped by the return pump and supplied to the inlet valves. The ABS module then activates the inlet and outlet valves as needed to modulate the pressure in the individual brakes. Some noise may occur during active braking.
Service information
The ABS module includes the HCU and the Electronic Control Unit (ECU) and should not be separated. The ABS module and HCU assembly is supplied as a single unit in a pre-charged condition.
NOTE: The ABS module, HCU and sensor assembly are fragile items and should be discarded if dropped or damaged.
Comments on this article