Contents: General information ⇩ Genuine Land Rover Parts ⇩ Protection against corrosion of new…⇩ Welding elements ⇩ Apply welding primer ⇩ Partial replacement ⇩ Applying cavity wax to door sill…⇩ Classification of various corrosion…⇩ Classification of various corrosion…⇩ Materials for body sealing ⇩ Material Application…⇩ Sealing materials for the underbody ⇩ The area of application of sealant…⇩ Precautions for body repair work ⇩ Do-it-yourself anti-corrosion…⇩ Installation of permitted accessories ⇩ Steam cleaning ⇩ Inspection as part of maintenance ⇩ Repair of the protective coating of…⇩ Structural adhesive ⇩ Sections bonded with structural…⇩ Sound insulation with foam material ⇩ Sound insulation placement, front…⇩ Soundproofing position, rear side…⇩ Weld Sealant ⇩ Seam sealant on the back ⇩ Seam Sealant for Bottom Seams ⇩ Wax sealant for closed cavities ⇩ Areas of application of protective…⇩ Areas where protective wax coating…⇩
General information
The anti-corrosion coating applied during the manufacture of the vehicle must be carefully preserved and/or the protective layer restored during and after body repair work. Only in this case conditions are ensured that prevent through corrosion.
Only genuine Land Rover body parts and materials can be used for body repairs (sealants, paint, etc.), authorized for use by this company.
Genuine Land Rover Parts
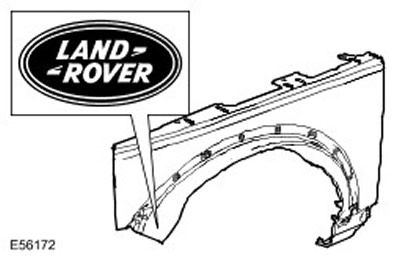
All Land Rover body repair parts are cathodically coated. Individual body parts are galvanized on one or both sides (in different zones depending on the car model).
Together with the elastic paint coating, this guarantees optimum, high-quality protection against corrosion caused by impacts from small objects such as gravel.
NOTE: Personal protective coverings (galvanized, cathodic coating) should not, as far as possible, be damaged or destroyed by sandblasting or other mechanical operations.
If after straightening work in the area where body parts meet (for example, in the area of the door hinges) hairline cracks appear, then it is necessary to restore the corrosion protection to the level provided by the factory technology. If necessary, the paintwork should be completely restored. The same applies to the straightening of complex profiles (for example, a floor panel). If necessary, renew or refresh the paintwork, sealant beads and underbody protection.
After repair, primer should be applied to all interior surfaces that will not be visible or accessible before applying cavity wax. To ensure an even coating on interior surfaces, the entire cavity should be sprayed thoroughly. (twice, with intermediate drying).
If body panels are exposed to strong heating during repair, this inevitably leads to damage or even destruction of the structure of the anti-corrosion coating. Heating reduces the effectiveness of the cavity protection material. Therefore, it is necessary to re-treat the damaged areas.
Welds must be cleaned before applying the anti-corrosion protective coating.
The corrosion protection measures that must be taken when replacing body parts are described on the following pages.
Protection against corrosion of new parts
All new components should be inspected for damage during shipping, such as scratches or dents. Depending on the extent of the damage, the following steps may be necessary:
Undamaged new part
- Do not strip the cathodic primer coating.
- Clean the surface thoroughly with silicone remover and wipe dry.
Slightly damaged new part
- Sand down the scratches
- Sand the surrounding area thoroughly.
- Clean the surface thoroughly with silicone remover and wipe dry.
- Apply an anti-corrosion primer to the cleaned areas.
Damaged new parts (bulges and dents)
- Sandblast the dented areas down to bare metal.
- Apply polyester based filler (only on a surface cleaned to bare metal)
- Apply putty.
- Lightly sand the entire piece.
- Clean the surface thoroughly with silicone remover and wipe dry.
- Apply an anti-corrosion primer to the cleaned areas.
Welding elements
Using a rotating wire brush, remove the coating from the inside and outside of the area to be welded, being careful not to damage the zinc coating.
NOTE: The areas to be cleaned should be as small as possible in size and the anti-corrosion coating applied during the manufacture of the vehicle should be removed. (cathode primer), should be preserved to the greatest possible extent.
NOTE: Welding primer should be stirred well before application.
Clean the repair area thoroughly. (silicone remover).
Apply welding primer evenly to all flanges to be welded. (old and new).
NOTE: The welding primer must be dried before welding.
Apply welding primer
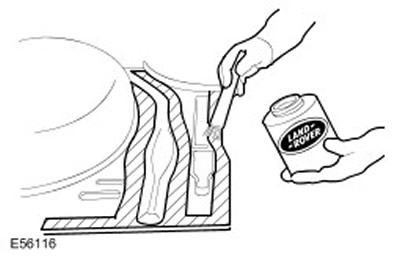
The weld beads should be removed after welding is completed, taking care not to weaken the material.
All weld irregularities must be removed.
If necessary, spot weld missing T-pins to secure trim tape clips in position. The vehicle should be completely cleaned of abrasive dust and metal shavings to prevent corrosion.
Clean and prime all interior areas and areas to be sealed.
NOTE: Allow primer to dry before applying sealant or underbody coating. Do not use solvents when applying sealant. (the sealant will not dry).
Partial replacement
When replacing parts, follow the procedure described in the "Welded Parts" section.
The main difference between partial replacement of components and complete replacement is the preparation of butt and overlap seams.
- When cutting body parts, care should be taken to properly remove paint and zinc coating on internal areas. This applies primarily to hard-to-reach internal areas.
- To ensure the quality of the weld, it is important that the inner surface is cleaned down to the metal. The remains of zinc and paint coating in the weld area burn out and form significant gaps during welding.
- If the zinc layer and paint coating are not removed, the zinc and paint will burn during the welding process. The resulting soot prevents proper protection of the cavity.
Sequence of actions
- Remove a 30mm wide layer of paint along the weld line using a rotating wire brush.
- This operation should be performed on both new and old body parts.
- Depending on the body element, the lower zinc layer should also be removed in a 10 mm wide area along the weld line.
NOTE: If the cavity is small, a flat scraper or wire brush can be used instead of a rotary brush. Do not use an angle grinder, as this may weaken the structure.
Applying cavity wax to door sill panel after partial repair
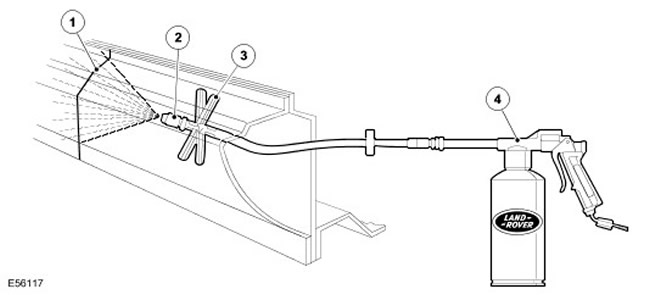
| Item name | Spare part catalog number | Description |
| 1 | - | Welding bead |
| 2 | - | Spray head |
| 3 | - | Spacer element |
| 4 | - | Spray |
Classification of various corrosion protection measures for dent removal
| Method of protection against corrosion | External surfaces | Accessible internal surfaces | Inaccessible internal surfaces |
| Coloring | X | X | |
| Protection of cavities | X |
Classification of various corrosion protection measures when installing new parts
| Method of protection against corrosion | Welded flanges before welding in the required position (contact surfaces) | All areas stripped down to bare metal | Accessible weldable flange area | Inaccessible area of the welded flange |
| Welding primer coating | X | |||
| Coloring | X | X | ||
| Curved edge protection | X | |||
| Protection of cavities | X |
Materials for body sealing
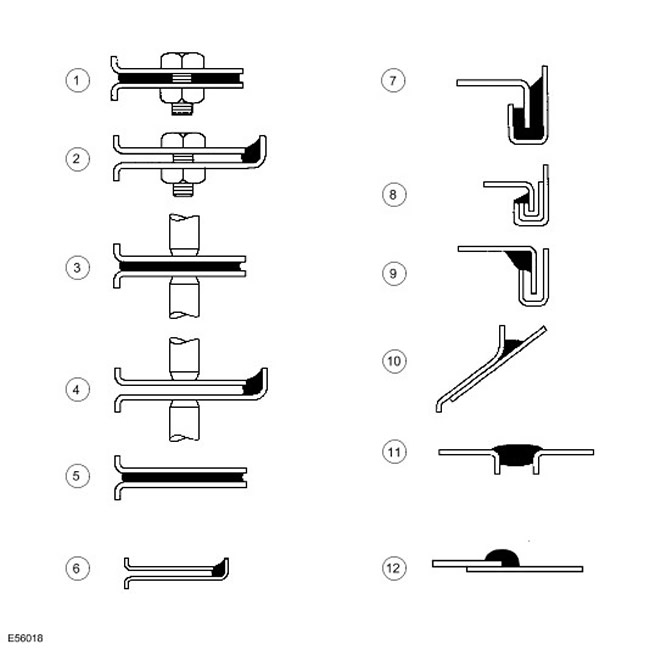
| Item name | Spare part catalog number | Description |
| 1 | Between the panels - bolted connection | |
| 2 | Between the edges of the panels there is a bolted connection | |
| 3 | Between panels - connection by spot welding | |
| 4 | Between the edges of the panels - connection by spot welding | |
| 5 | Between the panels - connection with glue | |
| 6 | Between the edges of the panels there is a connection with glue | |
| 7 | Lock connection - type A | |
| 8 | Lock connection - type B | |
| 9 | Lock connection - type C | |
| 10 | Gaps between panels - type A | |
| 11 | Gaps between panels - type B | |
| 12 | Lap joint |
| Description - Application | Supplier | Spare part number |
| Wax sealants for filling cavities | - | - |
| Sealant for internal cavities (amber color) | 3M | 0890/11/21 |
| Sealant for internal cavities (transparent) | 3M | 08909/19/29 |
| Wax sealant for closed cavities | Croda | PW57 |
| Engine bay wax sealants/varnishes | ||
| Engine bay wax sealant and cosmetic coating Astrolan | Astors | DA3243/1 |
| Sealant and varnish for engine compartment and cosmetic purposes | Croda | PW197 |
| Cosmetic varnish for engine bay | Dinol | 4010 |
| Various materials | - | - |
| Auto Adhesive Aerosol (Trim) - adhesive mastic for decorative parts | 3M | 08080 |
| Material for repair of elastic parts - parts made of polypropylene modified with rubber | 3M | 05900 |
| Soundproofing foam (sika baffle 278) - block repair using expanding foam | Sika | Land Rover Part Number: AZL 500021. Ford Part Number: 6H22-11840-AA |
| Elastic foam (vibration absorption) - between panels | Duramix | 4320 |
| Water Shedder Repair Aerosol (to remove moisture) | Teroson | - |
| Low temperature anti-corrosion coating (for magnesium alloys) | Land Rover | VEP 501 840 PMA |
| Materials for sealing seams | ||
| Body sealing - gaps between panels (type b) | 3M | 08568 |
| Drip Check Clear - sealing of bolted, spot welded, glued joints, gaps between panels of type (a) and (b), joints in a lock of type (c) | 3M | 08401 |
| Drip Chek Heavy - type (b) gaps between panels, type (c) locking joints | 3M | 08531 |
| Polyurethane Seam Sealer - polyurethane based sealant for bolted, spot welded, glued joints, type (a) and (b) gaps between panels, type (b) lock joints | 3M | 08684/89/94 |
| Polyurethane Sealer (Sachet) - polyurethane based sealant for bolted edge joints, type (b) lock joints | 3M | 08703/83/88 |
| Aerosol sealant - for overlap joints | 3M | 08800/23 |
| Super Seam Sealer - sealant for overlap joints, in type (b) lock | 3M | 08537 |
| Weld Thru' Sealer - penetrating sealant for spot weld joints | 3M | 08626 |
| Betafill Clinch and Brushable Sealer - brush applied sealant for type (b) lock joints | Gurit-Essex | 10211/15/20 |
| Joints, seams and bottom sealing - overlap joints | Gurit-Essex | 10101/10707 |
| Leak Check Clear - sealing of bolted, spot welded, glued joints, gaps between panels of type (a), joints in a lock of type (c) | Kent Industries | 10075 |
| Putty - sealant for filling gaps between panels type (b) | Kent Industries | - |
| Polyurethane Seam Sealer - polyurethane based sealant for bolted, spot welded, glued joints, joints between laminated panels, gaps between panels of type (a) and (b), joints in a lock of type (b) | PPG | 6500 |
| Polyurethane Seam Sealer - polyurethane based sealant for bolted, spot welded, glued joints, joints between glued panels, gaps between type (b) panels | Teroson | 92 |
| Terolan Light Seam Sealer - sealant for bolted, spot welded, glued joints, gaps between panels of type (a) and (b), between glued panels, joints in a lock of type (c) | Teroson | - |
| Terolan Special Brushable Seam Sealer is a brush-applied sealant for overlapping seams. | Teroson | - |
| Terostat Sprayable Seam Sealer - aerosol sealant for bolted, spot welded, glued joints, joints between glued panels, gaps between type (b) panels | Teroson | 9320 |
| Terostat 1K PU Seam Sealer (SE 20) - gaps between panels of type (a) and (b), spot welds and glued panel edges. | Teroson | - |
| Sealing Compound - sealant for bolted, spot welded, glued joints, joints between glued panels, gaps between type (b) panels | Wurths | 8901001/-/6 |
| Adhesives for body frame (structural) | ||
| Automotive Structural Adhesive - for sealing joints on glue, joints in a lock type (a) | 3M | 08115 |
| Two Part Structural Epoxy (two-component epoxy resin for body frame) - for adhesive and spot welding connections, for type (a) lock connections | Ciba-Geigy | XB5 106/7 |
| Sealing materials for the underbody | ||
| Body-Schutz | 3M | 08861 |
| Spray-Schutz | 3M | 08877 |
| Crodapol Brushable Underbody sealer (underbody sealant) | Croda | PV75 |
| Terotex Underseal (CP02) (for underbody) | Teroson | 9320 |
| Wax mastics for the underbody | ||
| Anti-gravel coating (smooth) | 3M | 08158/9 |
| Mastic for the underbody | Croda | PW61 |
| Mastic for the underbody | Dinol | Tectacote 205 |
| Penetrating primers for welds | ||
| Weld Thru' Coating (penetrating coatings for welds) | 3M | 05913 |
| Zinc Spray (aerosol zinc primer) | 3M | 09113 |
| Zinc Rich Primer (zinc primer) | ICI | p-565 634 |
Material Application Equipment/Suppliers
3M
- Automotive Trade Group
- 3M UK Pic
- 3M House
- PO Box 1
- Market Place
- Bracknell
- Berks
- RG12 1JU
- Phone (01344) 858611
- Burgess Hill
- Sussex
- RH 15 9LA
- Phone (014446) 42526
- Minden Industrial equipment
- 16 Greyfriars Road
- Moreton Hall
- Bury St Edmunds
- Suffolk
- IP32 7DX
- Phone (01284) 760791
- Watchmead
- Welwyn Garden City
- Hertfordshire
- AL7 1JB
- Phone 01707 358800
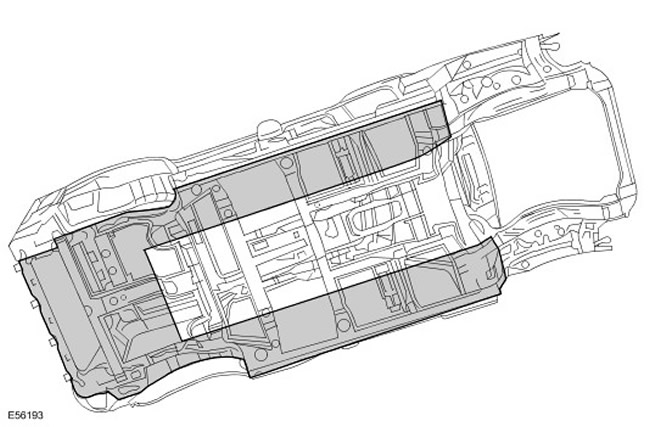
Sealing materials for the underbody
The underbody surface and outer sill panels are treated with Plastisol PVC underbody sealant. This material is not suitable for re-treatment. When repairing underbody areas with damaged sealant layer, sand the factory underbody coating in the damaged area down to the metal. Make sure that the treated area is sanded to a metallic shine and that the edges of the remaining coating sealant layer are securely bonded to the panel surface.
Apply a new coat of underbody sealer after applying primer but before applying paint. Apply weld sealer before applying underbody sealer. Make sure all plugs and grommets in the floor panel are (except for plugs of holes through which sealant is applied) installed in place before applying underbody sealant. Use a heat gun to reinstall any hot-melt plugs damaged during repair or replace them with rubber bushings.
CAUTION: Before applying new underbody sealant, cover all suspension components, wheels, tires, power pack, drive shafts, exhaust pipe and brakes. (including all attachment points).
The area of application of sealant on the bottom of the car
Precautions for body repair work
Be careful when carrying out repair work in the workshop. The sealant and wax protective coating of the underbody, weld seals, body panels can be damaged as a result of careless lifting of the car.
Do-it-yourself anti-corrosion treatment
It is not recommended to apply rust protection treatments yourself, in addition to the factory treatment, as this may void the vehicle's rust protection warranty. This does not apply to approved wax protection compounds that are compatible with and can be applied over the existing coating.
Installation of permitted accessories
When installing additional accessories, ensure that the vehicle's anti-corrosion protection is not compromised by either damage to the protective layer or the formation of moisture-retaining areas.
Do not drive self-tapping screws directly into body panels. To do this, first install the appropriate plastic inserts. When drilling holes in panels, chassis elements and other body parts, always treat the edges of the holes with a suitable zinc or acid primer, and then apply a protective wax mastic to the area around the hole with a brush.
Do not install accessories directly on painted metal surfaces to body panels without prior protective treatment. When joining metal surfaces to each other with bolts, always treat the joint surfaces with weldable zinc primer, place zinc tape or protective material between the surfaces.
Steam cleaning
Due to the high heat and pressure of steam cleaning, some adhesives and anti-corrosion materials may soften or melt.
Do not direct the steam jet at one place for too long and place the equipment nozzle no closer than 300 mm from the body surface.
CAUTION: Do not remove protective wax or paint from the underbody surface during repair work.
Inspection as part of maintenance
A mandatory condition for the effective operation of the factory anti-corrosion coating of the body is to have its condition checked by an authorized Land Rover dealer at least once a year.
Repair any body damage or corrosion found during inspection as early as possible to minimize damage levels and ensure the effectiveness and longevity of the factory anti-corrosion coating.
Repair of the protective coating of the bottom
In any case, when performing body repairs, ensure that the sealing and anti-corrosion coating is fully restored. This applies to both damaged areas and areas where the coating has been damaged, for example accidentally or during repairs.
Before straightening or shaping a deformed area, remove the anti-corrosion coating from the damaged areas. This applies primarily to panels with a protective wax coating, PVC-based sealant for the underbody, sound-absorbing pads, etc.
CAUTION: Do not use an oxy-acetylene torch to remove anti-corrosion coatings. When these coating materials burn, they emit large amounts of gases and smoke.
The most common method of removing sealant is to use a heat gun with a scraper. The high temperatures generated by this equipment can cause smoke to be released, so care must be taken.
Structural adhesive
Metal adhesive is applied to critical seam areas during factory body assembly. The material used is a high-temperature, thermosetting compound based on acrylonitrile and phenol-formaldehyde resin. The material bonds two metal surfaces together, while also acting as a sealant to prevent dirt, moisture, and gases from entering the joint. This material is not intended for use in body repair, so an approved structural adhesive for load-bearing body elements should be used instead.
CAUTION: When separating parts joined together with metal adhesive, it is important not to deform the joint. Gradually heat the joint until the adhesive softens enough to allow easy separation of the glued panels.
NOTE: When spot welding is performed on a joint between parts joined with metal adhesive, process parameters must be carefully selected to ensure a reliable weld.
Sections bonded with structural adhesive
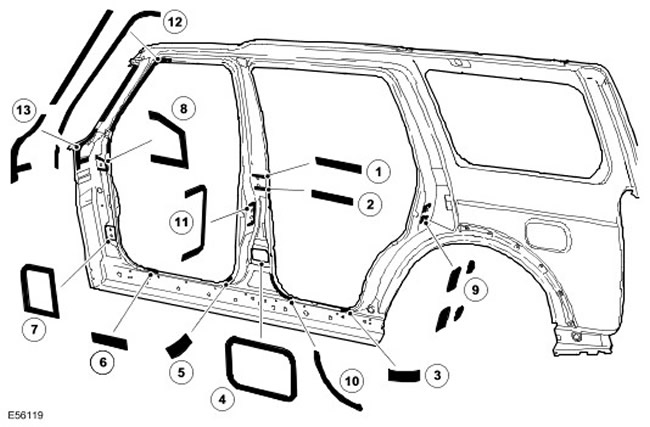
| Name | Usage | Operating principle |
| 1 | Upper hinge of the right and left middle pillars of the body | Structural adhesive |
| 2 | Upper hinge of the right and left middle pillars of the body | Structural adhesive |
| 3 | Right and left rear door sill panels | Structural adhesive |
| 4 | Right and left rear door sill panels | Structural adhesive |
| 5 | Right and left front door sill panels | Structural adhesive |
| 6 | Right and left front door sill panels | Structural adhesive |
| 7 | Lower hinge of the right and left front body pillars | Structural adhesive |
| 8 | Upper hinge of the right and left front body pillars | Structural adhesive |
| 9 | Rear pillar retainer reinforcement | Structural adhesive |
| 10 | Gap between the rear door and the B-pillar | Structural adhesive |
| 11 | Latch surface on the B-pillar | Structural adhesive |
| 12 | Gap between the front door and the front body pillar | Structural adhesive |
| 13 | Gap between waterproofing and front body pillar | Structural adhesive |
Welding seams located symmetrically to those shown in the figure are also subject to treatment. Apply a 3 mm bead of the composition to all marked panel joints. Do not cover the threshold drainage holes with glue.
Information obtained from the website www.LRman.ru
Sound insulation with foam material
Expanding foam sound deadening seals are used in various closed cavities of the car body to improve the performance of the car. These seals are applied during the manufacturing process of the car and expand during the painting process to increase the volume approximately 10 times, thus fixing it in place. Sound deadening seals are placed in such a way that they impede the penetration of sound into the interior through the structural elements and through the air.
Depending on their location, these seals can have a dual purpose. Seals located at the base of the body pillars are primarily designed to isolate the body from water when overcoming water obstacles. An additional purpose of these seals is sound insulation and protection against dust penetration.
The main purpose of the seal around the fuel filler neck is to protect against fuel and water penetration. The auxiliary purpose of this seal is sound insulation and protection against dust penetration.
The main purpose of the remaining seals is to prevent the transmission of sound into the passenger compartment through structural elements and through the air.
Another advantage of using sealing materials is a significant increase in the rigidity and strength of body elements, which improves safety in the event of a collision.
These seals are made using the foaming polymer 'Sika Baffle 250.'
Replacing foam soundproofing seals
Since the annealing temperature of parts during painting during repair operations is significantly lower than during factory painting, a different technology is required when replacing seals during repairs.
After a repair involving the replacement of a structural element containing foamed sound insulation, an approved foamed sound insulation sealant is introduced into the new element. The foamed sound insulation sealant is introduced after the painting work is completed. (where possible). When applying foaming material, it must fill the entire cavity space.
Sound insulation placement, front reinforcement
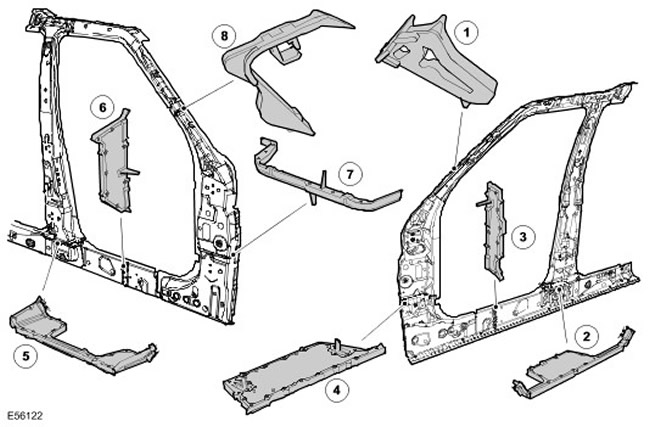
| Name | Description | Operating principle | Part number according to the repair catalog |
| 1 | Upper inner panel of the front body pillar | Soundproofing | EUH000520 |
| 2 | Lower inner panel of the B-pillar | Waterproofing/soundproofing | EUH000560 |
| 3 | Middle threshold panel | Soundproofing | EUH000670 |
| 4 | Lower inner panel of the front body pillar | Waterproofing/soundproofing | EUH000550 |
| 5 | Lower outer panel of the B-pillar | Waterproofing/soundproofing | EUH000570 |
| 6 | Outer threshold panel | Soundproofing | EUH000680 |
| 7 | Lower inner panel of the front body pillar | Waterproofing/soundproofing | EUH000540 |
| 8 | Upper outer panel of the front body pillar | Soundproofing | EUH000530 |
Soundproofing position, rear side panel
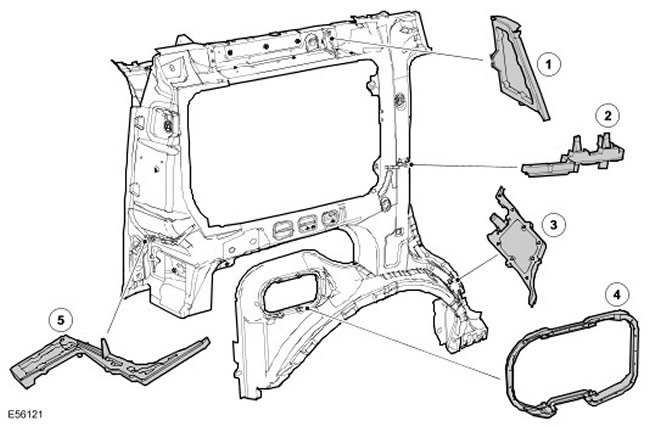
| Name | Description | Operating principle | Part number according to the repair catalog |
| 1 | Back Upper Belt | Soundproofing | EUH000650 |
| 2 | Rear pillar outer panel | Soundproofing | EUH000610 |
| 3 | Rear wheel arch outer panel | Waterproofing/soundproofing | EUH000590 |
| 4 | Opening for fuel filter | Waterproofing/fuel protection | ARY 780030 |
| 5 | Rear Door Pillar Outer Panel | Soundproofing | EUH000630 |
Weld Sealant
During factory body assembly, a heat-curing PVC-based sealant is applied to some panel joints. This material is not intended for use in body repair and must be replaced with an approved panel joint sealant.
The joint sealant is applied over the primer, but before the top coat of paint is applied.
The joint sealant should form a continuous bead, the profile of which depends on the type of joint. If the sealant material is applied with a brush, make sure to treat the entire surface of the joint.
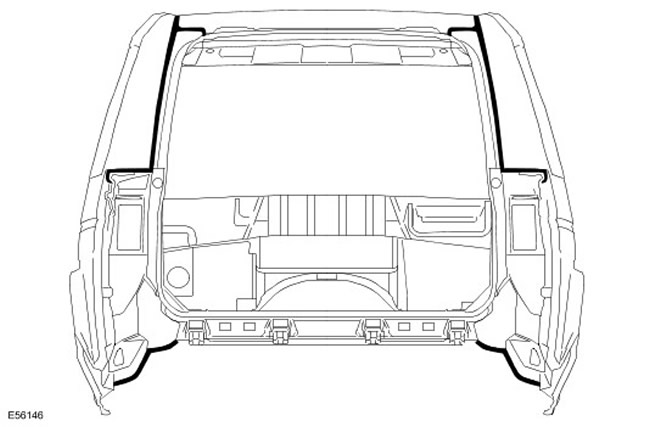
Check that all accessible welds are sealed after repair. When a vehicle is involved in a collision, areas of the bodywork that are located away from the point of impact are often deformed. As a result, the sealant coating in these areas can be damaged during subsequent panel straightening and repair. Inspect all welds in areas adjacent to the parts being repaired for damage to the coating, then remove any damaged or cracked coating and apply a fresh coating according to the following procedure:
- Clean the damaged area down to bare metal and etch the cleaned surface with a suitable phosphate primer.
- Treat the damaged surface with an acid primer.
- Apply proper seam sealant.
- Apply the proper color coat (and underbody sealant, if applicable.).
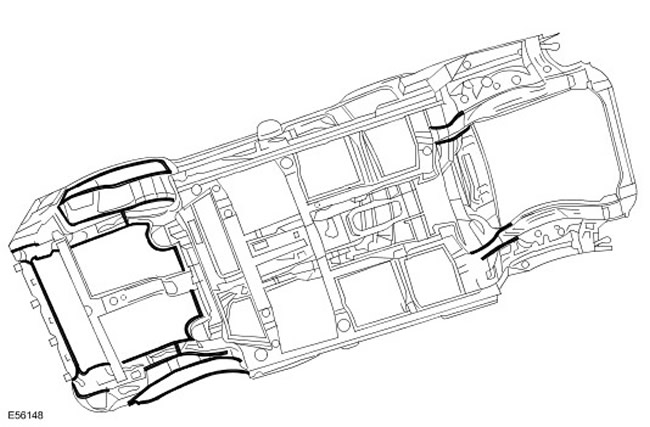
Seam sealant on the back
Seam Sealant for Bottom Seams
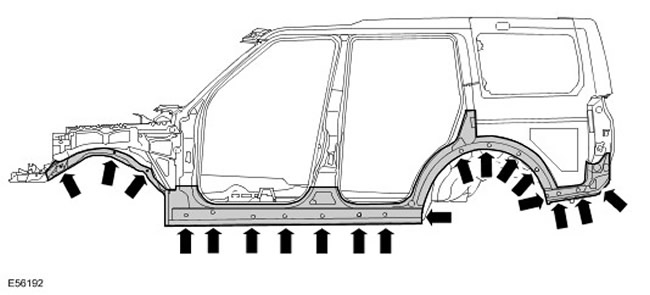
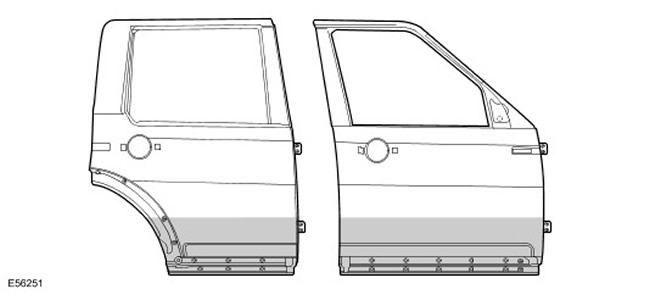
Wax sealant for closed cavities
After the repair is done, be sure to wax these areas with the proper cavity wax. Also, any cavities that were disturbed during the repair, whether they were factory waxed or not, should be waxed. This includes all box-shaped assemblies, cavities, and interior door panels.
Before injecting the protective compound, make sure that the cavities to be treated are cleaned of dirt and foreign substances. If necessary, clean the cavities from foreign particles.
The protective compound should be applied after painting is completed and before installing any decorative or overhead elements.
During the treatment process, ensure that the protective compound covers all flanges and seam areas and that it is applied to all repair areas of both old and newly installed panels.
It should be noted that new panels and body assemblies are supplied with internal cavities already treated with a protective compound. Re-treat these cavities after repair.
Reliable cavity treatment is very important. Always follow these rules:
- Complete all painting operations before applying wax sealant.
- Check the spray cone shape of the cavity treatment equipment.
- Cover all areas not to be treated with a protective coating.
- If there is a risk of contamination by the protective coating, remove components such as seat belt pretensioners.
- before treating the interior cavities of the doors, close the glass completely.
- Treat body areas normally covered by trim elements before installing these elements.
- After treatment with a protective compound, clean the drainage holes of the thresholds and doors.
- Keep all equipment clean, especially protective coating sprayers.
Areas of application of protective wax coating, body
Areas where protective wax coating is applied, doors
Comments on this article