General information
- If water leaks are observed after body repair, the cause can be determined by the methods described below. To find the places of water penetration, it is required to sequentially perform a test, guided by logical considerations. Before starting any checks, a complete inspection should be carried out.
- An external examination for existing leaks may indicate the following signs:
- The following signs may indicate existing leaks:
- Check the clearances and fit of components such as hood, tailgate, tailgate, doors, etc.
- Check the correct installation and possible damage to the sealing elements: plugs, rubber door seals, etc.
- Check that the water drain holes are not clogged.
- For more information about the presence of possible leaks, you can use various checks:
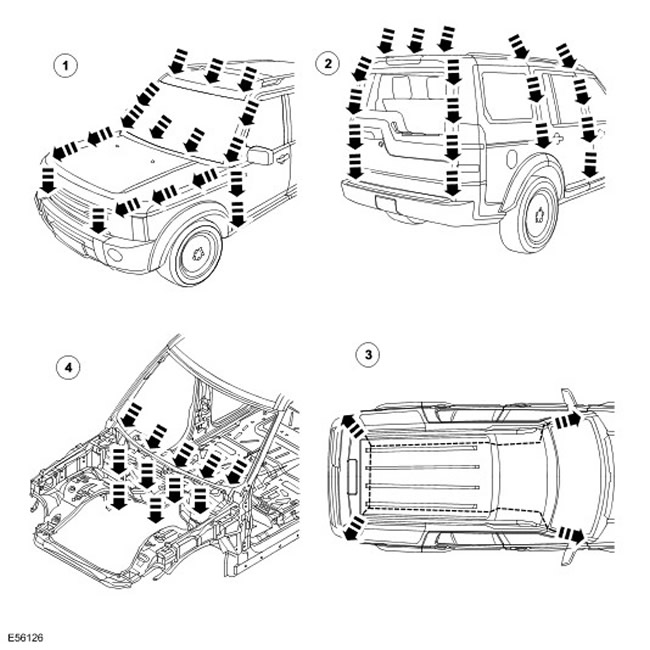
- Checking with the use of water supply from a hose
- Water splash test
- road test
- Chalk check (powder)
Practical implementation of tests and inspections
Checking with the use of water supply from a hose:
NOTE: Never point the water jet directly at the rubber seal.
- Perform a hose test with the help of a second person (inside the car).
- Use detachable spray tips (water nozzle to ensure a fine atomization of the water jet).
- Start at the bottom and spray the entire area, working your way up.
- Additional checks can be carried out in the car wash.
- Some leaks start here or appear only here.
- The interior of the respective vehicle should be checked using the backlight during the washing procedure.
- If no leaks are found during the above checks, a road test should be performed on wet roads.
- Road tests in various conditions:
- At various speeds.
- On various road surfaces (from asphalt to cobblestone pavement).
- When the vehicle is loaded or unloaded.
- Movement through puddles (water splash).
- This test checks the clamping and seating surfaces of the seal.
- Performing a check:
- Dust the door seal with powder or chalk.
- Coat the seal seating surface with a thin layer of grease.
- Close the door slowly and open it again.
- Check the width and continuity of the imprint on the door seal.
Other equipment can also be used to search for leaks: stethoscopes, ultraviolet lamps, special mirrors or ultrasonic devices.
Repairing a leak using recommended tools, accessories and materials
Tools and accessories:
- Dry absorbent fabric
- Removable spray tip
- Backlight, fluorescent tube
- Mirror
- Compressed air
- Device for installing the sealing lip
- Wet/dry vacuum cleaner
- Compressor for sealant
- Interior Trim Puller
- Blade or penknife
- Wedge (wooden or plastic)
- heat gun
- Special mirror for detecting hidden leaks
- Checking device using air supply
- sealant (tape and plastic compound)
- Universal Label
- Curled Edge Sealant
- Window Sealant
- Waterproofing (PVC)
- Double-sided adhesive tape for waterproofing
- Denatured alcohol (sold in stores)
- Polyurethane adhesive
- Silicone remover
- Tar removal composition
Water leaks according to mileage or service life
The increase in mileage affects the problem of leaks in the car. Existing factors:
- Maintenance and care of seals:
- Lack of maintenance, insufficient or incorrect maintenance
- Use of unsuitable materials
- Seal damage:
- As a result of aging, wear or mishandling/improper installation.
- Heavy pollution of the car:
- Severe contamination of the vehicle can seriously impair the functioning of the water drain channels, as well as the rubber seals.
- Factors depending on the service life:
- terms of Use
- Ultraviolet radiation
- Extreme climatic conditions
- Corrosion can have a serious effect on body components, especially as a result of the following processes:
- Slight or severe rusting mandrel seals
- Rusting of body welds
- through corrosion
Water leaks after body repair
If there is a leak in the car after repairing the body, the following points must be considered:
- Check the correct installation of the auxiliary components and their sealing.
- Check that the doors are installed correctly, including the tailgate and tailgate. The corresponding seals must not be damaged and must be installed correctly.
- Check the correct sealing of the welds.
- Check that the rubber o-rings are installed correctly.
- Windows with sealed glazing must have a correct and complete adhesive bond.
Water drain system
If water intrusion is observed in the vehicle, the areas into which water enters or drains should be checked first.
Water drain system
| Item name | Spare part number | Description |
| 1 | Water drain, front | |
| 2 | Water drain, side and rear | |
| 3 | Roof drainage system | |
| 4 | Drainage system of the engine compartment |
Water leaks. Diagnosis and Troubleshooting: Front of the cabin
Windshield
- Diagnosis: Water ingress into the area of the A-pillar, into the area of the instrument panel or on the sill panel.
- Cause: Tears in sealant bead
- Elimination:
- Breaks in the sealant bead can be found from the inside using compressed air. A leak can be identified from the outside by the escaping air.
- The second verification method is the water test. External cladding panels must be carefully removed using a plastic tool. Leakage should be sought from the inside, with outside help.
Side windows can have the same problems as windshields. Therefore, you should use the same troubleshooting steps.
door seal
- Diagnosis: Water intrusion into the bottom of the door interior trim or sill panel area.
- Cause:
- A waterproofing screen installed behind the inner lining of the door serves to drain water that has entered the door cavity. Water is drained through the drainage holes down or out. If the waterproof screen is damaged or installed incorrectly, water may enter the passenger compartment.
- In addition, drain holes can become clogged with leaves, dirt, or excess cavity protection material. Water collects in the doors and enters the interior of the car.
- Check the waterproofing screen for damage or improper installation.
- If the waterproofing screen must be re-bonded, only an approved joint sealant should be used.
- Before installing the waterproofing screen, check the cleanliness of the drainage holes.
- Diagnosis: Water intrusion into the sill panel area
- Cause: Insufficient clamping force between seal and door.
- Remedy: Check the clamping force: The easiest way to check the clamping force between the seal and the corresponding bearing surface is to check with a paper tape. Place strips of paper at various points between the door and seal and close the door completely. If the paper can be ejected without much resistance, the clamping force is too low. Adjust the clamping force: The clamping force is usually adjusted using the striker of the door lock. In this case, the alignment of the edges of the door and the side panel or the front and rear doors should be controlled. Another way to adjust is to change the position of the seal mounting flange. The clamping force increases as the flange moves towards the door.
- Check the seating surface: Apply chalk evenly to the sealing surface. Coat the door bearing surface evenly with petroleum jelly. Close the door completely - the lock should click into place. Open the door. The imprint of chalk is clearly visible on the lubricant film (bearing surface). The bearing surface must be at least 5 mm wide at all points.
- Check the clamping force: The easiest way to check the clamping force between the seal and the corresponding bearing surface is to check with a paper tape. Place strips of paper at various points between the door and seal and close the door completely. If the paper can be ejected without much resistance, the clamping force is too low.
- Adjust the clamping force: The clamping force is usually adjusted using the striker of the door lock. In this case, the alignment of the edges of the door and the side panel or the front and rear doors should be controlled. NOTE: When adjusting the clamping force, always check that the profiles of the various components are correctly aligned.
- Another way to adjust is to change the position of the seal mounting flange. The clamping force increases as the flange moves towards the door.
- Check the seating surface: Apply chalk evenly to the sealing surface. Coat the door bearing surface evenly with petroleum jelly. Close the door completely - the lock should click into place. Open the door. and the chalk imprint is clearly visible on the lubricant film (bearing surface). The bearing surface must be at least 5 mm wide at all points.
NOTE: When adjusting the clamping force, always check that the profiles of the various components are correctly aligned.
NOTE: Do not move the flange too far towards the door as this can reduce the bearing surface of the seal against the door.
- Other reasons:
- The door seal must completely seal the door where it contacts the body.
- Water can enter directly or indirectly into the interior of the vehicle if the seal is damaged anywhere.
- Elimination:
- A damaged or worn door seal should always be completely replaced.
- When replacing the seal, the following must be taken into account:
- Always install the seal first in the area of small radii (corners).
- Then evenly secure the seal to the flange by lightly tapping with a rubber mallet.
- The installed seal must not be twisted.
NOTE: The specified seal length must not be reduced.
- Another reason:
- The door seal is in contact with the welded flange all around. If this weld flange is deformed or damaged in any way (usually in areas with small radii), leaks may occur in this place.
- A stretched seal mandrel can also cause leakage.
- In both cases, water enters the vehicle interior under the seal mandrel.
- Elimination:
- Straighten the deformed welding flange using a hammer and anvil, preventing and if necessary repairing any damage to the paintwork.
- Another reason:
- The door seal is in contact with the welded flange all around. If this weld flange is deformed or damaged in any way (usually in areas with small radii), leaks may occur in this place.
- A stretched seal mandrel can also cause leakage.
- In both cases, water enters the vehicle interior under the seal mandrel.
- Diagnosis: Water intrusion through sunroof opening
- Cause:
- The sunroof is installed in the water trap. Water flows out through the water trap, water drain holes and drain hoses. Drain hoses run downwards on both sides through the A-pillar and C-pillar.
- Drain holes or drain hoses may be clogged with leaves, dirt, underbody protection material, and so on.
- Elimination:
- Check the water trap for leaks.
- Check the drain hoses for leaks and for proper connection to the water trap.
- Check the drain system for blockages and blow out with compressed air if necessary.
- Check the outer seal and the correct adjustment of the sunroof.
NOTE: For sunroof leaks, check the outer rubber seal and lock actuator or latch mechanism first.
Rear door and tailgate
- Diagnosis: Water intrusion into rear headlining and luggage compartment.
- Cause:
- Problems with leakage of the tailgate and tailgate are similar to the problems of other doors.
- In addition to this, the area to be compacted must be much larger. Holes for laying cables and hoses must also be sealed.
- Rubber grommet for cable and hose routing holes should be checked for damage and correct installation (completely disconnected).
- The rear door hinges and tailgate hinges may leak.
- Elimination:
- Check rubber o-rings and replace if necessary.
- Check the attachment points of the hinges and, if necessary, re-seal them with sealant.
- Diagnosis: Water intrusion into the side area of the luggage compartment
- Cause:
- The channel for forced air exhaust from the passenger compartment is located in the rear door pillar, behind the rear lights.
- The rubber damper for forced air suction must be free to move.
- Elimination:
- Remove forced air suction.
- Check the sealing area between the body and body, as well as the rubber flap.
- Replace seal if necessary.
- Diagnosis: Water intrusion into the luggage compartment area
- Cause:
- Leaks in rear window and sunroof.
- Check for leaks similar to checking for leaks in a windshield.
- Diagnosis: Water intrusion into the luggage compartment area
- Cause:
- Some panel connections are made during the manufacture of the vehicle in the area of the wheel arch and luggage compartment. These connections are sealed with sealant.
- Uneven application of sealant can lead to rupture in the sealed weld.
- Elimination:
- Clean the sealed weld.
- Find a leak in the sealed weld.
- Reseal with sealant.
Comments on this article