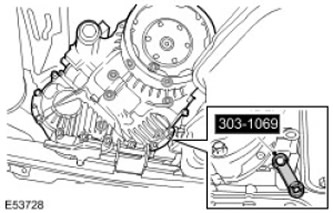
Special tool
 Adapter for key 303-1069 Adapter for key 303-1069 |
Removing
1. Disconnect a wire of weight from the storage battery. For more information refer to Specification.
2.
WARNING: It is forbidden to carry out work on a vehicle supported only by a jack. Always place secure supports under the vehicle.
Raise and support the vehicle.
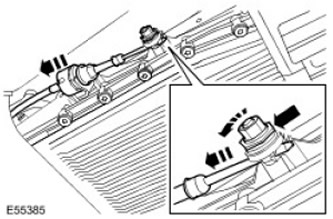
3. Remove the front propeller shaft. For more information refer to Front Drive Shaft - 2.7L Diesel (47.15.02)
4. Remove the exhaust system. For more information, refer to Exhaust System - Vehicle not included: Diesel Fuel Filter (30.10.08)
5. Remove the rear driveshaft. For more information refer to Rear propshaft (47.15.03)
6. Remove the starter. For more information refer to Starter (86.60.01)
7. Disconnect the selector cable.
- After securing the clamping sleeve with an additional wrench, loosen the locknut.
- Press the latch and release the cable.
8. CAUTION: Be sure to plug all open connections to avoid contamination of the system.
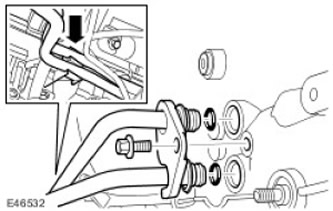
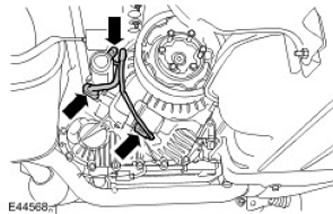
Disconnect transmission lines.
- Turn out a bolt.
- Release the clamp.
- Remove and discard 2 o-rings.
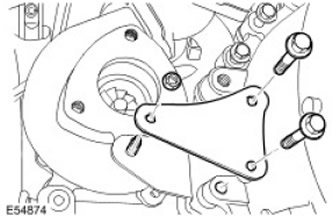
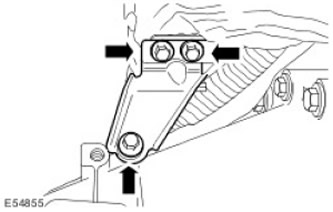
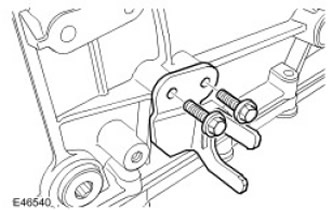
9. Remove the turbocharger support bracket. Loosen the nut and remove the 2 bolts.
10. Remove the exhaust system heat shield. Loosen 7 nuts.
11. Remove the left bypass exhaust pipe support bracket.
- Turn out 3 bolts.
- Disconnect the transmission wiring harness.

12. Remove the right exhaust bypass pipe support bracket. Turn out 3 bolts.
13. Remove the center support bracket for the bypass exhaust pipe. Turn out 2 bolts.
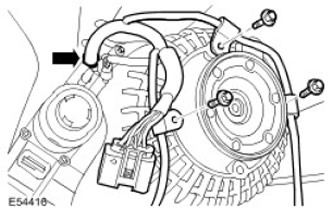
14. Disconnect the wiring harness from the left side of the transmission.
- Turn out 2 bolts.
- Release the clamp.
15. Disconnect the wiring harness from the right side of the transmission.
- Turn out a bolt.
- Disconnect the electrical connector.
16. Disconnect the electrical connectors of the transfer case. Disconnect 3 electrical connectors.
17.
CAUTION: Be sure to plug all open connections to avoid contamination of the system.
NOTE: Transmission shown removed for clarity.
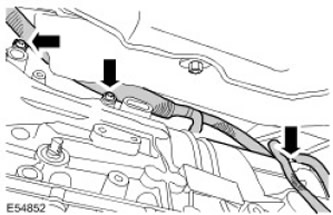
Disconnect the breather line. Squeeze the retaining ring.
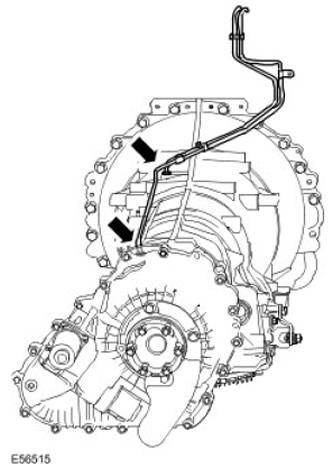
18. Disconnect the wiring harness from the transfer case.
- Turn out 3 bolts.
- Release the clamp.
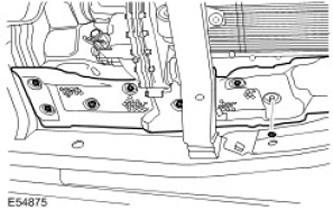
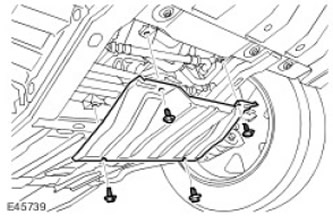
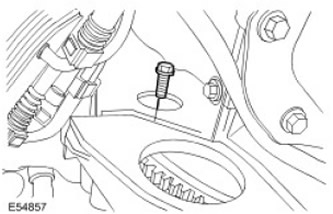
19. Remove the radiator access panel. Turn out 4 bolts.
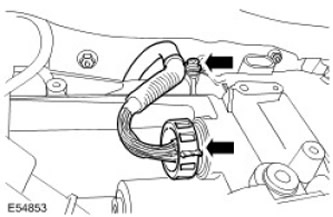
20. Disconnect the floppy disk.
- Remove the access hole plug.
- Turn the crankshaft clockwise to access the mounting bolts.
- Turn out 4 bolts.
21. Using a gearbox jack, jack up the gearbox.
22.
CAUTION: Support the transmission on a transmission jack.
CAUTION: Support the engine. When the transmission is removed, the engine will move forward.
CAUTION: Make sure the torque converter is not disconnected from the transmission.
NOTE: Transmission shown removed for clarity.
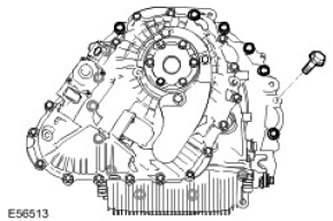
Remove the gearbox with an assistant. Turn out 15 bolts of fastening of a transmission.
23. Use a suitable tool to secure the torque converter.
24.
NOTE: Do not further disassemble if the part is removed only for access.
Remove the transmission from the transmission jack.
25. Drain the gearbox oil.
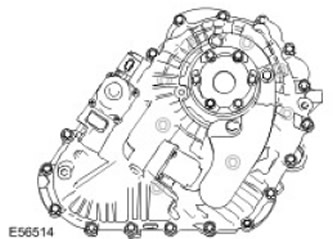
26. Together with an assistant, remove the transfer case.
- Remove 8 bolts.
- Remove and discard the O-ring.
27. Remove the selector cable bracket. Turn out bolts.
28. Remove the selector lever. Loosen the nut.
29. Disconnect the fuel filter housing and support bracket.
Installation
CAUTION: If the automatic transmission fluid is very dirty or contains metal particles, install a new transmission fluid cooler and new lines at the same time as the new transmission.
1.
NOTE: Clean the mating surfaces of the elements.
NOTE: Install a new o-ring.
Install the transfer box with an assistant.
- Lubricate input shaft splines with 'Weicon TL7391' grease.
- Screw in 8 bolts.
- Using the special tool, tighten the bolts to a torque of 45 Nm.
2. Fix the selector lever. Tighten the nut with a tightening torque of 12 Nm.
3. Attach the selector cable bracket. Screw in 2 bolts and tighten them to 10 Nm.
4. Attach the wiring harness to the gearbox.
- Repeat the above procedure on the other side.
- Tighten the bolt to 10 Nm.
6. Place the gearbox on a gearbox jack.
7. Remove the torque converter holder.
8.
NOTE: Apply recommended grease to torque converter bushing.
NOTE: Clean the mating surfaces of the elements.
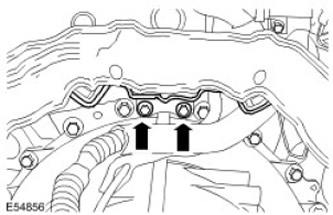
Install the gearbox with an assistant. Tighten 15 bolts to 45 Nm.
9. Connect the breather line.
10. Attach the wiring harness to the gearbox.
- Connect the electrical connector.
- Tighten the screws.
- Attach the wiring harness to the transmission.
NOTE: Clean the mating surfaces of the elements.
NOTE: Install new o-rings.
Connect transmission lines.
- Clamp the transmission fluid pipes.
- Tighten the bolt to 10 Nm.
- Rotate the crankshaft to access the bolts.
- Install the access hole plug.
- Tighten 4 bolts to 45 Nm.
14. Install the radiator access panel. Screw in and tighten the 4 bolts to 10 Nm.
15. Install the exhaust gas bypass center support bracket. Tighten the bolts to 25 Nm.
16. Establish the right support arm of a bypass pipe of the fulfilled gases.
- Align the bypass exhaust pipe support bracket assembly.
- Tighten the bolts to 25 Nm.
- Tighten the bolts to 25 Nm.
- Attach the transmission wiring harness to the support bracket.
19. Install the turbocharger support bracket. Tighten the nut and 2 bolts to 22 Nm.
20. Install the rear driveshaft. For more information refer to Rear propshaft (47.15.03)
21. Install the front driveshaft. For more information refer to Front Driveshaft - 2.7L Diesel (47.15.02)
22. Install the exhaust system. For more information, refer to Exhaust System - Vehicle not included: Diesel Fuel Filter (30.10.08)
23.
NOTE: Do not fully tighten the lock nut at this stage.
Connect the selector cable to the gearbox.
- Attach the inner cable to the clamping sleeve of the lever.
- Attach the selector cable to the support bracket.
25. Connect a wire of weight to the storage battery. For more information refer to Specification.
26. Check the fluid level in the transfer case and top up if necessary.
27. Check the transmission fluid level and top up if necessary. For more information, refer to Checking the Transmission Fluid Level (44.24.06)
28. Lower the car.
Comments on this article