Contents: Dismantling ⇩ Installation ⇩
CAUTION: If there is a lot of fuel in the tank, pump it out through the filler neck, using a special device, to a level below the fuel intake.
Dismantling
1. Disconnect the negative battery terminal.
2. Open the right rear door and tailgate.
3. Fold the right rear seat forward.
4. Unfasten the 3 buttons securing the front and rear mats.
5. Slide the luggage compartment carpet back to access the service hatch.
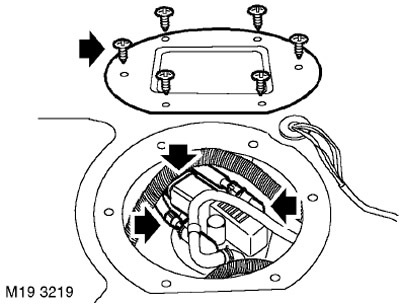
6. Remove the 6 screws securing the service hatch cover.
The article was copied from this resource (www.LRman.ru)
7. Remove the service hatch cover.
8. Disconnect the electrical connector from the fuel pump module.
9. To facilitate subsequent assembly, mark the fuel hoses, loosen the clamp and remove the fuel supply hose and the return hose.
CAUTION: Fuel leakage is inevitable during this operation. Take safety measures to prevent fire or explosion.
10. Vehicles with fuel-powered interior heater: Loosen the clamp and disconnect the fuel supply hose to the heater.
CAUTION: Always plug the fittings and holes to protect the system from dirt.
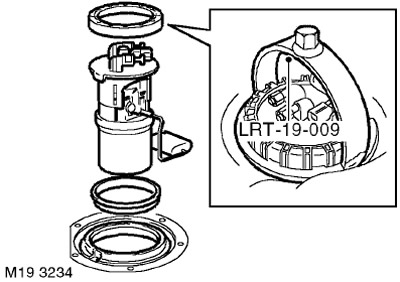
11. Using the LRT-19-009 tool, remove the retaining ring from the fuel pump module housing.
12. Remove the fuel pump module with the sealing ring.
Installation
1. Clean the fuel pump module housing and the mating surfaces on the fuel tank.
2. Install the sealing ring onto the fuel pump module.
3. Install the fuel pump module into the tank and use the LRT-19-009 tool to put the retaining ring in place.
4. Vehicles with fuel-powered interior heater: Connect the fuel supply hose to the heater and secure it with a clamp.
5. Connect the fuel supply and return line hoses, using the previously applied marks as a guide.
6. Connect the electrical connector to the fuel pump module.
7. Replace the service hatch cover.
8. Put the mat back in place and secure it with buttons.
9. Return the rear seat to its original position.
10. Close the rear door and tailgate.
11. Connect the negative battery terminal.
Comments on this article