Butt joint
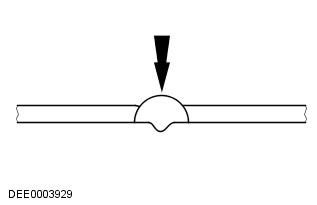
NOTE: Separating cuts for sectional replacement should be as short as possible. Cutting may only be done along the cutting lines shown in the repair diagrams.
It is prohibited to make cuts near reinforcements or along specified fold lines.
Prepare the parts remaining on the car and the new parts
- Restore the original shape of the adjacent surface of any dented body parts that are to remain on the car using a hammer and counter tool (ensures that the shape of the "old" element matches the new element). Remove spot or other welds using an angle grinder.
- Cut out new pieces to shape.
- If necessary, punch or drill holes to perform MIA welding.
NOTE: Do not use a welding torch to remove paint residue (heat may cause deformation of the metal).
- Clean all connecting flanges on both sides down to bare metal. Do not use an angle grinder for this purpose (this may weaken the metal and damage the zinc layer). The tools you will need are a rotating wire brush, a belt grinder or a plastic disc.
- Apply a sufficient amount of welding primer to the surfaces to be welded.
- The soil should be mixed well before use.
NOTE: When using aerosols, be careful not to contaminate adjacent areas.
Install new item
It is necessary to ensure that the new element exactly corresponds to the prescribed dimensions. The corresponding equipment:
- Straightening bench.
- Universal measuring system.
- Stapel.
- Measuring with a ruler or tape measure.
- Compass.
- Frame dimensions can be found in model-specific repair manuals.
NOTE: Any attached body components that require precision alignment and installation, such as bumpers, seals, headlights, taillights and lock assemblies, should be installed at this stage. Careless work can result in water leaks, wind noise intrusion and a significant amount of additional work.
Make sure the edges are aligned with the adjacent elements and check that the gaps are correct (compare the left and right sides). Make sure that the shape of the car is maintained.
Pinning a new element
NOTE: The amount of additional work can be significantly reduced if the joining and tack welding operations are performed with due care.
Depending on availability, the following fastening methods are available:
- Set of crimping pliers.
- Set of screw clamps.
- Self-tapping screws.
- Tack welds.
Use a center punch or screwdriver to ensure that the edges of the profiles are aligned when replacing them section by section. The edge is then tack welded to ensure that it is correctly positioned.
Alignment and execution of a tack weld
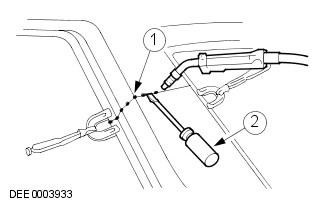
| Pos. | Spare part number | Name |
| 1 | - | Places of tack welds |
| 2 | - | Using a screwdriver to check the position |
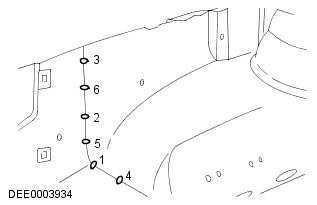
Longer joints are usually tack welded to prevent the panel from warping. It is important to tack weld in the correct sequence (see diagram). Weld the new piece following the instructions in the repair manual.
Correct sequence for tack welding
Continuation of repair/corrosion protection
This item is mainly devoted to the following work:
- Cleaning of welded seams.
- Priming bare metal.
- Sealing of welded seams.
- Applying a protective coating to the bottom.
- Installation of damping lining.
- Filling cavities with cavity sealant.
NOTE: For cavity sealant application areas, see the Corrosion Protection section.
The full version is available on the website: lrman.ru
Comments on this article