G1066520p1: Left Front Sensor Low Frequency Actuator Circuit
G1066520t1: Check actuator circuit for short to ground
1. Ignition off.
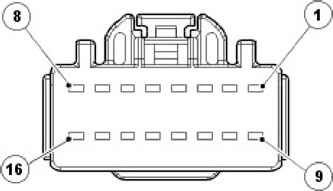
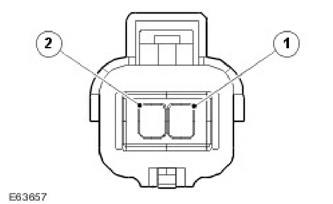
2. Disconnect left front sensor low frequency actuator electrical connector, C2198.
3.
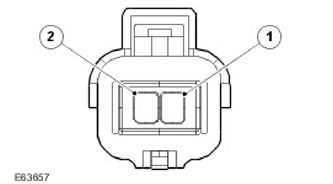
4. Measure the resistance between: C2198, harness side - Pin 2; Battery - Negative terminal
Is the resistance less than 10,000 ohms?
Yes - Go to detailed check G1066520t5.
No - Go to detailed check G1066520t3.
G1066520t2: Check activator circuit for short to power
1. Measure the resistance between: C2198, harness side - Pin 2; Battery - Positive terminal
Is the resistance less than 10,000 ohms?
Yes - Go to detailed check G1066520t6.
No - Go to detailed check G1066520t4.
G1066520t3: Check activator circuit for short to ground
1. Measure the resistance between: C2198, harness side - Pin 1; Battery - Negative terminal
Is the resistance less than 10,000 ohms?
Yes - Go to detailed check G1066520t7.
No - No faults, perform self-test as requested (ODST) for check. Determine the cause of a possible intermittent fault.
G1066520t4: Check activator circuit for short to power
1. Measure the resistance between: C2198, harness side - Pin 1; Battery - Positive terminal
Is the resistance less than 10,000 ohms?
Yes - Go to detailed check G1066520t8.
No - No faults, perform self-test as requested (ODST) for check. Determine the cause of a possible intermittent fault.
G1066520t5: Check for short circuit in wiring harness and unit
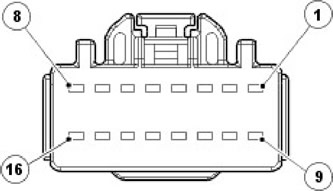
1. Disconnect the tire pressure monitoring module connector, C2447.
2.

3. Measure the resistance between: C2198, harness side - Pin 2; Battery - Negative terminal
Is the resistance less than 10,000 ohms?
Yes - REPAIR short circuit. The circuit contains intermediate connectors, C2243 and C2245. See wiring diagram for more information. Clear the DTC and perform a self-test on demand (ODST), using the manufacturer's approved diagnostic system to ensure that the faults are corrected.
No - INSTALL a new tire pressure monitoring module.
G1066520t6: Check for short in wiring harness and unit
1. Disconnect the tire pressure monitoring module connector, C2447.
2.
3. Measure the resistance between: C2198, harness side - Pin 2; Battery - Positive terminal
Is the resistance less than 10,000 ohms?
Yes - REPAIR short circuit. The circuit contains intermediate connectors, C2243 and C2245. See wiring diagram for more information. Clear the DTC and perform a self-test on demand (ODST), using the manufacturer's approved diagnostic system to ensure that the faults are corrected.
No - INSTALL a new tire pressure monitoring module.
G1066520t7: Check for short circuit in wiring harness and unit
1. Disconnect the tire pressure monitoring module connector, C2447.
2.

3. Measure resistance between: C2198, harness side - Pin 1; Battery - Negative terminal
Is the resistance less than 10,000 ohms?
Yes - REPAIR short circuit. The circuit contains intermediate connectors, C2243 and C2245. See wiring diagram for more information. Clear the DTC and perform a self-test on demand (ODST), using the manufacturer's approved diagnostic system to ensure that the faults are corrected.
No - INSTALL a new tire pressure monitoring module.
G1066520t8: Check for short circuit in wiring harness and unit
1. Disconnect the tire pressure monitoring module connector, C2447.
2.

3. Measure resistance between: C2198, harness side - Pin 1; Battery - Positive terminal
Is the resistance less than 10,000 ohms?
Yes - REPAIR short circuit. The circuit contains intermediate connectors, C2243 and C2245. See wiring diagram for more information. Clear the DTC and perform a self-test on demand (ODST), using the manufacturer's approved diagnostic system to ensure that the faults are corrected.
No - INSTALL a new tire pressure monitoring module.
G1066520t9: Check activator circuit for high resistance
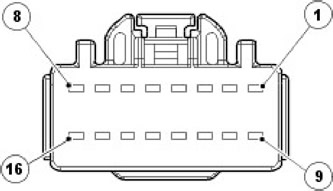
1. Measure the resistance between: C2447, harness side - Pin 14; C2198 Harness side - Pin 2
Is the resistance greater than 5 ohms?
Yes - ELIMINATE the high resistance of the electrical circuit. The circuit contains intermediate connectors, C2243 and C2245. See wiring diagram for more information. Clear the DTC and perform a self-test on demand (ODST), using the manufacturer's approved diagnostic system to ensure that the faults are corrected.
No - Go to detailed check G1066520t10.
G1066520t10: Check activator circuit for high resistance
1. Measure resistance between: C2447 harness side - Pin 13; C2198 Harness side - Pin 1
Is the resistance greater than 5 ohms?
Yes - ELIMINATE the high resistance of the electrical circuit. The circuit contains intermediate connectors, C2243 and C2245. See wiring diagram for more information. Clear the DTC and perform a self-test on demand (ODST), using the manufacturer's approved diagnostic system to ensure that the faults are corrected.
No - INSTALL a new front left sensor low frequency actuator. (86.53.16)
Detail Check G1066520p2: Right Front Sensor Low Frequency Actuator Circuit
G1066520t11: Check activator circuit for short to ground
1. Ignition off.
2. Disconnect the right front sensor low frequency actuator electrical connector, C2199.
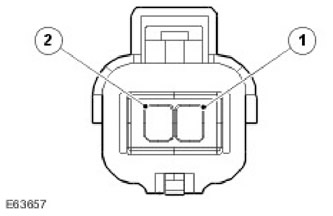
3. Measure the resistance between: C2199, harness side - Pin 2; Battery - Negative terminal
Is the resistance less than 10,000 ohms?
Yes - Go to detailed check G1066520t15
No - Go to detailed check G1066520t13
G1066520t12: Check activator circuit for short to power
1. Measure the resistance between: C2199, harness side - Pin 2; Battery - Positive terminal
Is the resistance less than 10,000 ohms?
Yes - Go to detailed check G1066520t16
No - Go to detailed check G1066520t14
G1066520t13: Check activator circuit for short to ground
1. Measure the resistance between: C2199, harness side - Pin 1; Battery - Negative terminal
Is the resistance less than 10,000 ohms?
Yes - Go to detailed check G1066520t17
No - No faults, perform self-test as requested (ODST) for check. Investigate the cause of a possible intermittent fault.
G1066520t14: Check activator circuit for short to power
1. Measure the resistance between: C2199, harness side - Pin 1; Battery - Positive terminal
Is the resistance less than 10,000 ohms?
Yes - Go to detailed check G1066520t18.
No - No faults, perform self-test as requested (ODST) for check. Determine the cause of a possible intermittent fault.
G1066520t15: Check for short circuit in wiring harness and unit
1. Disconnect the tire pressure monitoring module connector, C2447.

2. Measure the resistance between: C2199, harness side - Pin 2; Battery - Negative terminal
Is the resistance less than 10,000 ohms?
Yes - REPAIR short circuit. The circuit contains intermediate connectors, C2242 and C2244. See wiring diagram for more information. Clear the DTC and perform a self-test on demand (ODST), using the manufacturer's approved diagnostic system to ensure that the faults are corrected.
No - INSTALL a new tire pressure monitoring module.
G1066520t16: Check for short circuit in wiring harness and unit
1. Disconnect the tire pressure monitoring module connector, C2447.

2. Measure the resistance between: C2199, harness side - Pin 2; Battery - Positive terminal
Is the resistance less than 10,000 ohms?
Yes - REPAIR short circuit. The circuit contains intermediate connectors, C2242 and C2244. See wiring diagram for more information. Clear the DTC and perform a self-test on demand (ODST), using the manufacturer's approved diagnostic system to ensure that the faults are corrected.
No - INSTALL a new tire pressure monitoring module.
G1066520t17: Check for short circuit in wiring harness and unit
1. Disconnect the tire pressure monitoring module connector, C2447.

2. Measure the resistance between: C2199, harness side - Pin 1; Battery - Negative terminal
Is the resistance less than 10,000 ohms?
Yes - REPAIR short circuit. The circuit contains intermediate connectors, C2242 and C2244. See wiring diagram for more information. Clear the DTC and perform a self-test on demand (ODST), using the manufacturer's approved diagnostic system to ensure that the faults are corrected.
No - INSTALL a new tire pressure monitoring module.
G1066520t18: Check for short circuit in wiring harness and unit
1. Disconnect the tire pressure monitoring module connector, C2447.

2. Measure the resistance between: C2199, harness side - Pin 1; Battery - Positive terminal
Is the resistance less than 10,000 ohms?
Yes - REPAIR short circuit. The circuit contains intermediate connectors, C2242 and C2244. See wiring diagram for more information. Clear the DTC and perform a self-test on demand (ODST), using the manufacturer's approved diagnostic system to ensure that the faults are corrected.
No - INSTALL a new tire pressure monitoring module.
G1066520t19: Check activator circuit for high resistance
1. Measure resistance between: C2447 harness side - Pin 16; C2199 Harness side - Pin 2
Is the resistance greater than 5 ohms?
Yes - ELIMINATE the high resistance of the electrical circuit. The circuit contains intermediate connectors, C2242 and C2244. See wiring diagram for more information. Clear the DTC and perform a self-test on demand (ODST), using the manufacturer's approved diagnostic system to ensure that the faults are corrected.
No - Go to detailed check G1066520t20.
G1066520t20: Check activator circuit for high resistance
1. Measure resistance between: C2447 harness side - Pin 15; C2199 Harness side - Pin 1
Is the resistance greater than 5 ohms?
Yes - ELIMINATE the high resistance of the electrical circuit. The circuit contains intermediate connectors, C2242 and C2244. See wiring diagram for more information. Clear the DTC and perform a self-test on demand (ODST), using the manufacturer's approved diagnostic system to ensure that the faults are corrected.
No - INSTALL a new front right sensor low frequency actuator. (86.53.16)
Detail Check G1066520p3: Left Rear Sensor Low Frequency Actuator Circuit
G1066520t21: Check activator circuit for short to ground
1. Ignition off.
2. Disconnect the left rear sensor low frequency actuator electrical connector, C2200.
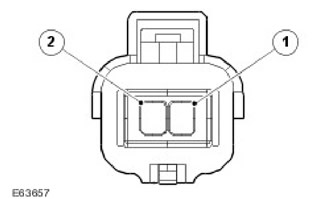
3. Measure the resistance between: C2200, harness side - Pin 2; Battery - Negative terminal
Is the resistance less than 10,000 ohms?
Yes - Go to detailed check G1066520t25.
No - Go to detailed check G1066520t23.
G1066520t22: Check activator circuit for short to power
1. Measure the resistance between: C2200, harness side - Pin 2; Battery - Positive terminal
Is the resistance less than 10,000 ohms?
Yes - Go to detailed check G1066520t26
No - Go to detailed check G1066520t24
G1066520t23: Check activator circuit for short to ground
1. Measure the resistance between: C2200, harness side - Pin 1; Battery - Negative terminal
Is the resistance less than 10,000 ohms?
Yes - Go to detailed check G1066520t27
No - No faults, perform self-test as requested (ODST) for check. Determine the cause of a possible intermittent fault.
G1066520t24: Check activator circuit for short to power
1. Measure the resistance between: C2200, harness side - Pin 1; Battery - Positive terminal
Is the resistance less than 10,000 ohms?
Yes - Go to detailed check G1066520t28.
No - No faults, perform self-test as requested (ODST) for check. Determine the cause of a possible intermittent fault.
G1066520t25: Check for short circuit in wiring harness and unit
1. Disconnect the tire pressure monitoring module connector, C2447.

2. Measure the resistance between: C2200, harness side - Pin 2; Battery - Negative terminal
Is the resistance less than 10,000 ohms?
Yes - REPAIR short circuit. See wiring diagram for more information. Clear the DTC and perform a self-test on demand (ODST), using the manufacturer's approved diagnostic system to ensure that the faults are corrected.
No - INSTALL a new tire pressure monitoring module.
G1066520t26: Check for short circuit in wiring harness and unit
1. Disconnect the tire pressure monitoring module connector, C2447.
2. Measure the resistance between: C2200, harness side - Pin 2; Battery - Positive terminal
Is the resistance less than 10,000 ohms?
Yes - REPAIR short circuit. See wiring diagram for more information. Clear the DTC and perform a self-test on demand (ODST), using the manufacturer's approved diagnostic system to ensure that the faults are corrected.
No - INSTALL a new tire pressure monitoring module.
G1066520t27: Check for short circuit in wiring harness and unit
1. Disconnect the tire pressure monitoring module connector, C2447.

2. Measure the resistance between: C2200, harness side - Pin 1; Battery - Negative terminal
Is the resistance less than 10,000 ohms?
Yes - REPAIR short circuit. See wiring diagram for more information. Clear the DTC and perform a self-test on demand (ODST), using the manufacturer's approved diagnostic system to ensure that the faults are corrected.
No - INSTALL a new tire pressure monitoring module.
G1066520t28: Check for short circuit in wiring harness and unit
1. Disconnect the tire pressure monitoring module connector, C2447.

2. Measure the resistance between: C2200, harness side - Pin 1; Battery - Positive terminal
Is the resistance less than 10,000 ohms?
Yes - REPAIR short circuit. See wiring diagram for more information. Clear the DTC and perform a self-test on demand (ODST), using the manufacturer's approved diagnostic system to ensure that the faults are corrected.
No - INSTALL a new tire pressure monitoring module.
G1066520t29: Check activator circuit for high resistance
1. Measure the resistance between: C2447, harness side - Pin 6; C2200 Harness side - Pin 2
Is the resistance greater than 5 ohms?
Yes - ELIMINATE the high resistance of the electrical circuit. See wiring diagram for more information. Clear the DTC and perform a self-test on demand (ODST), using the manufacturer's approved diagnostic system to ensure that the faults are corrected.
No - Go to detailed check G1066520t30.
G1066520t30: Check activator circuit for high resistance
1. Measure the resistance between: C2447, harness side - Pin 5; C2200 Harness side - Pin 1
Is the resistance greater than 5 ohms?
Yes - ELIMINATE the high resistance of the electrical circuit. See wiring diagram for more information. Clear the DTC and perform a self-test on demand (ODST), using the manufacturer's approved diagnostic system to ensure that the faults are corrected.
No - INSTALL a new low frequency rear left sensor actuator. Rear tire pressure monitor antenna (86.53.17)
Detailed Check G1066520p4: Right Rear Sensor Low Frequency Actuator Circuit
G1066520t31: Check activator circuit for short to ground
1. Ignition off.
2. Disconnect the right rear sensor low frequency actuator electrical connector, C2201.
3. Measure the resistance between: C2201, harness side - Pin 2; Battery - Negative terminal
Is the resistance less than 10,000 ohms?
Yes - Go to detailed check G1066520t35
No - Go to detailed check G1066520t33
G1066520t32: Check activator circuit for short to power
1. Measure the resistance between: C2201, harness side - Pin 2; Battery - Positive terminal
Is the resistance less than 10,000 ohms?
Yes - Go to detailed check G1066520t36.
No - Go to detailed check G1066520t34.
G1066520t33: Check activator circuit for short to ground
1. Measure the resistance between: C2201, harness side - Pin 1; Battery - Negative terminal
Is the resistance less than 10,000 ohms?
Yes - Go to detailed check G1066520t37
No - No faults, perform self-test as requested (ODST) for check. Determine the cause of a possible intermittent fault.
G1066520t34: Check activator circuit for short to power
1. Measure the resistance between: C2201, harness side - Pin 1; Battery - Positive terminal
Is the resistance less than 10,000 ohms?
Yes - Go to detailed check G1066520t38
No - No faults, perform self-test as requested (ODST) for check. Determine the cause of a possible intermittent fault.
G1066520t35: Check for short circuit in wiring harness and unit
1. Disconnect the tire pressure monitoring module connector, C2447.

2. Measure resistance between: C2201, harness side - Pin 2; Battery - Negative terminal
Is the resistance less than 10,000 ohms?
Yes - REPAIR short circuit. See wiring diagram for more information. Clear the DTC and perform a self-test on demand (ODST), using the manufacturer's approved diagnostic system to ensure that the faults are corrected.
No - INSTALL a new tire pressure monitoring module.
G1066520t36: Check for short in wiring harness and unit
1. Disconnect the tire pressure monitoring module connector, C2447.
2. Measure resistance between: C2201, harness side - Pin 2; Battery - Positive terminal
Is the resistance less than 10,000 ohms?
Yes - REPAIR short circuit. See wiring diagram for more information. Clear the DTC and perform a self-test on demand (ODST), using the manufacturer's approved diagnostic system to ensure that the faults are corrected.
No - INSTALL a new tire pressure monitoring module.
G1066520t37: Check for short circuit in wiring harness and unit
1. Disconnect the tire pressure monitoring module connector, C2447.

2. Measure the resistance between: C2201, harness side - Pin 1; Battery - Negative terminal
Is the resistance less than 10,000 ohms?
Yes - REPAIR short circuit. See wiring diagram for more information. Clear the DTC and perform a self-test on demand (ODST), using the manufacturer's approved diagnostic system to ensure that the faults are corrected.
No - INSTALL a new tire pressure monitoring module.
G1066520t38: Check for short circuit in wiring harness and unit
1. Disconnect the tire pressure monitoring module connector, C2447.

2. Measure the resistance between: C2201, harness side - Pin 1; Battery - Positive terminal
Is the resistance less than 10,000 ohms?
Yes - REPAIR short circuit. See wiring diagram for more information. Clear the DTC and perform a self-test on demand (ODST), using the manufacturer's approved diagnostic system to ensure that the faults are corrected.
No - INSTALL a new tire pressure monitoring module.
G1066520t39: Check activator circuit for high resistance
1. Measure the resistance between: C2447, harness side - Pin 8; C2201 Harness side - Pin 2
Is the resistance greater than 5 ohms?
Yes - ELIMINATE the high resistance of the electrical circuit. See wiring diagram for more information. Clear the DTC and perform a self-test on demand (ODST), using the manufacturer's approved diagnostic system to ensure that the faults are corrected.
No - Go to detailed check G1066520t40.
G1066520t40: Check activator circuit for high resistance
1. Measure the resistance between: C2447, harness side - Pin 7; C2201 Harness side - Pin 1
Is the resistance greater than 5 ohms?
Yes - ELIMINATE the high resistance of the electrical circuit. See wiring diagram for more information. Clear the DTC and perform a self-test on demand (ODST), using the manufacturer's approved diagnostic system to ensure that the faults are corrected.
No - INSTALL a new low frequency rear right sensor actuator. Rear tire pressure monitor antenna (86.53.17)
Detail check G1066520p5: Missing, incompatible, or malfunctioning low tire pressure sensor or receiver
G1066520t41: Check the correct installation of the wheel with tire and low tire pressure sensor
1. Make sure the full size wheel with tire is equipped with a low tire pressure sensor. The visual indication is metallic (not rubber) the valve stem of the low tire pressure sensor and the impossibility of installing it in a spare wheel of a reduced size.
Is a full size wheel fitted with a tire and low pressure sensor?
Yes - Go to detailed check G1066520t42.
No - Install the correct wheel and tire or low pressure sensor operating at the correct frequency as directed by the manufacturer's recommended diagnostic system (application «New low tire pressure sensor»).
G1066520t42: Check screen for additional DTCs
1. Remove the TPMS power fuse and reinsert. Clear DTCs and let vehicle sit for 15 minutes, then drive at least 15.5 mph (25 km/h), moving non-stop for at least 10 minutes. Note. If the vehicle speed falls below this value, the driving time to perform the test must be increased. Using manufacturer recommended diagnostic system and data logger signal «Tire pressure monitoring system status - learning mode status» confirm the end of the test, after the value becomes again «Switched off».
2. Check for additional DTCs C1A5631, C1A5831, C1A6031, C1A6231 with the same timestamp.
Are all four DTCs with the same timestamp logged in the tire pressure monitoring system module?
Yes - Replace the tire pressure monitoring module.
No - Go to detailed check G1066520t43.
G1066520t43: Check the position of the faulty low tire pressure sensor
1. Check the tire pressure monitoring system DTCs.
Are any DTCs C1AXX31 logged?
Yes - Install the correct low pressure sensor operating at the correct frequency as directed in the manufacturer's recommended diagnostic system (application «New low tire pressure sensor»), at the position corresponding to the registered DTC. Low tire pressure sensor (74.10.05)
No - No further action is required. Note. Using manufacturer recommended diagnostic system and data logger signal «Tire pressure monitoring system status - learning completed successfully» confirm the successful completion of the test.
Detailed check G1066520p6: Localization failure
G1066520t44: Check screen for additional DTCs
1. Check if the following additional DTCs appear on the screen: C1A5711, C1A5712, C1A5713. C1A5911, C1A5912, C1A5913, C1A6111, C1A6112, C1A6113, C1A6311, C1A6312, C1A6313.
Are any of the above DTCs logged?
Yes - See DTC index and corrective action.
No - Go to detailed check G1066520t45.
G1066520t45: Check screen for additional DTCs
1. Check if the following additional DTCs appear on the screen: C1A5631, C1A5831, C1A6031 or C1A6231
Is DTC C1A5631, C1A5831, C1A6031, or C1A6231 also registered?
Yes - See DTC index and corrective action.
No - Go to detailed check G1066520t46.
G1066520t46: Check activator installation
1. Check the correct installation of the activator. (86.53.16) Rear tire pressure monitor antenna (86.53.17)
Is the activator installed correctly?
Yes - Go to detailed check G1066520t47.
No - Correct if necessary. (86.53.16) Rear tire pressure monitor antenna (86.53.17)
G1066520t47: Check activator harness for short circuit
1. Locate and remove the blue L connector.
2. Measure the resistance on the appropriate activator circuits in the blue connector.
Is the resistance less than 1 ohm?
Yes - A value less than 1 ohm indicates a short circuit, repair the problem.
No - Install the correct low pressure sensor operating at the correct frequency as directed in the manufacturer's recommended diagnostic system (application «New low tire pressure sensor»), at the position corresponding to the registered DTC.
Detail check G1066520p7: Spare tire low pressure sensor not working
G1066520t48: Find out the type of spare tire fitted
1. Find out the type of spare tire fitted.
Small spare wheel?
Yes - Low tire pressure sensors are not fitted to undersized spare wheels. Low tire pressure sensors are only fitted to full-size spare wheels. The DTC should be ignored and no repair is required.
No - Go to detailed check G1066520t49.
G1066520t49: Make sure the spare wheel has a low pressure sensor
1. Check that the low pressure sensor is installed in the spare tire, considering the following: a) a visual indication of a low tire pressure sensor is a metal valve stem instead of a rubber one.
Tire pressure sensor installed?
Yes - Go to detailed check G1066520t50.
No - Install a new low tire pressure sensor. Note. Refer to the note above the DTC Index for replacement parts that may be covered by the manufacturer's warranty. See the relevant section of the repair manual.
G1066520t50: Check the operation of the spare tire pressure sensor
1. Fully deflate the spare tire by placing it next to the vehicle.
2. Turn on the ignition and check that the low pressure spare tire warning appears on the instrument panel for about 20 seconds.
3. Without taking the spare wheel away from the car, bring the tire pressure to normal. See section «Inspection and verification», warnings «Check tire pressure».
4. Turn on the ignition and check that there is no low pressure warning on the instrument panel.
Is the spare tire pressure warning still on the instrument panel?
Yes - Go to detailed check G1066520t51.
No - Repair is not required. It is possible that the customer has placed something in the luggage compartment that interferes with radio frequency reception.
G1066520t51: Check that the low tire pressure sensor code is correctly programmed into the module
1. Remove the low tire pressure sensor. Make a note of the 8-digit hexadecimal code printed on the case.
2. Using the recommended diagnostic system, read the spare wheel sensor code from the module. Refer to the appropriate procedure in the repair manual.
3. Compare the codes in steps 1 and 2.
Do the codes match?
Yes - Replace the low pressure sensor in the spare wheel. See the relevant installation section in the repair manual. The sensor ID code must be programmed into the tire pressure monitoring system module using the manufacturer's recommended diagnostic system. The identification code is located on the sensor kit packaging label and is also printed on the body of each sensor.
No - Program the sensor code recorded in step 1 into the module using the recommended diagnostic system. The identification code is located on the sensor kit packaging label and is also printed on the body of each sensor. Repeat the check to make sure the system is working properly. Go to detailed check G1066520t50.
Comments on this article