Contents: User settings ⇩ Functional purpose of user settings ⇩ Units of distance measurement ⇩ Fuel consumption units ⇩ Temperature units ⇩ Programmable speed warning ⇩ Headlight Delay Timer ⇩ Locking doors when moving off ⇩ Tilt the rear view mirror when…⇩ Restoring the position of the seat…⇩ Factory Reset ⇩ Sound warnings ⇩ On-board computer ⇩ Functional capabilities of the…⇩
User settings
User settings allow the driver to adjust certain vehicle settings to change the functionality of selected vehicle features. User settings are only available on models with upgraded instrument clusters.
The settings are stored in the EEPROM of the instrument cluster. Each vehicle has a factory vehicle configuration file, which defines the settings for a number of functions. Factory settings cannot be deleted, so the dealer or driver can restore them at any time.
NOTE: Factory settings may vary depending on the market where this vehicle is sold.
The user settings are controlled by CAN bus input and output messages from the instrument cluster, central junction box (CJB), ABS module, and integrated audio head unit (IHU). The following table lists the modules and the functions they perform.
| Module | Output information |
| Central Junction Box (CJB) | Remote control identification |
| Ignition key position | |
| ABS module | Vehicle movement |
| Instrument panel | Settings status |
| Vehicle configuration parameters | |
| Driver identification | |
| Integrated Head Unit (IHU) | Pressing the button ">>|" (search up) |
| Pressing the "|<<" (search down) | |
| Pressing the "+" button (increase volume) | |
| Pressing the "-" button (decrease volume) | |
| Query for distance units | |
| Request for units of measurement of fuel consumption | |
| Request interface language |
The systems/functions listed below can be customized by the user.
- HEVAC control module
- Central distribution block
- Instrument panel.
- Memory Management Module
- Navigation system control module
- Interior lighting (cJB function)
- Outdoor lighting (cJB function)
- Centralized door locking system (cJB function)
Functional purpose of user settings
To enter the user settings menu, press and release the trip computer button located at the end of the left multifunction switch. For safety reasons, the settings menu is only displayed when the vehicle is stopped. (the vehicle speed does not exceed 3 km/h), so that the driver is not distracted by working with the system. At speeds over 3 km/h, the settings window is not displayed on the display.
Once you enter the settings menu, you can move from one item to another using the audio control switches located on the steering wheel. To move from one menu item to another, use the search up and search down buttons (|<>|). The required values are set in the current menu using the volume control switches (+/-).
After entering the menu, the message "SETTINGS" appears on the message center display.
Now the driver can start working with the settings menu or exit it.
The user can go to the first menu item by pressing the button >>|, or to the last option by pressing the button |<<. After setting the required value, the setting is saved either when moving to the next menu item or when exiting the settings menu. The user settings menu can be closed at any time by pressing the on-board computer button.
If a menu item parameter has been changed, it is automatically saved when the next menu item is selected or when exiting the user settings menu.
Units of distance measurement
In the menu item "TRIP DISTANCE UNITS" (units of distance measurement) the user can select the units of measurement for the distance values displayed on the trip computer display. The units of measurement are selected using the "+" or "-" buttons on the steering wheel.
The driver can choose one of the following units of measurement:
- MILES (miles or miles per hour) (by default)
- КМ (km or km/h)
Fuel consumption units
In the menu item "FUEL USAGE UNITS" (units of measurement of fuel consumption) the user can select the units of measurement for the fuel consumption values displayed on the trip computer display. The units of measurement are selected using the "+" or "-" buttons on the steering wheel.
The driver can choose one of the following units of measurement:
- MPG (miles per gallon) (by default)
- LITRE/100KM
- KM/LITRE (km/l)
Temperature units
In the menu item "TEMP. DISPLAY UNITS" (units of temperature measurement) the user can select the units of measurement for the temperature values displayed on the trip computer display. The units of measurement are selected using the "+" or "-" buttons on the steering wheel.
The driver can choose one of the following units of measurement:
- Degrees C (degrees Celsius) (by default)
- Degrees F (degrees Fahrenheit)
Programmable speed warning
In the menu item "OVERSPEED WARNING" (speed warning) the user can set the speed threshold at which a warning will be issued. The threshold is selected using the "+" or "-" buttons on the steering wheel.
The driver can select the following positions:
- KM/N (km/h): from 10 to 250 km/h in 5 km/h increments. Default value: OFF
- MRN (miles per hour): 10 to 140 mph in 5 mph increments. Default: OFF
Headlight Delay Timer
In the menu item "HEADLAMP OFF DELAY" (headlight switch off delay) the user can set the period during which the headlights should be turned on after the ignition is turned off. The delay period is changed using the "+" or "-" buttons on the steering wheel.
The driver can choose the following delay periods (in seconds):
- 30 (by default)
- 60
- 120
- 240
Locking doors when moving off
In the menu item "DRIVE AWAY DOOR LOCKING" (locking doors when starting off) the user can turn on or off the automatic door locking function. The function is turned on and off using the "+" or "-" buttons on the steering wheel.
The driver can select the following positions:
- OFF
- ON (by default)
Tilt the rear view mirror when reversing (if any)
In the menu item "REVERSE MIRROR DIP" (tilt of rear view mirrors) the user can turn on or off the automatic tilt function of the outside rearview mirrors when reversing. The function is turned on and off using the "+" or "-" buttons on the steering wheel.
The driver can select the following positions:
- OFF
- ON (by default)
Restoring the position of the seat and mirrors (for models equipped with a memory module)
In the menu item "LAZY ENTRY" (entrance for the lazy) the user can turn on or off the function of restoring previously set positions of the seat and outside rear-view mirrors. The set positions are saved in the memory module, and individual settings are recognized by the identification code of the ignition key. The function is turned on and off using the "+" or "-" buttons on the steering wheel.
The driver can select the following positions:
- OFF (by default)
- ON
Factory Reset
In the menu item "RESTORE FACTORY SETTINGS" (restore factory settings) the user can cancel all changes by restoring the default values. These settings are stored in the vehicle configuration file (CCF) and cannot be deleted. To return to factory settings, select "Yes" using the "+" and "-" buttons on the steering wheel.
The driver can select the following positions:
- YES (yes)
- NO (no) (by default)
Sound warnings
The instrument cluster can emit audible signals to notify the driver of a message being displayed on the display or of a change in the vehicle's operating conditions. Audible warnings are emitted by a buzzer built into the instrument cluster. Audible warnings are divided into three groups: 1) audible signals accompanying the display of warning messages or the switching on of indicator lamps; 2) sound signals of the vehicle systems status; 3) sound signals of the state of the indicator lamps. The following are cases when warning sound signals are given at the request of various vehicle subsystems:
- Warning about lights not turned off
- Warning about unfastened seat belts
- Warning of the operation of the direction indicator/hazard warning lights
- Speed Warning
- Seat Position Memory Warning
- Parking Assist Front Sensor Warning
- Anti-theft system warning
- Key in ignition warning
- Coolant Overheating Warning
- Air suspension system warning
- Tire Pressure Monitoring System Warning
- Adaptive Cruise Control Warning
- Electronic Parking Brake Warning
- Automatic transmission warning
- Transfer case warning
- Rear differential warning
- Brake pad wear warning
- Windshield washer fluid low warning
- ABS Malfunction Warning
- Brake system malfunction warning
- Dynamic Stability Control (DSC) Malfunction Warning
- Hill Descent Control Malfunction Warning
- Hill Descent Control System On Warning
- Warning about the message of the automatic stability control system on descent
- Additional security system warning
- Engine Management System Warning
- Low engine oil pressure
- Exceeding the maximum speed of the on-board computer
On-board computer
The upgraded instrument clusters have software that enables the use of an on-board computer. The on-board computer provides the driver with information about current fuel consumption, the duration of the current trip, the average speed, and the distance that can be traveled with the available amount of fuel. The information is displayed at the bottom of the message center display, provided that there are no messages with a higher display priority. If there are no other messages or if they have a low priority, the message center display shows the on-board computer information.
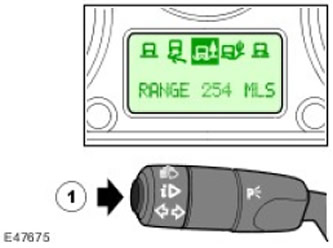
| Item name | Spare part catalog number | Description |
| 1 | - | On-board computer button |
Access to the on-board computer and changing some parameters responsible for displaying information on the display is carried out using the on-board computer button located at the end of the left multi-function switch.
Functional capabilities of the on-board computer
When the engine is started, the instrument cluster goes into diagnostic mode and a message appears on the message center display. "System check in progress" (system check in progress). Once the diagnostics are complete, the instrument cluster displays warning messages in order of priority, such as:, "DRIVER'S DOOR OPEN" (the driver's door is open).
After displaying warnings, the message center display changes to mode 3E. When the vehicle is stopped, pressing the trip computer button once displays the user settings menu on the display. Pressing the button again exits the settings menu and displays trip information. If the vehicle is moving, the settings menu call is ignored and trip computer information is displayed in the following order:
Distance traveled. The display shows the distance traveled since the last reset. Holding the trip computer button down for more than 2 seconds resets the trip meter. The display shows dashes for 3 seconds, then zeros. If the button is held down for less than 2 seconds, the display moves on to the next item.
- The display shows the distance traveled since the counter was last reset.
- Holding the trip computer button down for more than 2 seconds resets the trip meter. The display shows dashes for 3 seconds, then zeros.
- If the button is held down for less than 2 seconds, the display moves to the next item.
- The display shows the distance that can be traveled with the fuel in the fuel tank.
- If the button is held down for less than 2 seconds, the display moves to the next item.
- Average fuel consumption is displayed.
- Holding the trip computer button down for more than 2 seconds resets the average fuel consumption. The display shows dashes for 3 seconds, then zeros.
- If the button is held down for less than 2 seconds, the display moves to the next item.
- The average speed of movement is displayed.
- Holding the trip computer button down for more than 2 seconds resets the average speed. The display shows dashes for 3 seconds, then zeros.
- If the button is held down for less than 2 seconds, the display moves to the next item.
- The speed warning is only displayed if this feature is enabled in the user settings.
- Pressing the trip computer button for more than 2 seconds turns off the speed warning. Pressing the trip computer button again for more than 2 seconds turns on the speed warning.
- If the button is held down for less than 2 seconds, the display moves to the next item.
- Any warning messages are displayed here. If there is more than one message, each message is displayed for 3 seconds. After all messages have been displayed and before entering 3E mode, the display is blank for a short time.
- If the trip computer button is pressed for less than 2 seconds while warning messages are displayed, the trip computer operation stops and the display switches to 3E mode.
Comments on this article