Contents: Location of parking assistance…⇩ Review ⇩ Parking Assist Control Module ⇩ Parking assistance system connector…⇩ Input and output signals ⇩ Signals transmitted via the CAN bus ⇩ Diagnostics ⇩ Sensors ⇩ Parking assistance switch ⇩ Parking assistance speaker ⇩ Control scheme ⇩
Location of parking assistance system components
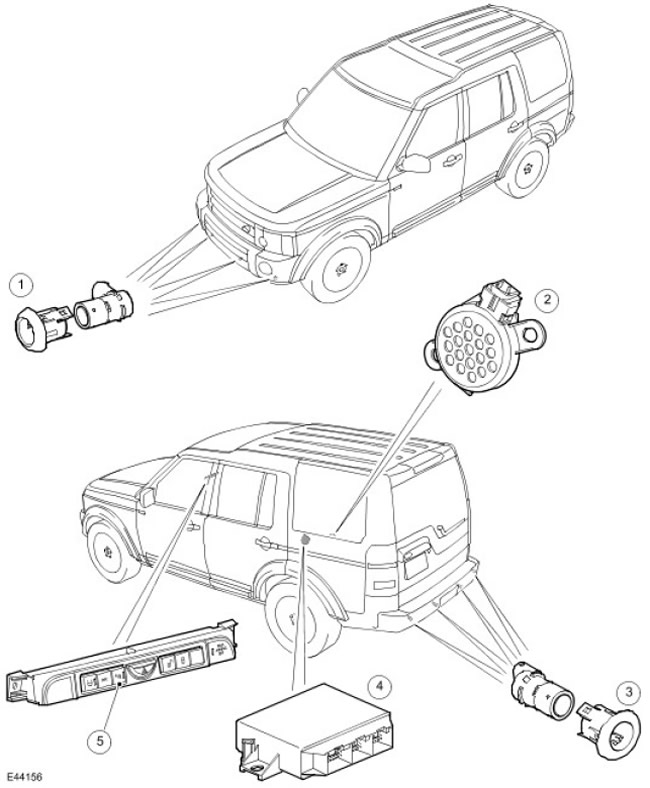
| Item name | Spare part catalog number | Description |
| 1 | - | Front sensors |
| 2 | - | Parking assistance speaker |
| 3 | - | 3 rear sensors |
| 4 | - | Parking assistance module |
| 5 | - | Parking assistance switch |
Review
The parking assistance system informs the driver with an audible warning about an obstacle in the vehicle's path when parking in front (if the package includes) or reversing. The purpose of the system is to assist the driver when parking the car in a limited space. The system is not a means of preventing collisions when driving in traffic and does not relieve the driver of the need for visual orientation.
The parking assistance system is not a standard feature on all vehicles. Some vehicles may only be equipped with rear sensors, and high-end vehicles may be equipped with front and rear sensors.
The system consists of four sensors in the rear bumper and four sensors in the front bumper. (if provided by the package), control module, control panel switch, rear speaker and front speaker (built into the instrument panel).
The system is based on the principle of ultrasonic echolocation. The received reflected sound signal is used by the system control module to calculate the distance to the obstacle.
A switch mounted on the dashboard allows the driver to turn off the parking assistance system when its services are not needed.
Parking Assist Control Module
The parking assistance system control module is located on the right side of the luggage compartment, behind the side trim panel.
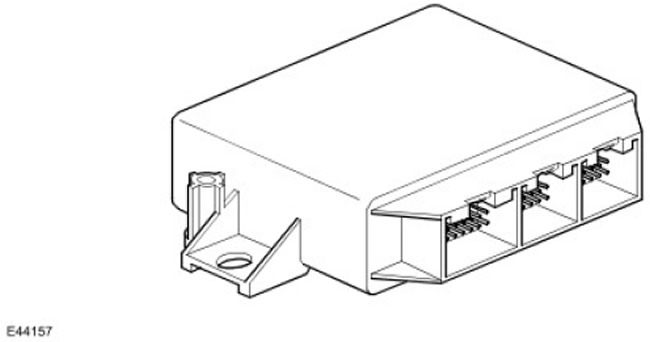
The parking assistance control module uses a single microprocessor to perform the following tasks:
- Control of ultrasonic sensors
- Control of ultrasonic sensors
- Evaluation of received reflected signals coming from sensors
- Interference suppression
- Parking Assistance Speaker Control
- Checking speakers and wires
- Control and monitoring of switch and wire status indicator
- Evaluation and monitoring of input control signals
- Managing diagnostic and testing functions
- Monitoring the food chain
- Transfer of information using a diagnostic line
Parking assistance system connector contacts
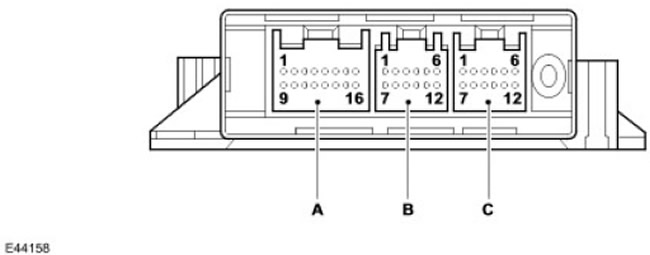
| Item name | Spare part catalog number | Description |
| A | - | Connector C0957 |
| B | - | Connector C1457 (Front sensors only) |
| C | - | Connector C0958 (Rear sensors only) |
Connector C0957
| Contact No. | Description | Input signal/output signal |
| 1 | Power circuit from the ignition switch | Input signal |
| 2 | Rear speaker | Output signal |
| 3 | Not used | - |
| 4 | Switch (ground) | Input signal |
| 5 and 6 | Not used | - |
| 7 | CAN low | Input signal/output signal |
| 8 and 9 | Not used | - |
| 10 | Rear Speaker Power Supply Circuit, 12V | Input signal |
| 11 and 12 | Not used | - |
| 13 | Switch LED | Output signal |
| 14 | CAN high | Input signal/output signal |
| 15 | Not used | - |
| 16 | Weight | Input signal |
Connector C01457
| Contact No. | Description | Input signal/output signal |
| 1 | 3 grounding of front sensors | Input signal |
| 2 | Power supply for front sensors, 12 V | Output signal |
| 3 and 4 | Not used | - |
| 5 | Signal from the left frontmost sensor | Input signal |
| 6 | Left Front Inner Sensor Signal | Input signal |
| 7 | Right Front Inner Sensor Signal | Input signal |
| 8 | Right Front Sensor Signal | Input signal |
| from 9 to 12 | Not used | - |
Connector C0958
| Contact No. | Description | Input signal/output signal |
| 1 | Not used | - |
| 2 | Right inner rear sensor signal | Input signal |
| 3 | Left inner rear sensor signal | Input signal |
| 4 | Right rear extreme sensor signal | Input signal |
| 5 | Left rear extreme sensor signal | Input signal |
| 6 and 7 | Not used | - |
| 8 | Grounding of rear sensors | Input signal |
| 9 and 10 | Not used | - |
| 11 | Power supply for rear sensors, 12V | Output signal |
| 12 | Not used | - |
Input and output signals
Communication between the control module and the external elements of the parking assistance system is carried out via three connectors for vehicles with front and rear sensors or via two connectors for vehicles with rear sensors only.
The control module receives input signals from the following elements:
- Reverse gear engaged - CAN message from the automatic transmission control module or, for vehicles with a manual transmission, from the transfer case control module.
- Forward gear engaged (except neutral or reverse) - CAN message from the automatic transmission control module or, for vehicles with a manual transmission, from the transfer case control module.
- Parking assistance switch
- Parking brake engaged - CAN message
- Trailer Connected - CAN Message for Central Junction Box (CJB):
- Power supply from ignition switch
- Sensors - Power and Ground Connections
- Sensors, digital signal: transmission (obstacle irradiation) and reception (reflected signal)
- Rear speaker: variable frequency output
- Front Speaker: CAN Message to Instrument Cluster
- Parking assistance switch: LED supply voltage in switch
Signals transmitted via the CAN bus
The parking assist control module receives and sends a series of digital signals via the medium-speed CAN bus. The received signals are used to control the operation of the parking assist system.
The messages received by the parking assist module and used to control the system are summarized in the table below.
| Message | Sender |
| Car speed | ABS module |
| Selector position: Automatic transmission | Gearbox control module |
| Selected gear: Manual transmission | Transfer Case Control Module |
| Turning the electronic parking brake on/off | Electronic Parking Brake Module |
| Vehicle status (in motion or not) | ABS module |
| Connecting a trailer | Central electrical distribution box |
| Outside temperature | Automatic Temperature Control (ATC) module |
| Engine operation status | Diesel Engine Control Unit |
| Stored odometer reading | Instrument panel |
| Voltage level in the vehicle's electrical system | Instrument panel |
| Timer | Instrument panel |
| Vehicle configuration | Instrument panel |
| Physical diagnostic request | Land Rover approved diagnostic system via diagnostic socket |
| Functional diagnostic request | Land Rover approved diagnostic system via diagnostic socket |
| Identifying the system configuration | Instrument panel |
Diagnostics
The parking assistance control module is connected to the diagnostic socket via a medium-speed CAN bus, so faults can be diagnosed using the T4 device. In addition, the control module performs self-diagnosis, which involves continuous monitoring of the system and, if a fault is detected, alerting the driver with an audible signal from the front or rear speaker (depending on the nature of the malfunction).
If a fault is detected in the parking assistance system, the control module notifies the driver as follows:
- If the system is active and a fault is detected in the sensors, speakers, control module or wiring, the system LED will flash at a rate of 2 Hz.
- If a fault is detected in the front sensors or rear speaker, an error tone at a frequency of 1500 Hz is emitted from the front speaker for three seconds.
- If a fault is detected in the rear sensors, the switch built into the LED switch, or in the event of a signal transmission error on the CAN bus, an error signal at a frequency of 1500 Hz is emitted from the rear speaker for three seconds.
Sensors
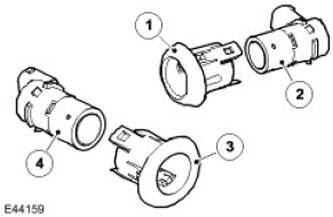
| Item name | Spare part catalog number | Description |
| 1 | - | Front sensor housing |
| 2 | - | Front sensor |
| 3 | - | Rear sensor housing |
| 4 | - | Rear sensor |
In the back and in the front (if provided by the package) there are four sensors on each bumper. Each sensor has two protrusions on its body, which are designed to fix it in the correct position in the bumper hole. The sensor body is inserted into the bumper from the front. After that, the sensor itself is inserted into the body from the back and fixed in it.
Each sensor has a three-pin connector that is connected to a common wiring harness for all four sensors. The rear sensor wiring harness is then connected to the common body wiring harness, and the front sensor wiring harness is connected to the engine compartment wiring harness. The three sensor contacts are designed to connect to ground, supply voltage, and to transmit a signal.
Each sensor has a plastic housing that contains a piezoelectric disk. The disk vibrates at a frequency of 38.4 kHz, generating an ultrasonic signal in the air. The disk also receives the reflected signal.
The parking assist control module controls each sensor by sending digital signals to it via a signal line. Each sensor has two operating modes; combined transmitter and receiver mode and receiver only mode.
In the combined mode, the sensor emits a series of ultrasonic pulses and then switches to the mode of receiving sound reflected from an obstacle at the detection distance. The reflected signals are amplified and converted from an analog signal to a digital signal in the sensor. The digital signal is transmitted to the parking assistance system control module, where it is compared with pre-programmed samples stored in the EEPROM memory. The control module receives this data from the sensor via the signal transmission line and calculates the distance to the obstacle based on the time interval between the irradiation of the obstacle and the reception of the reflected signal. The duration of the transmission pulse is set by the control module. The pulse repetition frequency is determined by the sensor.
In receiver mode, the sensor receives pulses emitted by neighboring sensors. The control module uses this information to accurately determine the position and distance to the obstacle.
Parking assistance switch
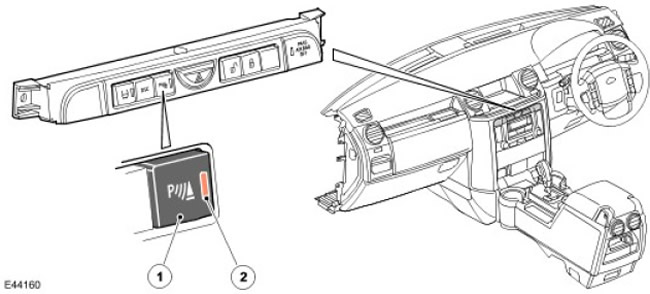
| Item name | Spare part catalog number | Description |
| 1 | - | Switch |
| 2 | - | LED |
The parking assistance switch is located on the central console above the integrated head unit, to the left of the hazard warning switch. The switch, whose positions are not fixed, has a built-in LED. To turn on the LED, a voltage of 12 V is supplied to the switch. The switch is connected to ground. When the switch button is pressed, a short circuit to ground occurs, which is interpreted by the parking assistance system as a command to turn the system on or off.
Parking assistance speaker
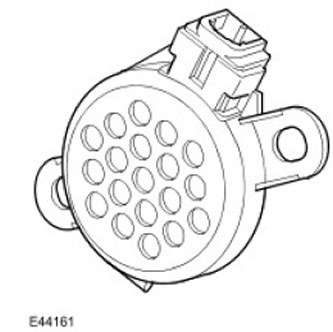
The parking assistance speaker is controlled by the control module and generates sound signals of different frequencies, informing the driver of the distance between the vehicle and an obstacle.
The rear parking aid speaker is located on the left side of the luggage compartment, behind the side panel of the body trim, below the window level. The speaker is attached to the body using two self-tapping screws. The speaker is connected to the parking aid control module by a wiring harness with a connector.
The front parking aid system uses a speaker built into the instrument cluster, which is controlled by commands transmitted via the CAN bus from the parking aid control module to the instrument cluster.
Control scheme
NOTE: A = Wired connection; D = High Speed CAN Bus; N = medium speed CAN bus
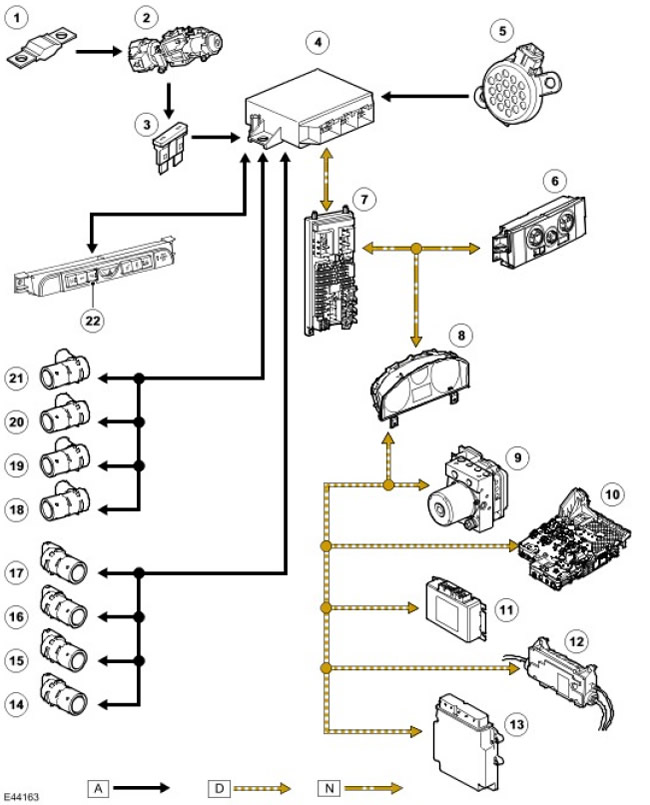
| Item name | Spare part catalog number | Description |
| 1 | - | Fuse link 11E (30A) |
| 2 | - | Ignition switch |
| 3 | - | Fuse 36P (5A) |
| 4 | - | Rear Parking Assist Speaker |
| 5 | - | Parking assistance module |
| 6 | ATC module | |
| 7 | - | Central Junction Box (CJB) |
| 8 | - | Instrument panel |
| 9 | - | ABS module |
| 10 | - | Gearbox control module |
| 11 | - | Transfer Case Control Module |
| 12 | - | Electronic Parking Brake Module |
| 13 | - | Engine Control Module |
| 14 | - | Left outer front sensor |
| 15 | - | Left inner front sensor |
| 16 | - | Right inner front sensor |
| 17 | - | Right frontmost sensor |
| 18 | - | Left rearmost sensor |
| 19 | - | Left inner rear sensor |
| 20 | - | Right inner rear sensor |
| 21 | - | Left rearmost sensor |
| 22 | - | Parking assistance switch |
Comments on this article