Removing
1.
WARNING: It is forbidden to carry out work on a vehicle standing on only one jack. Always support the vehicle with jack stands.
Raise and support the vehicle.
2. Remove the left rear wheel.
3. Use T4 to release pressure from the air suspension. For more information, refer to Relieving and Boosting Air Suspension System Pressure (60.50.38)
4.
CAUTION: Make sure the area around the contact surfaces is clean and dry before you start to disconnect or remove parts. Plug all open connections to avoid contamination of the system.
CAUTION: Visually inspect air line ends for damage or wear. Repair or replace the air line as needed.
NOTE: Note the position of the air lines.
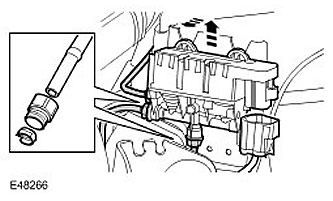
Disconnect the 3 air lines from the rear valve block.
5. Disconnect the electrical connector.
6. Remove the rear valve block. Loosen the three rubber pads on the valve block.
7. Remove the Voss fittings from the air lines. Remove and discard taper bushings and couplers.
Installation
1.
NOTE: New air suspension parts are shipped with Voss fittings installed and already torqued. If a new part is installed, it is not necessary to install new Voss fittings.
Install new Voss fittings on the rear valve block. Tighten connection (tightening torque 2.5 Nm).
2. Install the rear valve block.
- Attach the three valve block rubber pads.
- Connect the electrical connector.
- Connect the air lines to the Voss fittings.
- Pull on each air line to make sure it is securely seated in the Voss fitting.
3. Use T4 to pressurize the air suspension. For more information, refer to Relieving and Boosting Air Suspension System Pressure (60.50.38)
4. Install the wheel. Tighten wheel nuts (tightening torque 140 Nm).
Comments on this article