Contents: Removal ⇩ Installation ⇩
Removal
1.
CAUTION: Never work on a vehicle supported only by a jack. Always support the vehicle with special stands.
Raise and support the vehicle.
2. Using the T4 tool, release pressure from the air suspension.
For more information, refer to Releasing and Raising Air Suspension System Pressure (60.50.38)
3.
CAUTION: Before disconnecting or disassembling parts, make sure the area around the contact surfaces is clean and dry. To avoid contamination of the system, plug all open connections.
CAUTION: The air line can only be disconnected by unscrewing the Voss type nipple. Do not unscrew the air line mounting bushing from the air suspension air cylinder. Failure to follow this instruction may result in damage to the vehicle.
CAUTION: Visually inspect the ends of the air line for damage or wear. Repair or replace the air line if necessary.
Disconnect the air lines from the air suspension air tank.
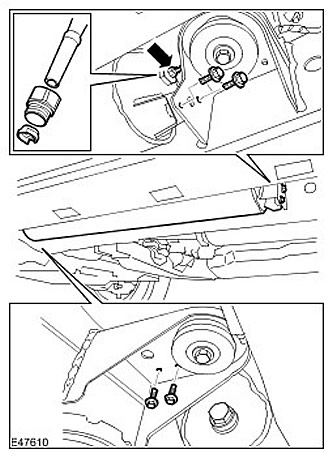
4. Remove the air suspension air cylinder. Unscrew the 4 bolts.
5. Remove the Voss type fitting from the air line. Remove and discard the cone bushing and coupling.
Installation
1.
CAUTION: Make sure the new Voss type fitting is installed and tightened completely with the corrector plug installed on it.
Install a new Voss type fitting onto the air suspension air spring. Tighten the new Voss type fitting (tightening torque 5 Nm).
2. Install the air suspension air cylinder.
- Place the air tank in the brackets on the chassis, insert the bolts into the holes and tighten them. (tightening torque 23 Nm).
- Install the air line into the Voss type fitting until it stops.
- Pull on the air line to ensure it is securely seated in the Voss type fitting.
3. Use T4 to increase the pressure in the air suspension. For more information, refer to Releasing and Increasing the Pressure in the Air Suspension System (60.50.38)
Comments on this article