Contents: Removal ⇩ Installation ⇩
Removal
1.
CAUTION: Never work on a vehicle supported solely by a jack. Always support the vehicle securely.
Raise and support the vehicle.
2. Remove the wheel and tire assembly.
3.
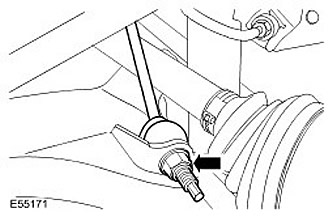
CAUTION: To prevent the ball joint from turning, use the supplied Allen key.
Remove the stabilizer bar strut. Unscrew the nut and discard it.
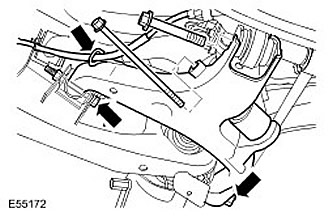
4. Loosen the 2 lower control arm bolts.
5. Disconnect the shock absorber assembly with the elastic element from the lower arm.
Loosen the nut and remove the bolt.
6. Disconnect the parking brake cable.
7. Remove 2 lower arm bolts.
8.
CAUTION: Make sure that the ball joint boot is not damaged. Damage to the boot will result in premature failure of the ball joint.
Disconnect the wheel knuckle from the lower arm. Remove the bolt.
9. Remove the lower arm.
Installation
1. Install the lower control arm. Insert the bolts, but do not tighten them completely yet.
2.
CAUTION: Make sure that the ball joint boot is not damaged. Damage to the boot will result in premature failure of the ball joint.
Attach the lower control arm to the wheel knuckle. Tighten the bolt. (tightening torque 175 Nm).
3. Disconnect the shock absorber assembly with the elastic element from the lower arm. Tighten the nut and bolt (tightening torque 300 Nm).
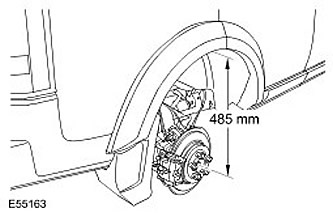
4. Set the distance from the center of the axle shaft to the edge of the wing so that it is 485 mm (19.10 inches).
5. Tighten the lower control arm bolts (tightening torque 275 Nm).
6. Secure the parking brake cable.
7. Attach the stabilizer bar strut. Screw on a new nut and tighten. (tightening torque 115 Nm).
8. Install the wheel and tire assembly. Tighten the wheel nuts. (tightening torque 140 Nm).
9. Adjust the wheel alignment angles.
(The original article is located on the website LRMAN.ru)
Comments on this article