Contents: Dismantling ⇩ Installation ⇩
Dismantling
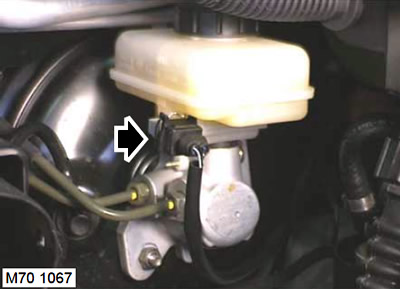
1. Disconnect the brake fluid level sensor multi-pin electrical connector.
2. Place a cloth under the brake master cylinder to prevent brake fluid from splashing.
CAUTION: Brake fluid can damage paintwork. If brake fluid comes into contact with painted surfaces, remove any traces of the fluid immediately and rinse the area with water.
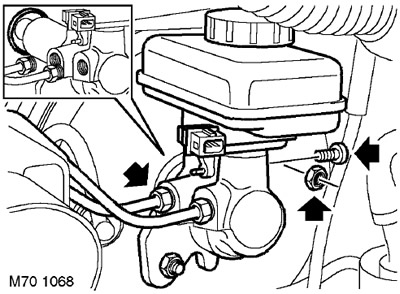
3. Disconnect the auxiliary brake circuit line coupling from the master cylinder.
4. Disconnect the main brake circuit line coupling from the master cylinder.
CAUTION: Always plug the fittings and holes to protect the system from dirt.
5. Remove the Torx head bolt that secures the master cylinder reservoir to gain access to the master cylinder retaining nut.
6. Unscrew and remove the two nuts securing the master brake cylinder to the vacuum booster and remove the master cylinder.
7. Install the Torx head bolt to the master cylinder reservoir.
8. Remove and discard the sealing ring.
Installation
1. Clean the mating surfaces of the master cylinder and vacuum booster.
2. Remove the Torx head bolt that secures the reservoir to the master cylinder.
3. Install a new O-ring onto the master cylinder.
4. Align the push rod with the master cylinder and install the cylinder onto the vacuum booster.
5. Install new nuts and tighten them to 25 Nm.
6. Replace the Torx head bolt that secures the reservoir to the master cylinder. Tighten the bolt to 8 Nm.
7. Clean the brake line connections and line ends.
8. Connect the main and auxiliary circuit pipelines and tighten the couplings to a torque of 17 Nm.
9. Connect the multi-pin electrical connector of the brake fluid level sensor.
10. Remove air from the brake system.
BRAKE SYSTEM, ADJUSTMENTS, Bleeding the brake system.
Comments on this article