Dismantling
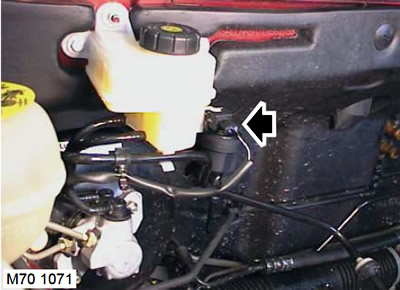
1. Disconnect the multi-contact electrical connector of the emergency brake fluid level sensor.
2. Disconnect a vacuum tube of the vacuum amplifier from an inlet collector and release it from fastening to the main brake cylinder.
3. Place a cloth under the brake master cylinder to avoid splashing brake fluid.
CAUTION: Brake fluid can damage paintwork. If brake fluid comes into contact with painted surfaces, remove any traces of fluid immediately and wash the area with water.
4. Disconnect the auxiliary brake circuit coupler from the master cylinder.
5. Disconnect the clutch of the pipeline of the main brake circuit from the master cylinder.
CAUTION: Always plug fittings and openings to keep dirt out of the system.
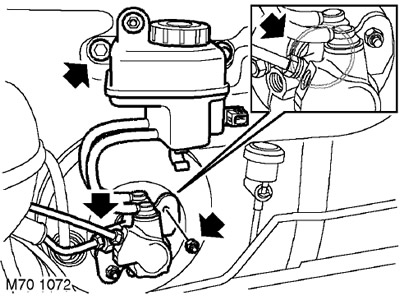
6. Turn away a nut and 2 bolts of fastening of a tank of the main brake cylinder.
7. Turn away and remove two nuts of fastening of the main brake cylinder to the vacuum amplifier and remove the main cylinder.
8. Remove and discard O-ring.
Installation
1. Clear adjoining surfaces of the main brake cylinder and the vacuum amplifier.
2. Install a new sealing ring on the brake master cylinder.
3. Align the pusher rod with the master brake cylinder and install the cylinder on the vacuum booster.
4. Install new nuts and tighten them to 25 Nm.
5. Establish a tank on the main brake cylinder, wrap a nut and bolts and tighten them with the moment of 6 Nanometers.
6. Clear places of accession of brake pipelines and tips of pipelines.
7. Connect the pipelines of the main and auxiliary circuits and tighten the couplings with a torque of 17 Nm.
8. Connect the vacuum tube of the vacuum booster to the intake manifold and attach it to the master cylinder reservoir.
9. Connect a multicontact electric socket of the gauge of emergency level of a brake liquid.
10. Remove air from the brake system.
BRAKING SYSTEM, ADJUSTMENTS, Bleeding of air from the brake system.
Comments on this article