Contents: Dismantling ⇩ Installation ⇩
Dismantling
1. Remove the rear axle drive shaft housing.
TRANSFER CASE, REPAIR WORK, Rear axle drive shaft seal: vehicles with Td4 engine.
TRANSFER CASE, REPAIR WORK, Rear axle drive shaft seal: vehicles with K1.8 engine.
TRANSFER CASE, REPAIR WORK, Rear axle drive shaft seal: vehicles with KV6 engine, except for North American market countries.
TRANSFER CASE, REPAIR WORK, Rear axle drive shaft seal: vehicles with KV6 engine, for North American market countries.
CAUTION: Before removing the rear axle drive shaft housing, measure its rotation resistance in the bearings.
2. Secure the rear axle drive shaft housing to the fixture and secure the fixture in a vice.
3. Compare the rotational resistance with the one obtained earlier.
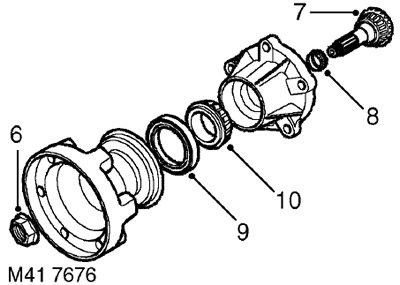
4. To facilitate subsequent assembly, apply mounting marks to the rear axle drive shaft and to the shaft flange.
5. Secure the rear axle drive shaft flange using the LRT-51-003 tool.
6. Unscrew and discard the nut.
7. Install the rear axle drive shaft housing on the press, place a mandrel on the end of the shaft and press the shaft out of the flange and out of the housing.
8. Remove and discard the deformable spacer sleeve.
9. Using a lever, remove the rear axle drive shaft seal.
CAUTION: Be careful not to damage the oil seal seat.
10. Remove the bearing from the rear axle drive shaft.
Installation
1. Wash the rear axle drive shaft, shaft flange and shaft housing.
2. Clean the oil seal seat.
3. Lubricate the bearing and install it into the shaft housing.
4. Lubricate the new seal.
5. Using a mandrel, press the oil seal into the crankcase seat.
CAUTION: The oil seal must be installed flush with the edge of the rear axle drive shaft housing.
6. Insert the shaft into the shaft housing using a new deformable spacer sleeve.
7. Apply a thin coat of molybdenum disulfide grease to the shaft flange splines.
8. Align the marks on the shaft with the marks on the flange and press the flange onto the shaft so that there is a gap of 2 mm between the bearings.
9. Fasten the assembled unit to the fixture and secure the fixture in a vice.
10. Fit a new nut, hold the flange with the LRT-51-003 tool and tighten the nut to 150 Nm.
11. Compare the rotational resistance with the one obtained earlier.
NOTE: The rotating resistance on new bearings is 180 to 200 N cm.
If the resistance on the previous bearings was higher than 20-30 N-cm and lower than on the new ones, then you need to adjust the resistance to the previously recorded value.
If the rotation resistance on the previous bearings was below 20 N cm, then the resistance needs to be adjusted to 20-30 N cm.
12. If the rotation resistance is too low, carefully tighten the nut and measure the resistance again. If the rotation resistance is too high, disassemble the unit and assemble it with a new deformable spacer sleeve. Reassemble using a new nut. Measure the rotation resistance again.
13. Check the flange runout using a dial indicator.
ATTENTION: Flange runout should not exceed 0.05 mm.
14. Remove the fixture from the vice and remove the assembled unit from the fixture.
15. Install the rear axle drive shaft housing.
TRANSFER CASE, REPAIR WORK, Rear axle drive shaft seal: vehicles with Td4 engine.
TRANSFER CASE, REPAIR WORK, Rear axle drive shaft seal: vehicles with K1.8 engine.
TRANSFER CASE, REPAIR WORK, Rear axle drive shaft seal: vehicles with KV6 engine, except for North American market countries.
TRANSFER CASE, REPAIR WORK, Rear axle drive shaft seal: vehicles with KV6 engine, for North American market countries.
Comments on this article