NOTE: The description of the removal procedure in this manual may include installation steps.
Removing
1. Raise and support the vehicle
WARNING: Place secure stands under the vehicle.
2. Remove the left rear wheel and tire assembly. Refer to procedure: Wheel and tire (204-04 Wheels and tires, Removal and installation).
3. With assistance, remove the rear muffler. Refer to Procedure: Exhaust System (309-00A Exhaust system - 3.2L NA - I6, Removal and installation).
4. Discard bolts.
WARNING: Do not use a lever to disengage the driveshaft pivots from the transfer case or rear differential flanges.
Mark the position of the elements to facilitate subsequent installation. Secure the cardan shaft with suitable clamps.
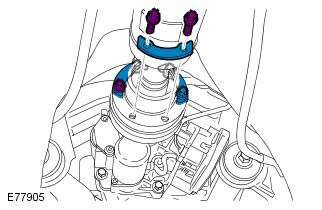
5.
6.
7. Remove the left rear axle shaft. Refer to Procedure: Rear Left Axle (205-05 Rear drive axle, Removal and installation).
8. Support the differential with a gearbox jack.
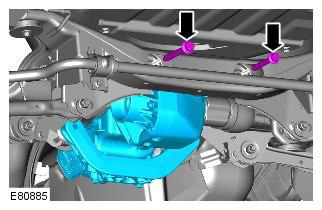
9. Discard bolts.
CAUTION: Mark the position of the elements to facilitate subsequent installation.

10. Discard bolts.
CAUTION: Mark the position of the elements to facilitate subsequent installation.
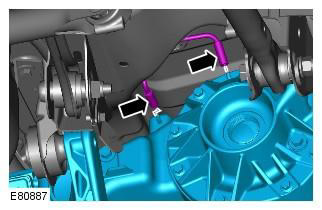
11. Carefully disconnect the inner hinge of the right axle shaft from the differential, take it to the side and tie it.
12.
13. Gently lower and remove the differential box.
14.
NOTE: Do not proceed with further dismantling if the element is removed only for access.

15.
Installation
1. Install a new O-ring on the active coupling.
CAUTION: Clean area around element and remove foreign material from area.
2. Align the active clutch with the differential and tighten the bolts. Tightening torque: 24 Nm
Clean the area around the element and remove foreign material from it. Use new bolts.
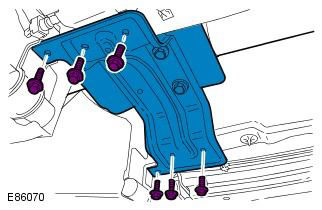
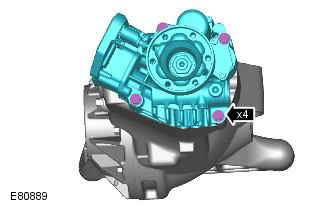
3. Install the rear differential support bracket. Tightening torque: 35 Nm
4. Using a transmission jack, carefully lift the assembly.
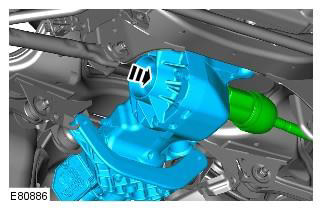
5. Connect the differential vent lines.
6. Attach the inner hinge of the right axle shaft to the differential.
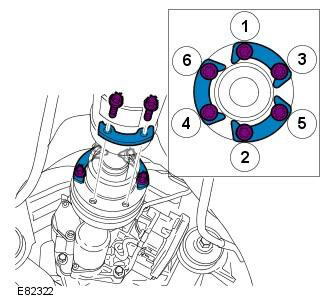
7. Screw in bolts of fastening of the forward plug of back differential. Tightening torque: 175 Nm
The alignment marks must be aligned. Use new bolts.
8. Screw bolts of fastening of the back plug of back differential. Tightening torque: 110 Nm
The alignment marks must be aligned. Use new bolts.
9. Establish the left half shaft. Refer to Procedure: Rear Left Axle (205-05 Rear drive axle, Removal and installation).
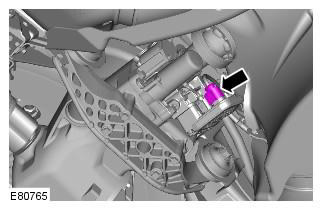
10. Connect the electrical connector of the active clutch module.
11. Install the propshaft rear support bracket. Tightening torque: 35 Nm
12. Connect the cardan shaft to the rear flange. Tightening torque: 40 Nm
CAUTION: Use new bolts.
13. Install the rear muffler. Refer to Procedure: Exhaust System (309-00A Exhaust system - 3.2L NA - I6, Removal and installation).
14. Install the left rear wheel. Refer to procedure: Wheel and tire (204-04 Wheels and tires, Removal and installation).
15. Check the fluid level in the active clutch and top up if necessary. Refer to Procedure: Activated Friction Clutch Filler (205-02 Rear Drive Axle/Differential, General Procedures).
16. Fill the differential with working fluid. Refer to the procedure: Draining the gear oil from the differential and filling the differential with gear oil (205-02 Rear Drive Axle/Differential, General Procedures).
Comments on this article