Contents: Pinpoint test A: checking…⇩ Pinpoint Test B: Checking Oil…⇩ Pinpoint Test C: Checking Engine Oil…⇩
NOTE: When reference is made to "suitable equipment" this refers to standard workshop equipment. When carrying out any checks, refer to the operating instructions for your own equipment.
Pinpoint test A: checking compression in cylinders
WARNING: Only use compression testers capable of reading the higher compression pressures present in diesel engines. Failure to follow this instruction may result in injury.
NOTE: If possible, the compression test should be performed at normal engine operating temperature.
A1: Checking the compression in the engine cylinders ("dry")
- Apply the parking brake and move the selector lever to neutral (or engage park on vehicles with automatic transmission).
- Turn the ignition OFF.
- Remove the starter relay.
- Disconnect the starter solenoid electrical connector.
- Connect a suitable remote start device to the starter solenoid.
- Remove the glow plugs. For additional information, refer to: Glow Plugs (303-07B Glow Plug System, Removal and Installation).
- Install a suitable adapter in place of the glow plug in the first cylinder to be tested.
- Connect a suitable tester to the adapter. See warning above.
- Using the remote starter, crank the engine at least five revolutions.
- Record the values of compression pressure and the rotational speed at which it is achieved.
- Repeat steps 7 - 10 above for the remaining cylinders, turning the engine the same number of revolutions each time.
- Compare the compression pressure readings for all cylinders.
Да - If the compression readings are not very low due to natural causes (experience will indicate this), check for other causes of the customer complaint. No - GO to A2.
A2: Checking the compression in the engine cylinders ("wet")
CAUTION: If engine oil is injected into the cylinders, allow the engine to run at 2,000 rpm for at least 10 minutes after completing the check to prevent damage to the catalytic converter. Failure to follow this instruction may result in vehicle damage.
NOTE: There is a combustion chamber at the top of each piston. Take care not to allow oil to enter this chamber.
- Using a suitable oil can with a long flexible nozzle, immediately before checking, inject a small amount of clean engine oil into the cylinder so that the oil fills the gap between
- piston and cylinder.
- Repeat steps 7 - 10 of the above test, adding oil to each cylinder immediately before testing.
- Compare the compression pressure readings for all cylinders.
The article is based on data from the website LRMAN.RU
Are the compression pressure readings higher than a dry test?
Да - Higher readings after adding oil may indicate wear or damage to the cylinder, piston and/or piston rings. Disassembly is required to confirm this.
No - If the compression pressure remains unchanged after adding oil, but the reading is still less than 90% of the readings for the other cylinders, this may indicate a sticking and/or seizing valve, leaks through the cylinder head gasket, etc. Disassembly is required to verify this. Clear any DTCs that may have been triggered by the test.
Pinpoint Test B: Checking Oil Consumption
NOTE: Oil consumption varies depending on a number of factors. New engines typically consume more oil than "broken-in" engines once the consumption value has been determined. Contact your dealer's technical support for more information.
B1: Check for increased oil consumption
- Start the electric motor and allow it to run until it reaches normal operating temperature.
- Place the car on a level, horizontal surface and turn off the engine.
- Let the car sit for at least five minutes.
- Check the oil level.
- If necessary, adjust the level and record the readings and mileage in the vehicle's service book.
- Advise the owner/driver that a check is being performed and that he should not add oil while the check is in progress, but should check the level every 100-150 miles.
- When the oil level reaches the ADD mark, the customer must bring the car to the service station for inspection.
- Add oil to the level corresponding to the initial stage of the test and record the amount of oil required to do this and the mileage covered during the test.
- Based on this, it is possible to calculate the consumption and make a decision on whether the consumption is really considered increased.
Да - Disassembly will be required to check the items listed in the malfunction symptom table.
No - No further action required.
Pinpoint Test C: Checking Engine Oil Pressure
NOTE: Before checking the oil pressure, drive the vehicle for at least 10 km. Do not attempt to reach normal operating temperature by idling the engine.
NOTE: Before starting this test, check the engine oil level and add oil as needed.
C1: Check for insufficient engine oil pressure
- Remove the oil pressure sensor. For additional information, refer to: Engine Oil Pressure (EOP) Sensor (303-14B Electronic Controls - 2.2L Duratorq - Td4, Removal and Installation).
- Connect the oil pressure gauge and adapter in place of the oil pressure sensor.
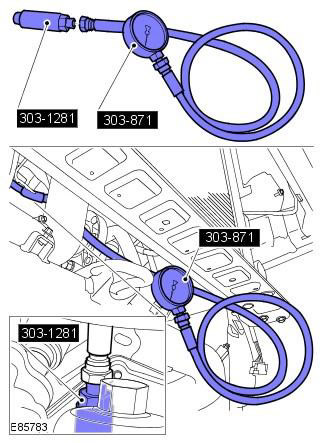
- Start the engine and check for leaks at the pressure gauge connection.
- Allow the engine to idle and monitor the oil pressure.
- Increase the engine speed to 4000 rpm and check the fuel pressure.
Да - The presence of these pressure values does not indicate a malfunction, the oil pressure is considered normal.
No - Low pressure may indicate problems with such components/parameters as: oil pump, filtration, engine clearances. Check for any other signs of engine failure (noise, etc.). High pressure may indicate a blockage in the lubrication system. If this problem is not resolved, high oil pressure will lead to engine oil leaks and other malfunctions.
Comments on this article