car logo Ford
car logo Volkswagen
car logo BMW
car logo Opel
car logo Audi
car logo Toyota
car logo Peugeot
English Русский
Български
Беларускі
Український
Српски
Hrvatski
Română
Polski
Slovenský
Magyar


Main
Freelander
Discovery
Range Rover
Defender
Contacts
Articles

Bleeding air from the low pressure fuel system (Discovery 3)

 
  • Main
  • Discovery
  • Discovery 3
  • Power unit
  • Fuel supply
  • Bleeding air from the low pressure fuel system
 
        0  

Special tool


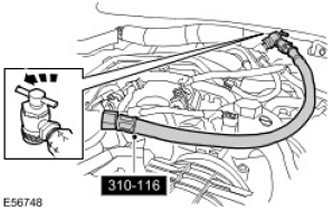
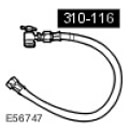
Fuel Rail Pressure Test Adapter 310-116 (LRT-19-006A)

CAUTION: Wait at least 30 seconds after stopping the engine before attempting any repairs to the high pressure fuel injection system. Failure to do so could result in injury.


CAUTION: Before beginning any work on the fuel system, ground the vehicle and maintain the ground connection until work is completed.


CAUTION: Do not smoke or carry a lighted cigarette or open flame of any type when working on or near fuel-related components. There is a risk of ignition of flammable vapors. Failure to follow these instructions may result in personal injury.


CAUTION: After completing repairs, visually inspect the fuel system for leaks. Failure to do so could result in injury.


WARNING: If fuel is swallowed, do not induce vomiting and seek medical attention immediately. Failure to follow these instructions may result in injury.


WARNING: If fuel gets into your eyes, rinse with cold water or an eye wash solution and seek medical attention immediately.


CAUTION: Wash your hands thoroughly after handling fuel as prolonged contact with the skin may cause irritation. If irritation occurs, seek medical attention.


CAUTION: This procedure involves handling fuel. Always be prepared for possible fuel splashing and follow safe fuel handling practices. Failure to follow these instructions could result in personal injury.


CAUTION: Diesel fuel injection equipment is manufactured to very precise tolerances and with very small clearances. Therefore, it is especially important to maintain absolute cleanliness when working with these components. Open holes or lines should always be plugged using suitable plugs. Failure to follow this instruction may result in dirt entering the fuel injection system.


CAUTION: This procedure must be performed before attempting to start the engine after removing or replacing any fuel system component that penetrates the fuel line. Failure to follow this instruction may result in damage to the fuel pump.


1. This procedure is mandatory when removing, disconnecting or replacing any of the following fuel system components: fuel tank, fuel lines, fuel filter element, fuel coolers, fuel pump or fuel rail pressure sensor.

2. Remove the engine cover. Engine Cover - 2.7L Diesel (12.30.50)

3. Install the special tool on the Schrader valve of the fuel rail. Remove the dust cap from the Schrader valve.

4. Place a container to collect spilled fuel. Open the valve on the special tool.
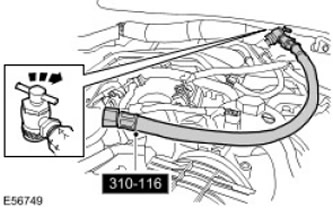
4. Place a container to collect spilled fuel. Open the valve on the special tool.


5. Turn the ignition key to the ON position for 25 seconds. You should hear the noise of the fuel pump in the tank.


6. Repeat the above procedure until clean fuel without air bubbles comes out of the special tool. Without turning off the pump, close the valve on the special tool to prevent air from entering the system.

7. Remove the special tool from the Schrader valve. Put the dust cap on the Schrader valve.

7. Remove the special tool from the Schrader valve. Put the dust cap on the Schrader valve.


8. Remove the container.

9.
NOTE: To remove air from the fuel rails and injectors, allow the engine to idle for 2 minutes.


Details can be found on the website www.lrman.ru

Start the engine and let it idle.

10. Install the engine cover. Engine Cover - 2.7L Diesel (12.30.50)


This article is available at russian, bulgarian, belarusian, ukrainian, serbian, croatian, romanian, polish, slovak, hungarian
Article review: Saveliy Ushakov


Previous articles
Specification 4.0L
Specification 4.4L
Specification 2.7L
Specification Turbocharger
Device and technical description 4.0L
Device and technical description 4.4L
Device and technical description 2.7L
Device and technical description Turbocharger

Current article
Bleeding air from the low pressure fuel system

Next articles
Fuel Filter Condensate Drain Valve 2.7L
Emptying the fuel tank
Checking the fuel system pressure 2.7L
Checking the fuel system pressure 4.0L
Checking the fuel system pressure 4.4L
Relieving pressure in the fuel supply system 4.0L
Relieving pressure in the fuel supply system 4.4L


Similar articles from Land Rover repair manuals:
• Relieving pressure in the fuel supply system Freelander 1 (1997-2006)
• Rear Tire Pressure Monitoring System (TPMS) Antenna Freelander 2 (2006-2014)
• Checking the fuel system pressure Range Rover 3 (2001-2012)
• Bleeding air from the low pressure fuel system Defender 2007+ (2007-2016)

Comments on this article


No comments yet


How much will 34 + 15 =


Discovery 3 
  • General information
  • Using the manual
  • Precautionary measures
  • Service Information
  • Technique
  • Health protection
  • Road test
  • Identification codes
  • Jacking and lifting
  • Maintenance - diesel
  • Maintenance - petrol
  • Chassis
  • Suspension
  • Front suspension
  • Rear suspension
  • Wheels and tires
  • Dynamic suspension
  • Cardan shaft
  • Rear drive axle
  • Front drive axle
  • Front axle axles
  • Rear axle axles
  • Brake system
  • Parking brake
  • Hydraulic brake
  • Vacuum brake booster
  • Anti-lock braking system
  • Steering
  • Steering column
  • Power unit
  • Petrol engine 4.0L
  • Petrol engine 4.4L
  • Diesel engine 2.7L
  • Engine cooling
  • Fuel supply
  • Drive units
  • Launch system
  • Ignition system
  • Emission reduction
  • Air filtration
  • Fuel vapor control
  • Electronic control part
  • Car gearbox
  • Clutch
  • All-wheel drive systems
  • Transfer case
  • Exhaust system
  • Fuel tank and lines
  • Acceleration control
  • Electrical equipment
  • Climate control
  • Instruments and control lamps
  • Battery and charging system
  • Information system
  • Lighting and headlights
  • Power distribution
  • Electronic Function Group
  • Body and coating
  • Body elements
  • Interior and body trim
  • Mirrors and glasses
  • Seats
  • Instrument panel and console
  • Handles and locks
  • Windshield wipers and washers
  • Sunroof and bumpers
  • Safety system
  • Body repairs
  • Repair of front end elements
  • Repair of back elements
  • Side panel repair
  • Frame and body mount

Discovery 1 
  • General information
  • Technical specifications
  • Introduction to manual
  • Troubleshooting
  • Power unit
  • Diesel engine Tdi
  • Petrol engine V8i (3.9 l)
  • Petrol engine V8i (4.0 l)
  • Petrol engine Mpi
  • Reducing harmful emissions
  • Fuel system Tdi
  • Fuel system MFi
  • Fuel system SFi
  • Fuel system MPi (MEMS)
  • Cruise control
  • Cooling system (Tdi)
  • Cooling system (V8i)
  • Cooling system (MPi)
  • Exhaust system
  • Transmission
  • Clutch
  • Manual gearbox R380
  • Manual gearbox LT 77
  • Transfer case LT230T
  • Automatic gearbox
  • Cardan shaft
  • Rear axle
  • Front axle
  • Chassis
  • Steering system
  • Front suspension
  • Rear suspension
  • Brake system
  • Wheels and tires
  • Body and interior
  • Passive safety
  • Doors, locks and windows
  • Exterior body parts
  • Interior trim details
  • Seats
  • Electrical equipment
  • Heating and ventilation
  • Air conditioning
  • Windscreen wipers
  • Starting and charging system
  • Equipment and devices
  • Lighting and headlights


LRman.ru © 2013-2026 | Mobile version | Free Lander | Discovery | Range Rover | Defender | Contacts | | Sitemap |
Car repair and service instructions Land Rover: Freelander, Discovery, Range Rover, Defender
We use cookies to make pages load faster and provide a more user-friendly experience 🍪