Dismantling
1. Remove a reception pipe of system of release.
MANIFOLDS AND EXHAUST SYSTEM: MOD. K, volume 1.8, REPAIR WORKS, Downpipe.
2. Drain the engine oil.
MAINTENANCE, MAINTENANCE, Engine oil and oil filter - K1.8.
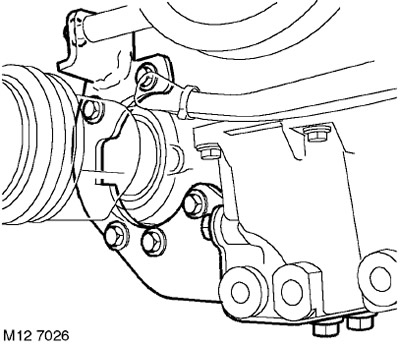
3. Turn away a bolt of fastening of the bottom crossbar to an arm on the pallet.
4. Loosen the bolt securing the engine lower cross member to the subframe, move the cross member away from the bracket on the pallet.
5. Turn away 3 bolts of fastening of an arm of the lower crossbar to the pallet and remove an arm.
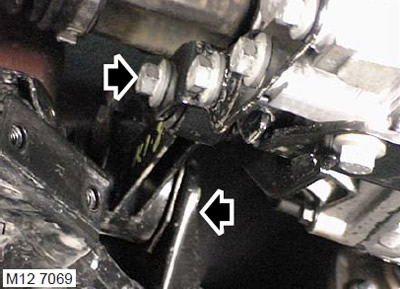
6. Turn away the top bolt of fastening of an arm of a distributing box to the block of cylinders.
7. Turn out 5 bolts of fastening of an arm to a distributing box.
8. Turn out 3 bolts of fastening of an arm of a distributing box to the pallet.
9. Position the transfer box bracket so that there is room to remove the pallet.

10. Turn away 2 bolts of fastening of the pallet of the engine to a transmission.
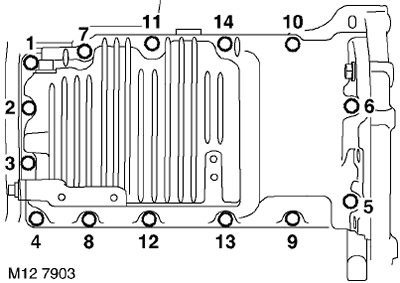
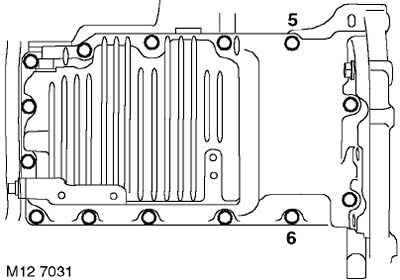
11. Note the position of the two longest bolts M8x60, and unscrew the 14 bolts securing the pallet to the integral main bearing cap in the sequence shown in the figure.
12. Lightly tap the sump with a mallet to knock it off the sealant layer and remove the sump.
CAUTION: Do not separate the sump from the main bearing cap using the lever.
Installation
1. Clean the inside of the sump. With a lint-free cloth and solvent, clean the mating surfaces of the sump and integral main bearing cap.
2. Apply a continuous bead of STC 4600 Sealant to the surface of the pan and spread evenly using a roller trowel.
WARNING: Assembly of prepared parts must be done immediately to prevent contamination of surfaces with applied sealant.
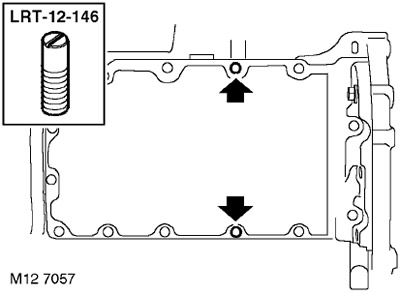
3. Screw the mounting studs, LRT-12-146, into the positions indicated in the figure.
4. Install the pan on the cover of the main bearings, screw the bolts into sockets 4 and 5 and tighten them to a torque of 4 Nm.
5. Screw 10 bolts into the remaining sockets and lightly tighten them. The two longest M8 x 60 bolts must be screwed into the back holes of the pan.
6. Screw bolts of fastening of the pallet to a transmission, slightly tighten them and weaken again. With this technique, the rear flange of the pallet will take the correct position in relation to the gearbox.
7. Remove the mounting studs, LRT-12-146, screw in and lightly tighten the two remaining bolts.

8. Make sure that the rear flange of the sump is aligned with the gearbox housing and gradually tighten the sump mounting bolts in the sequence shown in the figure, the M8x25 bolts with a torque of 25 Nm, and the M8x60 bolts with a torque of 30 Nm.
9. Tighten bolts of fastening of the pallet to a transmission. Tightening torque 45 Nm.
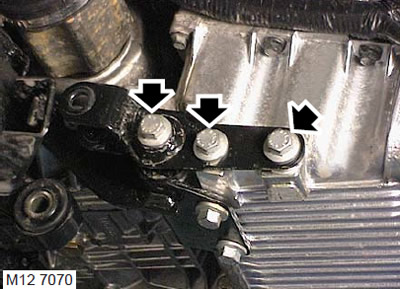
10. Install the bracket on the transfer case and on the pallet, screw in the bolts of the bracket to the transfer case and tighten them to a torque of 50 Nm, and the bolts of the bracket to the pallet - to a torque of 45 Nm.
11. Screw in the upper bolt of the transfer case bracket to the cylinder block and tighten it to 45 Nm.
12. Install the lower cross member bracket on the pallet, screw in the bolts and tighten them to a torque of 100 Nm.
13. Install the lower cross member on the pallet bracket, screw in the bolts and tighten them to a torque of 80 Nm.
14. Tighten the bolt securing the lower cross member to the subframe to 80 Nm.
15. Establish a reception pipe of system of release.
MANIFOLDS AND EXHAUST SYSTEM: MOD. K, volume 1.8, REPAIR WORKS, Downpipe.
16. Fill the engine with oil.
MAINTENANCE, MAINTENANCE, Engine oil and oil filter - K1.8.
Comments on this article