Removing
1. Disconnect the ground wire from the battery. For more information refer to Specification.
2. Remove the engine cover. For more information refer to Engine Cover - 2.7L Diesel (12.30.50)
3. Remove the cooling fan shroud. For more information refer to Cooling Fan Shroud (26.25.11)
4. Unload the refrigerant from the A/C system. For more information, refer to Refrigerant Recovery, Vacuuming and Charging the Air Conditioning System (A/C) (82.30.02)
5. Remove the extra battery shelf. For more information, refer to Additional Battery Shelf (76.10.31)
6. Remove the accessory drive belt. For more information refer to Drive Belt Accessories (86.10.03)
7.
WARNING: It is forbidden to carry out work on a vehicle supported only by a jack. Be sure to place secure supports under the vehicle.
Raise and support the vehicle.
8. Remove the left front wheel.
9. Remove the bottom wing mudguard panel. Remove four clips.
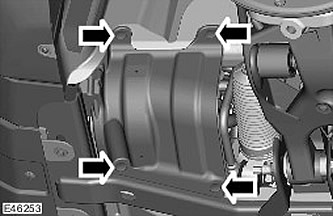
10. Remove the left front mudguard. For more information refer to Fender Mudguard (76.10.48)
11. Remove the upper arm and brake line heat shields to gain access.
- Remove three nuts.
- Turn out three bolts.
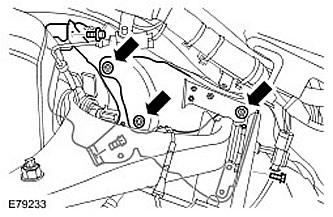
12. Release the charge air cooler intake pipe.
- Turn out two bolts.
- Loosen the nut.
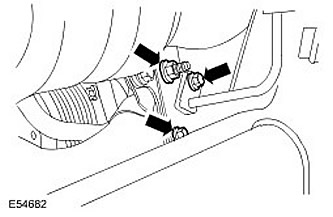
13. Disconnect the charge air cooler inlet hose. Release the clamp.
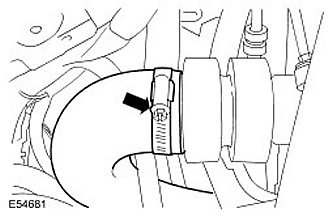
14. Disconnect the charge air cooler inlet hose. Release the clamp.
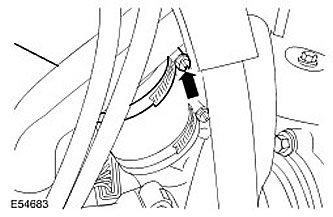
15.
CAUTION: Plug off all refrigerant lines immediately to prevent dirt and moisture from entering.
CAUTION: Be careful not to damage mating surfaces.
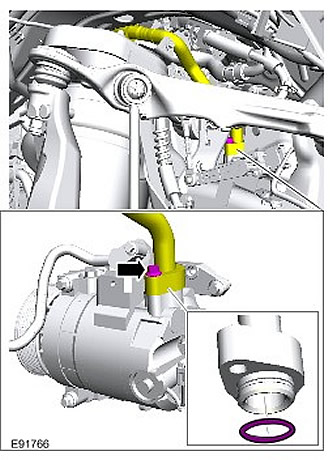
Disconnect the low pressure line from the A/C compressor.
- Remove the O-ring and discard it.
- Using a suitable clamp, secure the A/C low pressure pipe to the side.
16. Turn out a bolt of fastening of a back arm of the pump of the amplifier of a steering. Reposition the charge air cooler intake piping to gain access to the power steering pump mounting bolt.
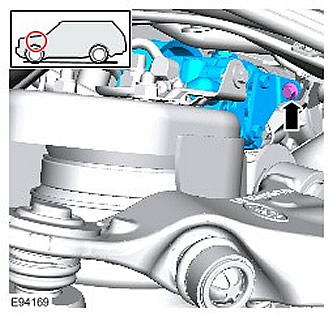
17.
WARNING: It is forbidden to carry out work on a vehicle supported only by a jack. Be sure to place secure supports under the vehicle.
Lower the car.
18.
ATTENTION: If the power steering fluid gets on the paintwork, the affected area of the coating should be immediately washed with cold water.
Disconnect the high pressure line from the power steering.
- Remove the O-ring and discard it.
- Insert plugs into open ports.
- Allow the liquid to drain into the container.
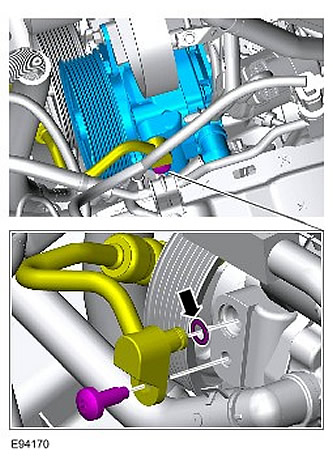
19.
ATTENTION: If the power steering fluid gets on the paintwork, the affected area of the coating should be immediately washed with cold water.
Disconnect the power steering pump feed hose.
- Clamp the power steering supply hose to minimize fluid loss.
- Insert plugs into open ports.
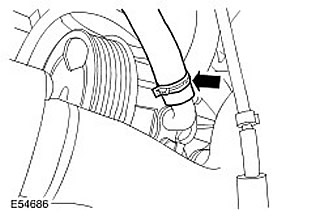
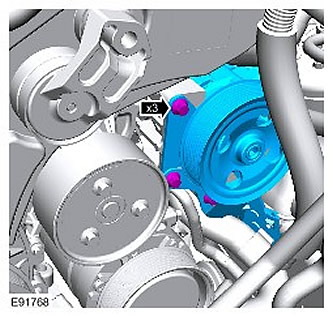
20. Remove the power steering pump. Remove the three front power steering pump mounting bolts.
Installation
1. Install the power steering pump and bracket. Install the three power steering pump front bolts and tighten them slightly, then loosen each bolt 1/4 turn.
2.
WARNING: It is forbidden to carry out work on a vehicle supported only by a jack. Be sure to place secure supports under the vehicle.
Raise the vehicle.
3. Install the power steering pump rear bracket bolt.
- Reposition the charge air cooler intake piping to gain access to the power steering pump mounting bolt.
- Tighten the bolt to 25 Nm.
4.
WARNING: It is forbidden to carry out work on a vehicle supported only by a jack. Be sure to place secure supports under the vehicle.
Lower the car.
5. Tighten the power steering pump front bolts to 24 Nm.
6. Connect the power steering supply hose.
- Remove the plugs from the holes.
- Remove the clamp from the hose.
7.
NOTE: Lubricate seals with clean power steering fluid.
Connect the nipple connection of the power steering high pressure pipe.
- Remove the plugs from the holes.
- Install a new sealing ring.
- Tighten the Torx bolt to 25 Nm.
- Remove container.
8.
CAUTION: Lubricate new seals with clean compressor oil.
Connect the low pressure line to the A/C compressor.
- Remove the plugs from the holes.
- Install a new sealing ring.
- Tighten the bolt to 9 Nm.
9.
WARNING: It is forbidden to carry out work on a vehicle supported only by a jack. Be sure to place secure supports under the vehicle.
Raise the vehicle.
10. Connect the charge air cooler inlet hose. Tighten the clamps.
11. Install the charge air cooler intake pipe.
- Screw in two bolts.
- Screw on the nut.
- Tighten to 10 Nm.
12. Install the upper arm and brake line heat shields.
- Screw in three bolts.
- Screw on three nuts.
13. Install the lower fender mudguard trim panel. Install four clamps.
14. Install the left front mudguard. For more information refer to Fender Mudguard (76.10.48)
15. Install the wheel.
16.
WARNING: It is forbidden to carry out work on a vehicle supported only by a jack. Be sure to place secure supports under the vehicle.
Lower the car.
17. Install the accessory drive belt. For more information refer to Drive Belt Accessories (86.10.03)
18. Install the additional battery shelf. For more information, refer to Additional Battery Shelf (76.10.31)
19. Refill the air conditioning system. For more information, refer to Refrigerant Recovery, Vacuuming and Charging the Air Conditioning System (A/C) (82.30.02)
20. Install the cooling fan shroud. For more information refer to Cooling Fan Shroud (26.25.11)
21. Check the power steering fluid level. add if necessary. For more information, refer to Filling and Bleeding the Power Steering System
22. Install the engine cover. For more information refer to Engine Cover - 2.7L Diesel (12.30.50)
23. Connect ground wire to battery. For more information refer to Specification.
Comments on this article