car logo Ford
car logo Volkswagen
car logo BMW
car logo Opel
car logo Audi
car logo Toyota
car logo Peugeot
English Русский
Български
Беларускі
Український
Српски
Hrvatski
Română
Polski
Slovenský
Magyar


Main
Freelander
Discovery
Range Rover
Defender
Contacts
Articles

Maintenance and diagnostics (Discovery 3)

 
  • Main
  • Discovery
  • Discovery 3
  • Power unit
  • All-wheel drive systems
  • Maintenance and diagnostics
 
        0  
Contents: Service ⇩ Diagnostics ⇩ Calibration of the range shift…⇩ Procedure for adjusting the…⇩

Service


Main dimensions (in millimeters)
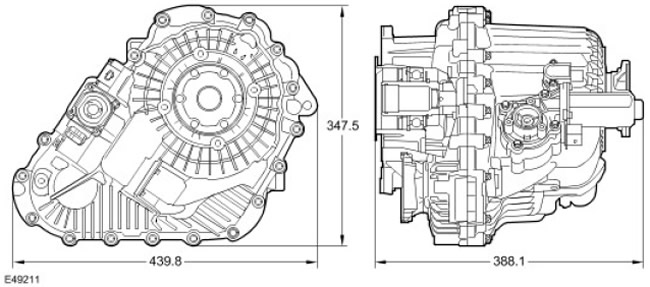

Main dimensions (in millimeters)


The weight of the transfer case without oil is 40.30 kg, and with oil - 41.55 kg. It is necessary to pour 1500 ml ±2% oil into the empty box.

The transfer case uses Shell TF 0753 oil, which was specially developed by Magna Steyr and Shell. The oil contains special additives that improve the operation of the transfer case. No other oil should be used in the transfer case.

When installing or reinstalling the transfer case, the splines of the input shaft must be lubricated with a special anti-seize grease. "Weicon anti-seize montagepaste grau TL 7391".
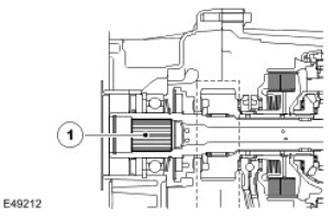
When installing or reinstalling the transfer case, the splines of the input shaft must be…


Item nameSpare part catalog numberDescription
1-Primary shaft splines


Diagnostics


The transfer case control module is capable of storing fault codes in its memory, which can be read using the T4 tool or any other diagnostic tool using the KW2000 protocol*.

This information is transmitted via the diagnostic connector.

The diagnostic connector enables various control modules connected to the buses to communicate with the T4 device or another suitable diagnostic tool. The data is transmitted to the connector via the CAN bus. This allows reading diagnostic information and programming various functions using the T4 device or another suitable diagnostic tool.

The transfer case control module uses diagnostic trouble codes (DTCs) that correspond to malfunctions in the transfer case electrical circuits.

Calibration of the range shift mechanism and clutch


In order for the range shift mechanism to function properly, the transfer case control module must be calibrated to the dimensions of the transfer case to which it is connected.

This calibration must be performed in the following cases:
  • When replacing the switch
  • When replacing the transfer case control module
  • When replacing the transfer case or the selected range sensor
  • In the event that a fault in the vehicle or the transfer case control module has resulted in the transfer case range being undefined.
Calibration can be done using T4.

Procedure for adjusting the transmission mechanism of a manual gearbox


The transfer case control module is capable of self-tuning, which allows it to determine which gear the driver has selected. In any of the following cases, the self-tuning parameters must be initialized by performing the transfer case setup procedure:


  • If the transfer case control module is reprogrammed or replaced
  • If the manual transmission has been replaced
  • If the gear position sensor has been replaced
During the adjustment of the transmission mechanism, the car must move smoothly in each gear with the clutch fully disengaged in one driving cycle. The procedure in question can be performed in both the high and low ranges of the transfer case.

The procedure for adjusting the transmission mechanism

  • If the transmission learning is performed due to replacement of the manual transmission or gear position sensor, use the T4 tool to set the transmission learning status in the transfer case control module to 0.
  • Set the car in motion.
  • When reversing, completely remove your foot from the clutch pedal for 3 seconds and check that the R symbol is displayed on the instrument panel.
  • While driving in 1st gear, wait until gear 1 is displayed on the instrument cluster and shift to the next gear. While driving, shift to higher gears immediately after the current gear is displayed on the instrument cluster until you reach 6th gear, then stop the car.
  • Stop the engine, remove the ignition key and wait at least 60 seconds. (to turn off the power supply to the transfer case control module).
  • Insert the ignition key and turn the ignition switch to position II (ignition).
  • Select each gear in turn. If the corresponding gear is displayed on the instrument cluster immediately after each gear is selected, the gear adjustment procedure has been completed successfully. If the gear position is not displayed on the instrument cluster, the gear adjustment procedure has not been completed successfully and must be repeated.
NOTE: The T4 tool can also be used to verify that the transmission adjustment procedure has been completed successfully.


This article is available at russian, bulgarian, belarusian, ukrainian, serbian, croatian, romanian, polish, slovak, hungarian
Article review: Saveliy Ushakov


Previous articles
Specifications
The device and technical description of the transfer case
Transfer case — sectional view
Transfer case housings and pumps
Interaxle differential assembly
Multi-plate clutch assembly
Transfer Case Control Module
Transfer Case Control Module Input Signals

Current article
Maintenance and diagnostics

Next articles
The principle of operation of the system
Diagnostics and testing
Low/High Range Sensor
Four-wheel drive (4WD) control module
Transfer case shift motor
Transfer case clutch solenoid


Similar articles from Land Rover repair manuals:
• Maintenance operations Freelander 2 (2006-2014)
• Precautions when performing maintenance Freelander 1 (1997-2006)
• Steering diagnostics and checks Defender 2007+ (2007-2016)

Comments on this article


No comments yet


How much will 38 + 25 =


Discovery 3 
  • General information
  • Using the manual
  • Precautionary measures
  • Service Information
  • Technique
  • Health protection
  • Road test
  • Identification codes
  • Jacking and lifting
  • Maintenance - diesel
  • Maintenance - petrol
  • Chassis
  • Suspension
  • Front suspension
  • Rear suspension
  • Wheels and tires
  • Dynamic suspension
  • Cardan shaft
  • Rear drive axle
  • Front drive axle
  • Front axle axles
  • Rear axle axles
  • Brake system
  • Parking brake
  • Hydraulic brake
  • Vacuum brake booster
  • Anti-lock braking system
  • Steering
  • Steering column
  • Power unit
  • Petrol engine 4.0L
  • Petrol engine 4.4L
  • Diesel engine 2.7L
  • Engine cooling
  • Fuel supply
  • Drive units
  • Launch system
  • Ignition system
  • Emission reduction
  • Air filtration
  • Fuel vapor control
  • Electronic control part
  • Car gearbox
  • Clutch
  • All-wheel drive systems
  • Transfer case
  • Exhaust system
  • Fuel tank and lines
  • Acceleration control
  • Electrical equipment
  • Climate control
  • Instruments and control lamps
  • Battery and charging system
  • Information system
  • Lighting and headlights
  • Power distribution
  • Electronic Function Group
  • Body and coating
  • Body elements
  • Interior and body trim
  • Mirrors and glasses
  • Seats
  • Instrument panel and console
  • Handles and locks
  • Windshield wipers and washers
  • Sunroof and bumpers
  • Safety system
  • Body repairs
  • Repair of front end elements
  • Repair of back elements
  • Side panel repair
  • Frame and body mount

Discovery 1 
  • General information
  • Technical specifications
  • Introduction to manual
  • Troubleshooting
  • Power unit
  • Diesel engine Tdi
  • Petrol engine V8i (3.9 l)
  • Petrol engine V8i (4.0 l)
  • Petrol engine Mpi
  • Reducing harmful emissions
  • Fuel system Tdi
  • Fuel system MFi
  • Fuel system SFi
  • Fuel system MPi (MEMS)
  • Cruise control
  • Cooling system (Tdi)
  • Cooling system (V8i)
  • Cooling system (MPi)
  • Exhaust system
  • Transmission
  • Clutch
  • Manual gearbox R380
  • Manual gearbox LT 77
  • Transfer case LT230T
  • Automatic gearbox
  • Cardan shaft
  • Rear axle
  • Front axle
  • Chassis
  • Steering system
  • Front suspension
  • Rear suspension
  • Brake system
  • Wheels and tires
  • Body and interior
  • Passive safety
  • Doors, locks and windows
  • Exterior body parts
  • Interior trim details
  • Seats
  • Electrical equipment
  • Heating and ventilation
  • Air conditioning
  • Windscreen wipers
  • Starting and charging system
  • Equipment and devices
  • Lighting and headlights


LRman.ru © 2013-2026 | Mobile version | Free Lander | Discovery | Range Rover | Defender | Contacts | | Sitemap |
Car repair and service instructions Land Rover: Freelander, Discovery, Range Rover, Defender
We use cookies to make pages load faster and provide a more user-friendly experience 🍪